導入
The Sena R1 Smart Cycling Helmet integrates advanced communication technology into a traditional cycling helmet design. It features built-in speakers and a microphone, enabling seamless communication, music playback, GPS navigation, and phone calls. Designed for comfort and safety, the R1 enhances your cycling experience whether you're riding solo or with a group.
This helmet complies with CPSC 16 CFR Part 1203 safety standard.
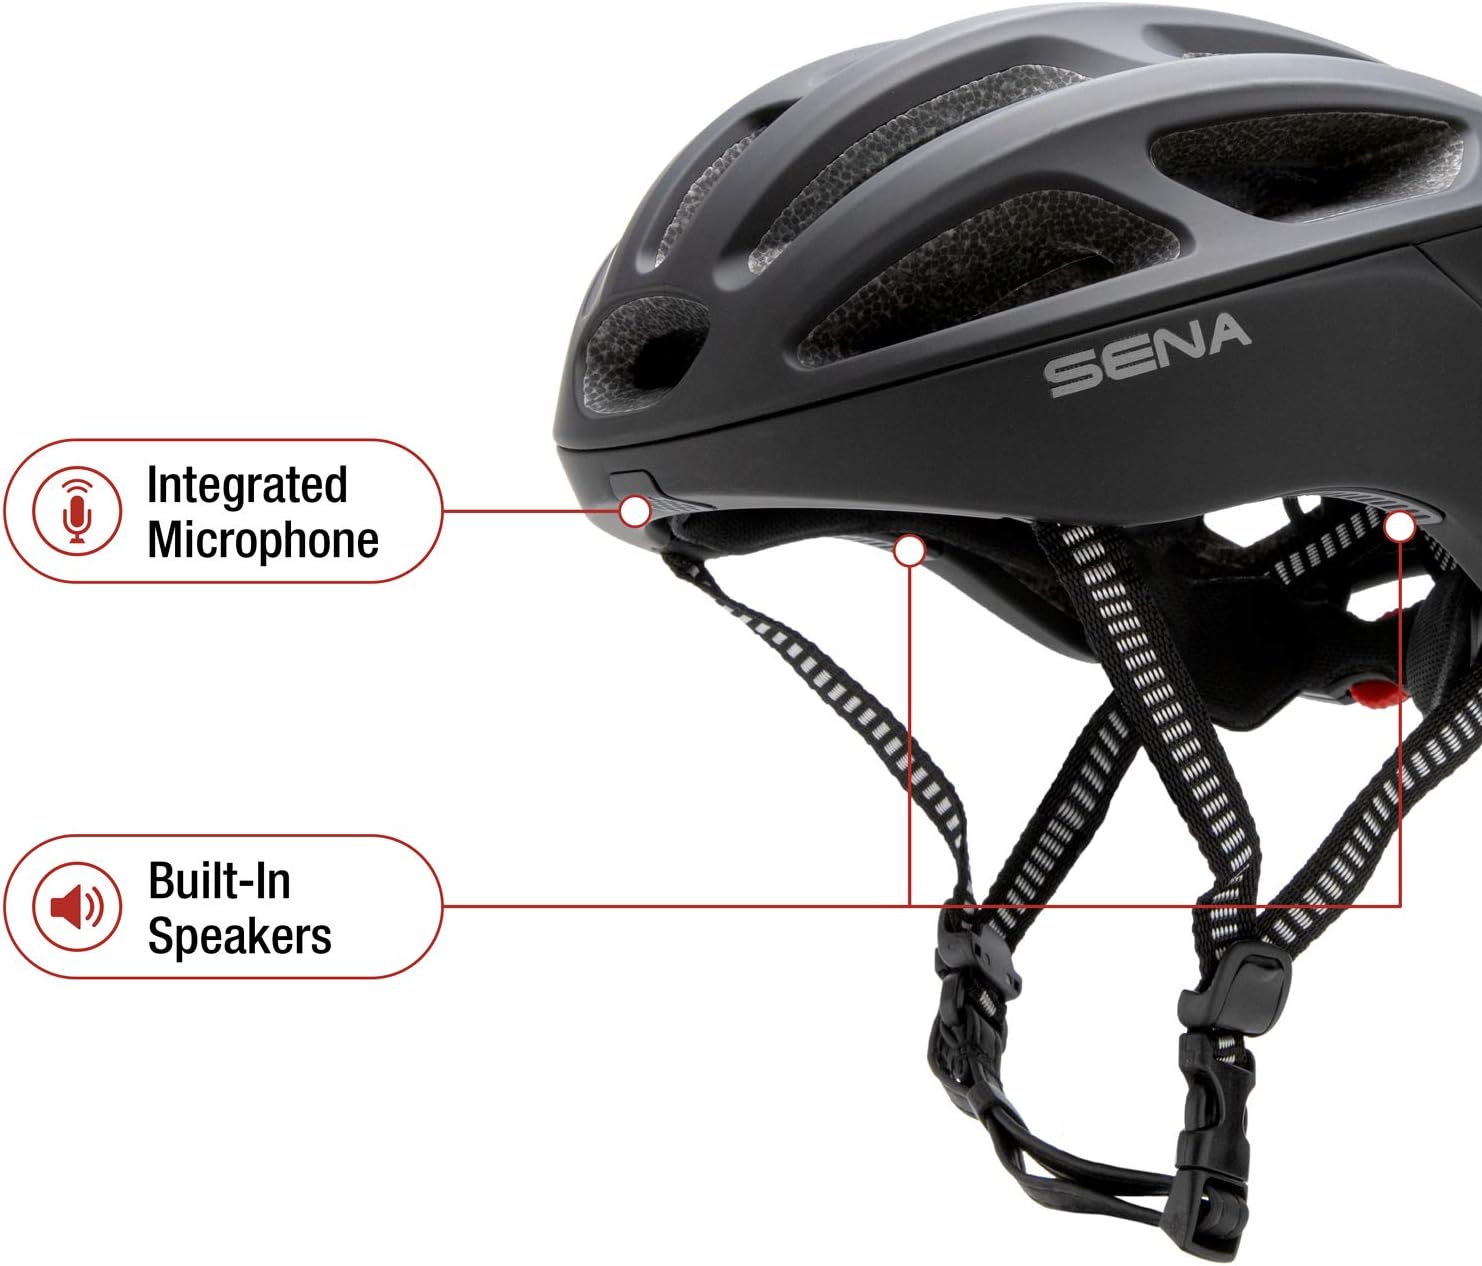
Figure 1: Sena R1 Smart Communications Helmet, side view.
箱の中身
- Sena R1 Smart Communications Helmet
- USB充電ケーブル

Figure 2: Key features of the Sena R1 Helmet.
設定
1. Measuring Your Head for Proper Fit
Before using your Sena R1 helmet, ensure it fits correctly for optimal comfort and safety. A proper fit is crucial for the helmet's protective capabilities.
- Measure Circumference: Use a flexible tape measure to wrap horizontally around your head, approximately one inch above your eyebrows and the top of your ears.
- ぴったりフィット: Pull the tape measure snugly but comfortably. Ensure it remains level from front to back.
- 記録測定: Note the measurement where the tape overlaps.
- Compare to Size Chart: Refer to the Sena R1 sizing guide to find the helmet size closest to your head measurement.
Video 1: Sena Cycling Helmet Size Guide. This video demonstrates how to measure your head and adjust the helmet for a secure fit.
2. Adjusting the Helmet
- Loosen Dial Adjustment: Before placing the helmet on your head, open the dial adjustment at the back to ensure the helmet shell can fit down properly.
- ポジションヘルメット: The helmet should sit level on your head, not too far forward or backward. The front edge should be about one inch above your eyebrows.
- Tighten Dial Adjustment: Turn the dial at the back of the helmet clockwise to tighten it until it feels snug but comfortable. It should not be overly tight, just secure enough to prevent excessive movement.
- Buckle Chin Strap: Fasten the chin strap. It should be loose enough to allow you to move your mouth comfortably, but tight enough that you can only fit two to three fingers between your chin and the strap.
- サイドストラップを調整する: Adjust the buckles on the side straps so they form a 'V' shape just below your ears and lie flat against your head. The straps should not touch your ears.

図3:背面 view of the Sena R1 helmet, highlighting the adjustment dial for a secure fit.
3. ヘルメットの充電
Locate the charging port on the rear of the helmet, typically covered by a small rubber flap. Connect the provided USB charging cable to the port and to a power source. The LED indicator will show charging status.

図4:背面 view of the Sena R1 helmet, showing the charging port and control buttons.
操作手順
1. 電源のオン/オフ
- 電源オン: Press and hold the center button on the helmet's control panel until you hear an audible prompt or see the LED indicator light up.
- 電源を切る: Press and hold the center button again until the helmet powers down.
2. Bluetooth Pairing (Smartphone)
The Sena R1 helmet can be paired with your smartphone to access features like music, GPS navigation, and phone calls.
- ペアリングモードに入る: With the helmet powered off, press and hold the center button for several seconds until the LED flashes rapidly, indicating pairing mode.
- スマートフォンでBluetoothを有効にする: Go to your smartphone's Bluetooth settings and search for available devices.
- Select Sena R1: Choose 'Sena R1' from the list of devices. Once connected, the LED will change to a steady blue light.

Figure 5: Pairing your smartphone with the Sena R1 helmet for music, GPS, and phone calls.
3. グループインターコム
The R1 supports 4-way group intercom, allowing communication with up to three other riders within a range of up to 900 meters (0.5 miles) in open terrain.
- ペアリングを開始する: On two helmets, press and hold the center button until you hear 'Intercom Pairing'. The LED will flash red.
- Connect Helmets: Tap the center button on one of the helmets to connect them.
- ライダーを追加する: To add additional riders (up to four total), repeat the process by tapping the previously connected helmet and then the new helmet.
- Activate Group Intercom: Once all desired helmets are paired, tap any connected helmet to jump back into group intercom mode.
ビデオ2:Sena Tech Talk: R1 - Bluetooth自転車ヘルメット。このビデオでは、view of the R1's features, including group intercom and smartphone connectivity.

Figure 6: Communicate with other riders using Bluetooth intercom.
4. Music, GPS, and Phone Calls
- 音楽ストリーミング: Once paired with your smartphone, you can stream music from your favorite apps directly to the helmet's built-in speakers. Use the helmet's control buttons to adjust volume, skip tracks, or pause playback.
- GPSナビゲーション: Audio cues from your smartphone's GPS application will be transmitted through the helmet speakers, providing turn-by-turn directions without needing to look at your phone.
- 電話: Answer or make phone calls using the integrated microphone and speakers. Sena's Advanced Noise Control technology helps ensure clear voice transmission by reducing wind and background noise.

Figure 7: Solo rider features include music streaming, GPS, and phone calls.
5. FMラジオ
The Sena R1 includes a built-in FM radio. Use the helmet's controls to scan for stations and adjust volume.
6. Sena Cycling App
Customize settings, manage friend groups for intercom, and access other features using the dedicated Sena Cycling App on your smartphone. The app provides a visual interface for easy configuration.

Figure 8: Manage settings from your phone with the Sena Cycling App.
メンテナンス
1. ヘルメットの掃除
- 外観: ヘルメットの外側を柔らかくて乾いた布で拭きます。amp 布と中性洗剤を使用してください。刺激の強い化学薬品や研磨剤入りの洗剤は使用しないでください。
- 内部パッド: The inner padding is removable and washable. Follow the care instructions on the padding label, typically hand wash with mild soap and air dry.
2. バッテリーのお手入れ
- 頻繁に使用しない場合でも、バッテリーの状態を維持するために、ヘルメットを定期的に充電してください。
- Avoid extreme temperatures when storing or charging the helmet.
トラブルシューティング
- 電源なし: ヘルメットが完全に充電されていることを確認してください。充電ケーブルと電源を確認してください。
- Bluetooth 接続の問題: Ensure the helmet is in pairing mode. Forget the device on your smartphone's Bluetooth settings and attempt to re-pair. Ensure no other Bluetooth devices are interfering.
- インターホンが接続されない: Ensure all helmets are within range and in intercom pairing mode. Follow the group intercom pairing steps carefully.
- オーディオ品質の問題: Check volume levels on both the helmet and your connected device. Ensure the microphone is not obstructed.
仕様
| 特徴 | 詳細 |
|---|---|
| ブランド | セナ |
| モデル名 | R1-STD |
| 色 | マットブラック |
| 年齢範囲 | アダルト |
| 外側素材 | ポリカーボネート(PC) |
| 内側素材 | レザー |
| アイテム重量 | 380グラム |
| アイテムの寸法 | 10.4 x 13.1 x 7.6インチ |
| 特集 | Bluetooth, Visor (Visor sold separately) |
| 接続性 | ブルートゥース4.1 |
| インターホン | 4-Way Group Intercom, up to 900m (0.5 miles) range |
| オーディオ | Built-in HD Speakers & Microphone, Advanced Noise Control, FM Radio |
| バッテリー寿命 | Up to 12 hours (Intercom) |
| 安全基準 | CPSC 16 CFR パート 1203 |
安全情報
Always wear your helmet correctly and ensure all straps and adjustment systems are properly secured before riding. A helmet can only provide protection if worn and fitted correctly. Regularly inspect your helmet for any signs of damage. Replace the helmet after any significant impact, even if visible damage is not apparent.
保証とサポート
Sena R1スマートコミュニケーションヘルメットには、 2年間保証. For detailed warranty information, technical support, or to access user guides, please visit the official Sena webサイト: www.sena.com.