
1。 オーバーview
The Amazon Basics Electronic Keypad Deadbolt Door Lock offers convenient keyless entry with a touch-control keypad, providing enhanced security for your home. It features customizable security codes, an automatic locking function, and dual operation options including a traditional keyed entry. This deadbolt is designed for standard door preparations.

画像: 正面 view of the Amazon Basics Electronic Keypad Deadbolt, highlighting features such as programmable user codes, automatic locking, compatibility with left and right-handed doors, and dual electronic/keyed entry options.
2. パッケージ内容
インストールを開始する前に、すべてのコンポーネントが揃っていることを確認してください。
- デッドボルトキーパッドアセンブリ
- レシーバーアセンブリ
- デッドボルトラッチ
- 取り付けプレート
- シリンダー
- ストライクプレート
- Square Corner Latch
- ドライブインスリーブ
- 2つのキー
- Screw Pack (Deadbolt Chassis Screws x2, Machine Screws x3, Wood Screws x5)

Image: All parts included in the Amazon Basics Electronic Keypad Deadbolt package, including the keypad, interior assembly, latch, strike plate, keys, and various screws.
3. インストール
Follow these steps carefully for proper installation. An official installation video is provided below for visual guidance.
Video: Official Amazon Basics installation guide for the Traditional Electronic Keypad Deadbolt. This video demonstrates the complete installation process from start to finish.
3.1 Door Compatibility and Measurements
This lock is designed to fit standard door preparations. Verify your door's dimensions before installation.
- Door Holes: Only suitable for 2-1/8 inches (54.1 mm) center hole.
- ドアの厚さ: 1-3/8 inches to 1-3/4 inches (35.1 mm to 50.8 mm).
- バックセット: 2-3/8 inches or 2-3/4 inches (60.5 mm or 69.9 mm).
- ボア径: 1インチ(25.4 mm)。

Image: Diagram illustrating door compatibility, showing required dimensions for door holes, thickness, and backset for the deadbolt installation.
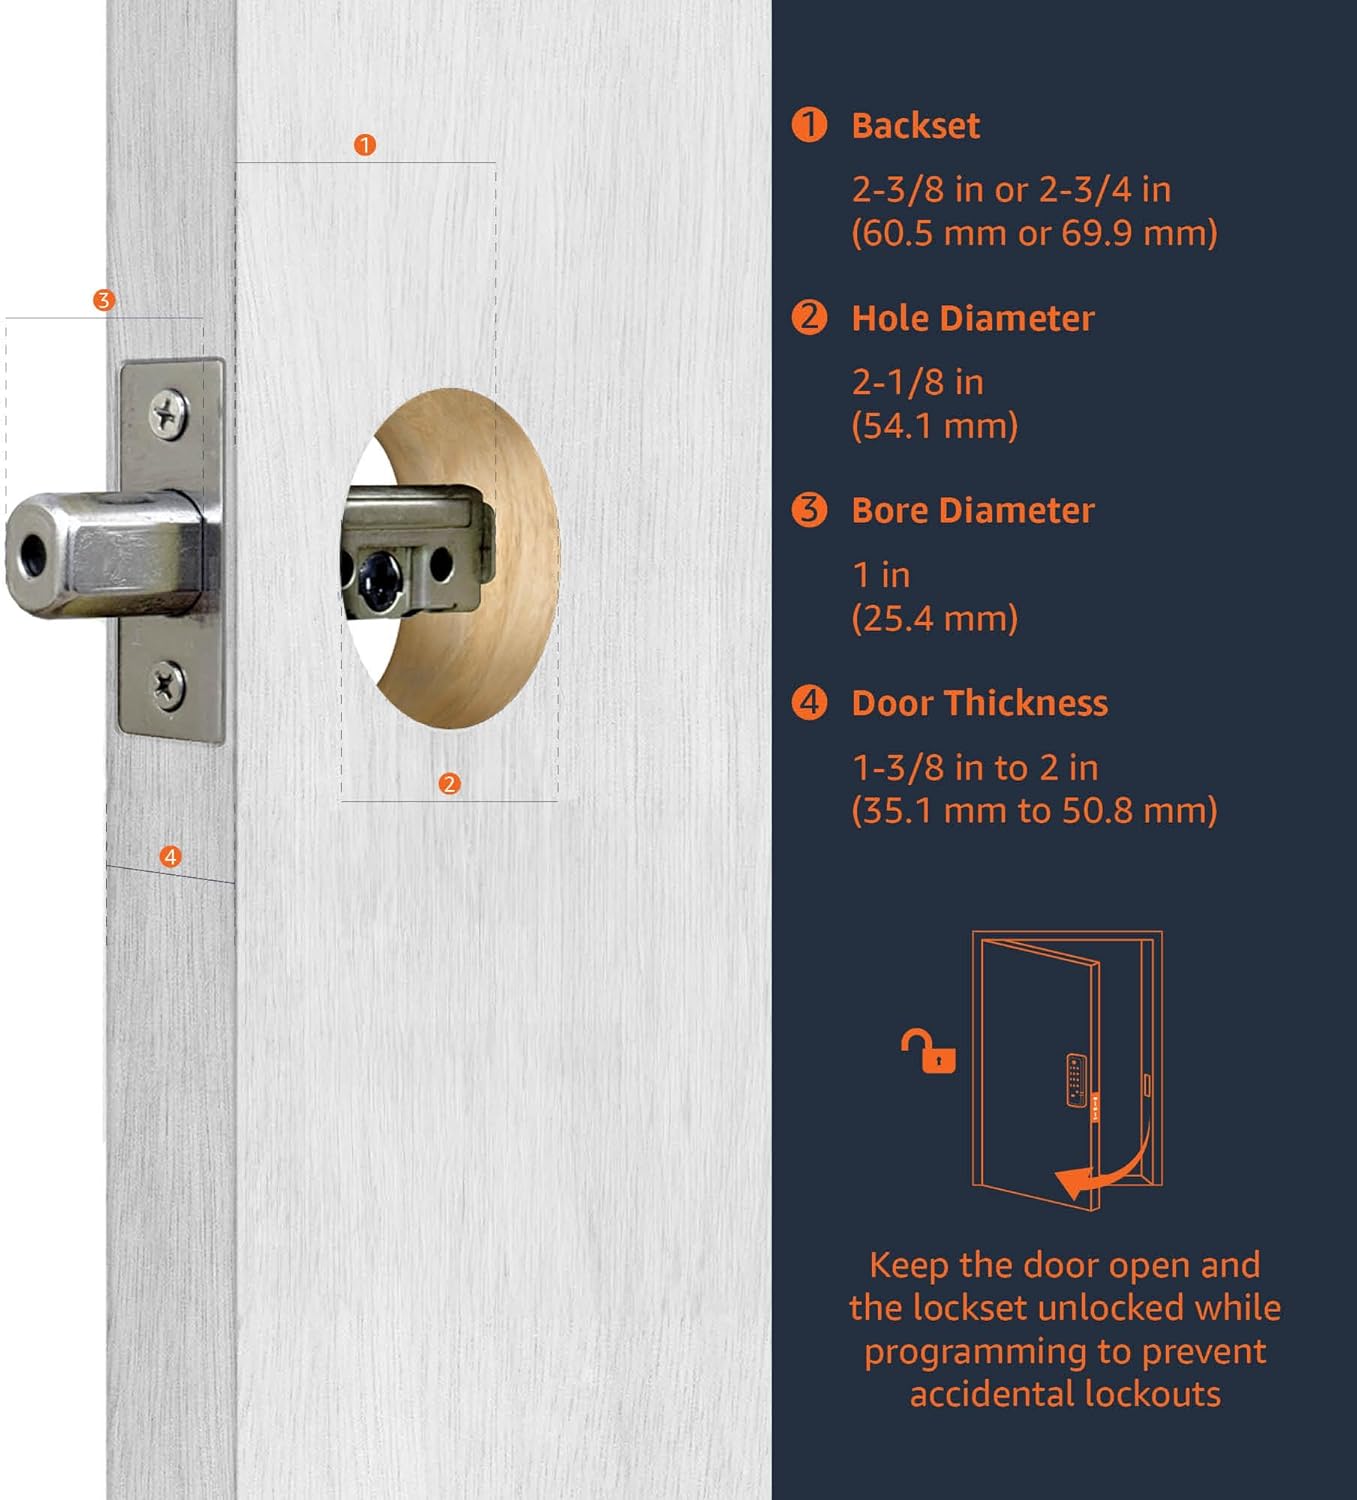
Image: Close-up diagram detailing the backset, hole diameter, bore diameter, and door thickness requirements for installing the deadbolt.
3.2 ラッチの取り付け
Insert the deadbolt latch into the door edge. Ensure it is parallel to the door face. Secure it with the provided wood screws. (Refer to video 0:20-1:00)
3.3 Keypad Assembly Installation
Install the exterior keypad assembly, ensuring the tailpiece passes through the latch. (Refer to video 1:00-1:30)
3.4 Interior Assembly Installation
Attach the interior mounting plate, then connect the inner and outer harness connectors. Secure the interior assembly to the door with screws. (Refer to video 1:30-2:00)
3.5 バッテリーの取り付け
Insert 4 (AA) 1.5V alkaline batteries into the interior assembly. Alkaline batteries are recommended for stable power supply. Cover the battery lid. (Refer to video 2:00-2:15)
4. セットアップとプログラミング
After installation, program your lock for optimal functionality. The default Programming Code (PC) is 0000.
4.1 Door Handing Identification Process
The lock needs to learn if it's installed on a right-handed or left-handed door. This is crucial for correct operation. (Refer to video 2:15-2:45)
- Enter PC (0000) then press the Lock/Unlock button.
- Press '0' then press the Lock/Unlock button.
- The lock will perform a self-check to identify door handing.
4.2 Change Programming Code (PC)
Change the default PC for security. Programming Codes should be 4-10 digits in length. (Refer to video 2:45-3:15)
- Enter current PC then press the Lock/Unlock button.
- Press '4' then press the Lock/Unlock button.
- Enter new PC then press the Lock/Unlock button.
4.3 Create New User Code (UC)
Up to 6 sets of user codes can be saved. User codes should be 4-10 digits in length. (Refer to video 3:15-3:45)
- Enter PC then press the Lock/Unlock button.
- Press '1' then press the Lock/Unlock button.
- Enter new UC then press the Lock/Unlock button.
4.4 Delete an Existing User Code (UC)
(Refer to video 3:45-4:00)
- Enter PC then press the Lock/Unlock button.
- Press '2' then press the Lock/Unlock button.
- Enter the UC you want to delete then press the Lock/Unlock button.
4.5 Delete All User Codes (UC) at once
Auto-locking and Keypad locking functions will be invalid when User Codes are deleted. The lock can only be operated by key during that time. (Refer to video 4:00-4:15)
- Enter PC then press the Lock/Unlock button.
- Press '3' then press the Lock/Unlock button.
4.6 Toggle Auto-Lock On/Off
The preset delay-time is 30 seconds. (Refer to video 4:15-4:30)
- Enter PC then press the Lock/Unlock button.
- Press '5' then press the Lock/Unlock button.
4.7 Set Auto-Lock Time Delay
10-99 seconds delay-time available. (Refer to video 4:30-4:45)
- Enter PC then press the Lock/Unlock button.
- Press '6' then press the Lock/Unlock button.
- Enter seconds (10-99) then press the Lock/Unlock button.
4.8 Enable / Disable All User Codes
Auto-locking and keypad locking functions will be invalid when user codes are disabled. The lock can only be operated by key during the time. (Refer to video 4:45-5:00)
- Enter PC then press the Lock/Unlock button.
- Press '8' then press the Lock/Unlock button.
4.9 Create a One-Time User Code
User Codes should be 4-10 digits in length. The one-time user code will automatically cancel after it is used one time. (Refer to video 5:00-5:15)
- Enter PC then press the Lock/Unlock button.
- Press '9' then press the Lock/Unlock button.
- Enter One Time Code then press the Lock/Unlock button.
4.10デフォルト設定に戻す
The programming is reset back to the original factory codes once you hear 3 long beeps. New installation or restoring default setting: you must run the door handing identification process first. (Refer to video 5:15-5:30)
- Press the 'R' button for more than 5 seconds.
5. 操作手順
Once installed and programmed, operating your deadbolt is straightforward:
- ロックを解除するには: Enter your programmed User Code (UC) on the keypad, then press the Lock/Unlock button. The deadbolt will retract.
- 施錠する: Press and hold any button on the keypad for a few seconds, or press the Lock/Unlock button. The deadbolt will extend. If auto-lock is enabled, the deadbolt will automatically extend after the set delay time.
- キー入力: Use the traditional key provided as an alternative entry method.
6. メンテナンス
Regular maintenance ensures the longevity and optimal performance of your deadbolt:
- バッテリー交換: Replace all four AA alkaline batteries when the low battery indicator appears or when the lock's operation becomes sluggish. To access the battery compartment, slide off the cover on the interior assembly.
- クリーニング: キーパッドと外部表面を柔らかくて清潔な布で拭いてください。amp 布で拭いてください。仕上げや電子部品にダメージを与える可能性のある研磨剤入りの洗剤や溶剤は使用しないでください。
- 潤滑: スムーズに動作するように、デッドボルト ラッチ機構にシリコンベースの潤滑剤を定期的に塗布してください。
7。 トラブルシューティング
If you encounter issues with your deadbolt, consider the following common solutions:
- ロックが応答しません: Check the batteries. Ensure they are correctly inserted and have sufficient charge. Replace with new alkaline batteries if necessary.
- 誤ったコード入力: If the lock flashes red or beeps incorrectly, re-enter your user code carefully. Ensure the correct programming code is used for programming functions.
- デッドボルトが伸縮しない: Verify that the door is properly aligned and not binding. Ensure the door handing identification process was completed correctly after installation or factory reset.
- Forgotten Codes: If you forget your user codes, you can delete all user codes (Step 4.5) or perform a factory reset (Step 4.10) and reprogram.
8. 仕様
| 特徴 | 詳細 |
|---|---|
| ブランド | Amazonベーシック |
| モデル名 | PL14910 |
| 特集 | キーレス |
| ロックタイプ | キーパッド |
| 商品の寸法 (長さ x 幅 x 高さ) | 9.05 x 6.13 x 2.99インチ |
| スタイル | 伝統的 |
| 色 | マットブラック |
| 個数 | 1 |
| 仕上げタイプ | サテン |
| 含まれるコンポーネント | Screw pack, latch, strike and keys |
| コントローラータイプ | ハンドコントロール |
| アイテム重量 | 2.07 ポンド (0.94 キログラム) |
| 制御方法 | 触る |
| 欧州連合 | 193598101164 |
| 電池は必要ですか? | はい(単三電池4本、別売) |
9. 保証とサポート
For warranty information and customer support, please refer to the documentation included with your product or visit the official Amazon Basics support page. Keep your purchase receipt for warranty claims.