1. はじめに
This manual provides essential instructions for the safe and effective use of your Stealth UL50 Fireproof 50 Gun Storage Safe. Please read this manual thoroughly before installation and operation to ensure proper functionality and security.

図1: 前面 view of the Stealth UL50 Gun Safe.
2. 安全情報
警告: これらの安全に関する指示に従わなかった場合、重傷または死亡事故につながる可能性があります。
- 銃器は常に弾を抜いた状態で施錠して保管してください。
- Keep ammunition stored separately from firearms.
- 金庫が倒れたり外れたりしないように、しっかりと固定されていることを確認してください。
- 使用していないときは常に金庫をロックしてください。
- Do not share your safe's combination with unauthorized individuals.
- Keep children away from the safe and its keys/combination.
- Verify the safe is properly closed and locked after each use.

Figure 2: Hard plate and re-locker for enhanced security.
3. セットアップ
3.1開梱と配置
Carefully remove the safe from its packaging. Due to its weight (870 lbs), professional assistance is recommended for moving and placement. Ensure the chosen location is level and provides adequate space for opening the door fully.
3.2 Battery Installation (for Electronic Lock)
The electronic lock requires a 9-volt battery. Connect a new Duracell 9V CopperTop battery to the battery connector located on the keypad. Slide the battery back into the housing and close the tray.
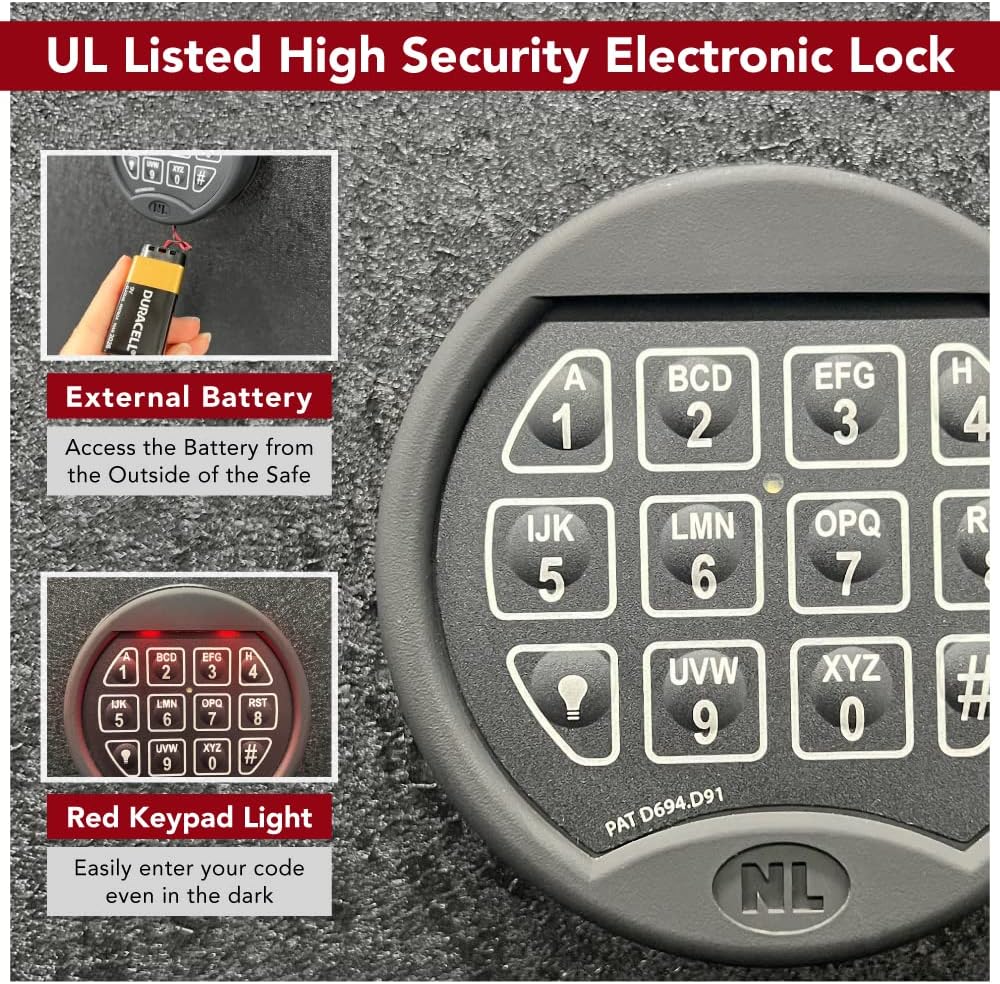
Figure 3: Electronic lock keypad with battery connector.
3.3 金庫の固定
For maximum security, the safe must be anchored to a concrete surface. Four pre-drilled bolt-down holes are provided at the bottom of the safe, and mounting hardware is included. Follow local building codes and safety guidelines for proper installation.

Figure 4: Bolt-down holes and mounting hardware.
4. 操作
4.1 初めて金庫を開ける
To open the safe for the first time, enter the default combination: 1-2-3-4-5-6. After entering the combination, you will hear a double beep. Turn the handle to open the door. Once the door is open, extend the bolts by turning the handle again. This prevents accidental lockout while changing the combination.
4.2 組み合わせの変更
With the door open and bolts extended:
- Hold down the '0' (zero) key until you hear a double beep.
- Enter the current combination (e.g., 1-2-3-4-5-6). You will hear another double beep.
- Enter your new 6-digit combination. You will hear a double beep.
- Re-enter your new 6-digit combination to confirm. You will hear a final double beep.
重要: Test the new combination several times with the safe door open before closing it to ensure it works correctly.
4.3 内部構成
The safe features a fully carpeted interior with a triple gun rack, offering 40 total gun slots. It includes six adjustable medium shelves and two adjustable full-length top shelves. The interior can also be configured as an all-shelf interior by removing the gun rack components.

Figure 5: Interior with gun rack and shelves.
4.4 Door Panel Organizer
The Molle door panel organizer is fully adjustable and includes:
- ピストルホルスター 8 個
- 2 Triple Magazine Pouches
- 3 Zippered Medium Pockets
- 2 Zippered Large Pockets

Figure 6: Molle door panel organizer.
4.5 Electrical Power Outlet
An electrical outlet kit is installed inside the safe, featuring three standard outlets and two USB slots. This allows for charging and powering electronic devices within the safe.

Figure 7: Internal electrical outlet kit.
5. メンテナンス
- クリーニング: 外側は柔らかくて乾いた布で拭いてください。amp 布。 研磨剤入りクリーナーは避けてください。
- ドアシール: Periodically inspect the intumescent door seal for any damage or wear. Ensure it is free from obstructions.
- バッテリー交換: Replace the 9-volt battery in the electronic lock annually, or immediately if the low battery indicator activates.
- ロック機構: ロック機構に潤滑油を塗らないでください。ロックが固く感じる場合は、カスタマーサポートにお問い合わせください。
6。 トラブルシューティング
6.1 Electronic Lock Issues
- キーパッドが応答しません: Check the 9-volt battery. Replace with a new Duracell 9V CopperTop battery if necessary.
- Incorrect combination entered: The lock will typically beep to indicate an incorrect entry. Wait a few seconds and re-enter the correct combination carefully. Multiple incorrect entries may trigger a lockout period.
- ロックアウト: If the lock enters a lockout mode after too many incorrect attempts, wait for the lockout period to expire (usually 5-15 minutes) before trying again.
6.2 Door Not Closing/Opening Smoothly
- Check for any obstructions around the door frame or locking bolts.
- Ensure the safe is on a level surface. Adjust if necessary.
7. 仕様
| 特徴 | 詳細 |
|---|---|
| ブランド | ステルス |
| モデル番号 | UL50 |
| 外形寸法(H x W x D) | 70" x 42" x 24" (Add 3" to Depth for Handle) |
| 重さ | 870ポンド |
| ロックタイプ | UL Listed Electronic Lock (NL UR-2020) |
| Burglary Rating | UL RSC (Residential Security Container) |
| 耐火等級 | 1 Hour at 1200°F (Internal temperature never above 350°F) |
| Door & Body Construction | 12 Gauge Solid Steel |
| ロックボルト | 12 Solid Steel, 1.25" Diameter, 4-way locking system |
| インテリア | Fully carpeted, Triple Gun Rack (40 slots), 6 Adjustable Medium Shelves, 2 Adjustable Full-Length Top Shelves |
| Door Panel Organizer | Molle system with 8 Pistol Holsters, 2 Triple Magazine Pouches, 3 Zippered Medium Pockets, 2 Zippered Large Pockets |
| コンセント | 3 Outlets, 2 USB Slots |
| 取り付け | 4 Pre-drilled bolt-down holes, mounting hardware included |
| 色 | Armored Black |

Figure 8: External dimensions of the safe.
8. 保証とサポート
8.1 保証情報
The Stealth UL50 safe is backed by a Lifetime Burglary & Fire Warranty そして 2 年間の部品および労働保証. This warranty covers break-ins, attempted break-ins, and house fires.
8.2 カスタマーサポート
For any questions, technical assistance, or warranty claims, please contact Stealth customer support. Refer to your purchase documentation for specific contact details.