
1. はじめに
ご購入ありがとうございますasing the GooDee Mini Projector GD-DE-9. This manual provides essential information for setting up, operating, and maintaining your projector. Please read it thoroughly before use to ensure optimal performance and safety.
The GooDee GD-DE-9 is a portable LED projector designed for home entertainment, gaming, and presentations. It features a native resolution of 800x480p, supports up to 1080p input, and offers multiple connectivity options including HDMI, VGA, USB, AV, and SD card. Its advanced cooling system ensures quiet operation, and the integrated 2W speaker provides clear audio.

図1.1: 前面 view of the GooDee Mini Projector GD-DE-9.
2. 安全情報
火災、感電、または怪我を防ぐため、次の安全上の注意事項を守ってください。
- プロジェクターを開けないでくださいasing. すべての修理は資格のあるサービス担当者に依頼してください。
- 火災や感電を防ぐため、プロジェクターを雨や湿気にさらさないでください。
- 適切な換気を確保してください。通気口を塞がないでください。
- プロジェクターに付属の電源アダプターのみを使用してください。
- プロジェクターのレンズを直視しないでください。amp オンです。
- プロジェクターを安定した水平な場所に設置してください。
- 雷雨のときや長期間使用しない場合は、プロジェクターを電源コンセントから抜いてください。
3. パッケージ内容
パッケージにすべてのアイテムが含まれていることを確認してください。
- GooDee Mini Projector GD-DE-9
- 電源アダプター
- リモートコントロール
- HDMIケーブル
- AVケーブル
- ユーザーマニュアル
4.製品オーバーview
4.1 プロジェクターのコンポーネント

図4.1:側面 view 入力/出力ポート付き。
The projector features a direct light path optical technology for enhanced brightness and an advanced cooling system for quiet operation.

Figure 4.2: Advanced Cooling System and HIFI Stereo Speaker.
4.2リモコン
The remote control allows you to operate the projector from a distance. Insert two AAA batteries (not included) into the remote control before use.

図 4.3: リモート コントロール
5. セットアップ
5.1 設置と投影距離
The image size is adjusted by changing the projection distance. For optimal viewing, a projection distance between 1.5 to 4 meters is recommended, yielding screen sizes from 50 to 130 inches. The best projection size is typically 80-100 inches at a distance of 6.6-8 feet.

Figure 5.1: Projection Distance and Screen Size Chart.
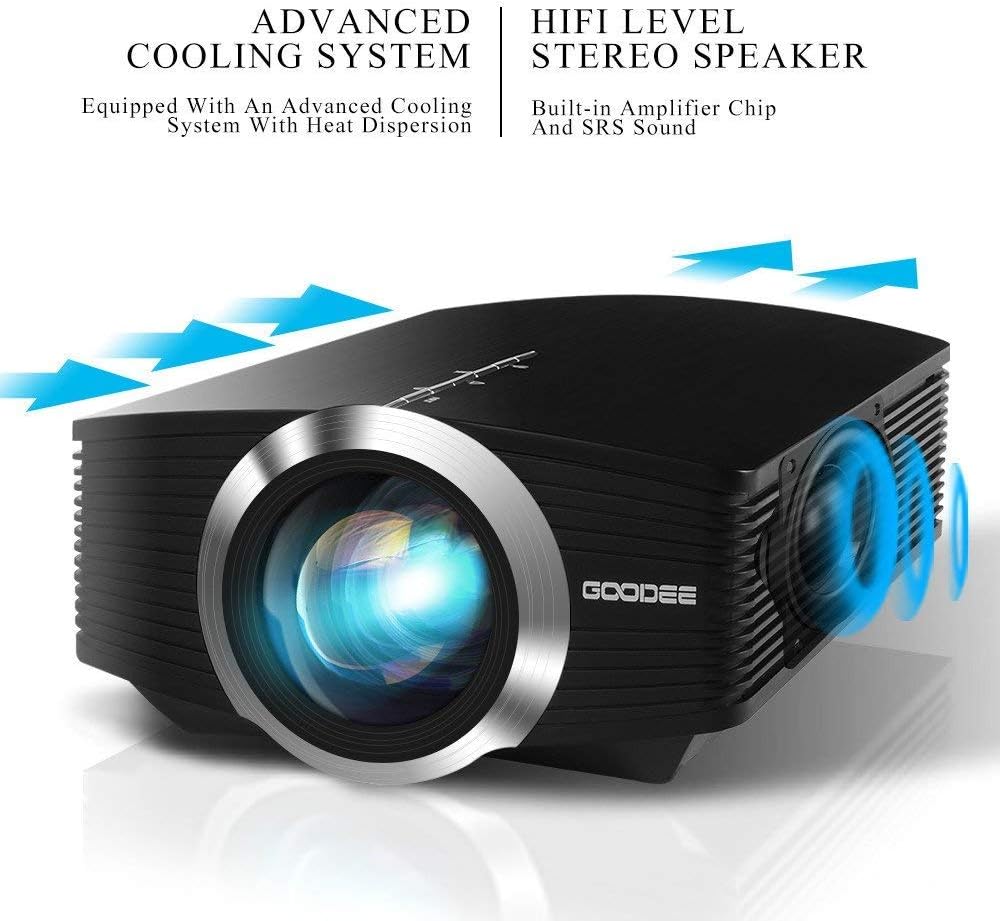
図5.2:例ample Projector Placement.
5.2電源接続
電源アダプタをプロジェクターの電源入力ポートに接続し、アダプタを電源コンセントに差し込みます。
5.3 入力デバイスの接続
The projector supports various input sources including HDMI, VGA, USB, AV, and SD card. It can connect to PCs, laptops, DVD players, PS3/4, Xbox ONE, and smartphones/tablets (via MHL cable and adapter, not included).

Figure 5.3: Multimedia Connection Diagram.
To connect a smartphone or tablet, ensure your device supports MHL functionality. You will need an MHL cable and a suitable adapter (not included).

Figure 5.4: Connecting Smartphones/Tablets.
5.4 Focus Adjustment and Keystone Correction
Adjust the focus ring on the projector lens until the image is clear. Use the keystone correction feature to adjust the image if it appears trapezoidal. The projector supports a ±15° keystone correction.
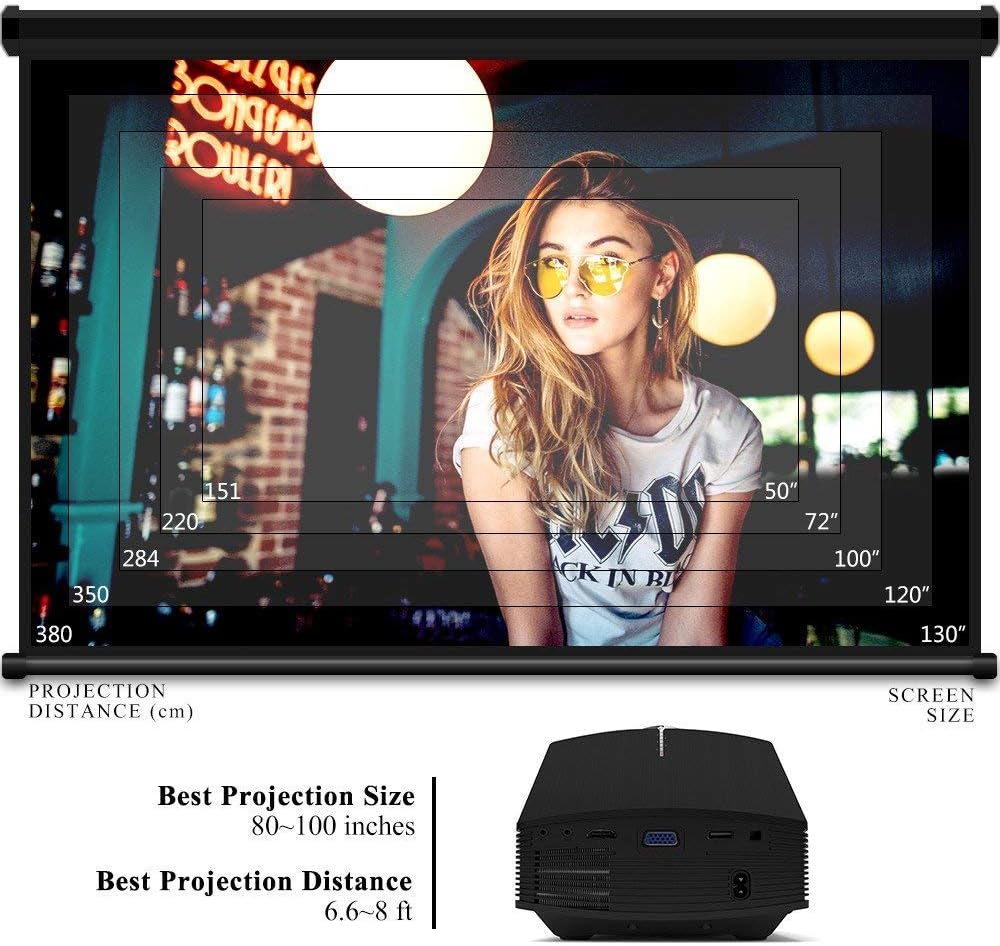
Figure 5.5: Focus and Keystone Adjustment.
6. 操作手順
6.1 電源オン/オフ
プロジェクターまたはリモコンの電源ボタンを押して、プロジェクターの電源をオンまたはオフにします。
6.2 ソースの選択
Press the 'Source' button on the projector or remote control to cycle through available input sources (HDMI, VGA, USB, AV, SD). Select the desired input source corresponding to your connected device.
6.3メニューナビゲーション
Use the arrow buttons on the projector or remote control to navigate through the on-screen menu. Press 'OK' or 'Enter' to confirm selections. Use the 'Menu' button to access settings and 'Exit' or 'Return' to go back.
6.4オーディオ出力
The projector has a built-in 2W speaker. For external audio, connect speakers or headphones to the 3.5mm audio output jack on the projector.
7. メンテナンス
7.1 レンズのクリーニング
Use a soft, lint-free cloth or lens cleaning paper to gently wipe the projector lens. Do not use abrasive cleaners or solvents.
7.2 通気口の清掃
Regularly clean the air vents to ensure proper airflow and prevent overheating. Use a soft brush or compressed air to remove dust accumulation.
7.3 ストレージ
プロジェクターを使用しない場合は、直射日光や極端な温度を避け、涼しく乾燥した場所に保管してください。ほこりや損傷を防ぐため、元の梱包材または保護ケースを使用してください。
8。 トラブルシューティング
| 問題 | 考えられる原因 | 解決 |
|---|---|---|
| 画像が表示されない | 間違った入力ソースが選択されています。ケーブルが正しく接続されていません。デバイスの電源がオンになっていません。 | 正しい入力ソースを選択し、すべてのケーブル接続を確認し、ソースデバイスの電源がオンになっていることを確認します。 |
| 画像がぼやけている | フォーカスが調整されていません。プロジェクターがスクリーンに近すぎる/遠すぎます。 | フォーカスリングを調整し、投影距離を調整します。 |
| 画像は台形です | プロジェクターがスクリーンに対して垂直ではありません。 | キーストーン補正を調整します。 |
| 音が出ない | Volume too low; Muted; External audio device not connected/configured. | 音量を上げる; ミュートを解除する; 外部オーディオの接続と設定を確認する。 |
| リモコンが動作しない | 電池残量が少ない/切れている。リモコンとプロジェクターの間に障害物がある。リモコンセンサーがブロックされている。 | 電池を交換し、障害物を取り除いて、リモート センサーに障害物がないことを確認します。 |
9. 仕様
| 特徴 | 詳細 |
|---|---|
| ブランド | グーディー |
| モデル番号 | GD-DE-9 |
| 表示タイプ | 液晶 |
| ネイティブ解像度 | 800 x 480 ピクセル |
| サポートされている解像度 | 最大1080p |
| 輝度 | 3000ルーメン(LED) |
| Lamp 人生 | 30,000時間 |
| 接続技術 | HDMI、USB、VGA、AV、SDカード |
| ハードウェアインターフェイス | HDMI、USB、VGA |
| 内蔵スピーカー | 2Wステレオスピーカー |
| 投影距離 | 1.5 - 4 meters (6.6 - 8 feet recommended) |
| 画面サイズ | 50 - 130 inches (80 - 100 inches recommended) |
| キーストーン補正 | ±15° 手動 |
| フォームファクター | ポータブル |
| 取り付けタイプ | 卓上マウント |
| 色 | 黒 |
| パッケージ寸法 | 33 x 21.6 x 11.8 cm |
| アイテム重量 | 1.48キロ |
| 推奨用途 | ゲーム、ホームシアター |
| 対応デバイス | Smartphone, PC, Laptop, DVD Player, PS3/4, Xbox ONE, Fire TV Stick |
10. 保証とサポート
GooDee offers a 3-year warranty for this projector. If you encounter any issues or are not completely satisfied with your purchase, please contact GooDee customer support. A refund or replacement is available within the first 2 months of purchase. Customer satisfaction is our top priority.
For support, please refer to the contact information provided on the GooDee official webサイトまたは購入プラットフォーム。