1.製品オーバーview
The Kulannder 5D Diamond Painting LED Magnifier Lamp is designed to assist with detailed tasks such as diamond painting, cross-stitch, needlework, reading, and small repairs. It features a main lens with 4X magnification and a smaller inset lens with 6X magnification, complemented by three integrated LED lights for enhanced illumination. The flexible gooseneck and strong clip allow for versatile positioning and secure attachment to various surfaces.

Image 1.1: Kulannder LED Magnifier Lamp, illustrating its flexible design and clip for attachment.
2. パッケージ内容
- 1 x LED Light Magnifier with Clip
- レンズクリーニングクロス x 1
3. 製品仕様
| 特徴 | 仕様 |
|---|---|
| ブランド | クランダー |
| 色 | 黒 |
| Magnifier Material | アクリルレンズ |
| 光源 | 3 x LED Illuminating Lamps |
| Magnification (Large Lens) | 4X |
| Magnification (Small Lens) | 6X |
| 電源 | 単3電池XNUMX本(別売) |
| グースネックの長さ | Approximately 33cm / 13 inches |
| Clamp オープニング | Approximately 6cm / 2.36 inches |
4. セットアップ手順
Follow these steps to set up your Kulannder LED Magnifier Lamp:
- コンポーネントを解凍します: Carefully remove the magnifying glass head and the gooseneck with the attached clamp パッケージから。
- Connect Head to Gooseneck: Securely connect the magnifying glass head to the top of the gooseneck. Ensure it clicks into place or is firmly screwed on, depending on the model.
- バッテリーの取り付け: Locate the battery compartment on the magnifying glass head. Open it and insert three (3) AAA batteries (not included), ensuring correct polarity. Close the compartment securely.
- 表面に取り付ける: 強いclを使用するamp to attach the lamp to a stable surface such as a desk, table, or workbench. Ensure the clamp is firmly secured to prevent accidental dislodgement.
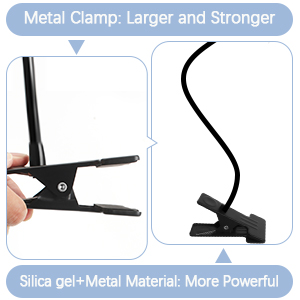
Image 4.1: Visual guide for connecting the magnifier head, installing batteries, and clamping the unit to a surface.
5. 操作手順
Operating your LED Magnifier Lamp 簡単です:
- 電源オン/オフ: Locate the ON/OFF switch on the side of the magnifying glass head. Slide the switch to the "ON" position to turn on the LED lights. Slide it to "OFF" to turn them off.
- 位置を調整: The flexible gooseneck allows for 360-degree adjustment. Bend and position the gooseneck to direct the magnifier and light precisely over your work area. The gooseneck is designed to hold its position without collapsing.
- Utilize Magnification: Use the large 4X lens for general magnification. For finer details, utilize the smaller 6X inset lens.

Image 5.1: The flexible gooseneck allows for precise positioning of the magnifier and light.
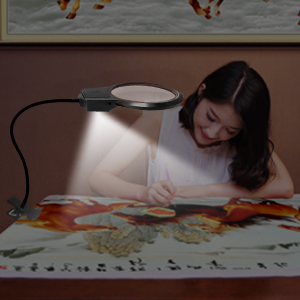
Image 5.2: The magnifier features both 4X and 6X lenses for varying levels of detail.
6. メンテナンス
To ensure the longevity and optimal performance of your magnifier lamp:
- レンズの掃除: Use the provided lens cleaning cloth to gently wipe the magnifier lenses. Avoid using abrasive materials or harsh chemical cleaners, as these can scratch or damage the acrylic lens.
- バッテリー交換: When the LED lights dim or stop working, replace all three AAA batteries with new ones. Ensure correct polarity during installation.
- ストレージ: 使用しないときは、保管してくださいamp 直射日光や極端な温度を避け、清潔で乾燥した場所に保管してください。

Image 6.1: Use the included lens cloth for gentle cleaning of the magnifier lens.
7。 トラブルシューティング
- ライトが点灯しない:
- Check if the ON/OFF switch is in the "ON" position.
- 電池が正しい極性で正しく取り付けられていることを確認してください。
- 古い電池を新しいものと交換してください。
- ライトのちらつき:
- これは多くの場合、電池残量が少ないことを示しています。電池を交換してください。
- Ensure battery compartment connections are clean and secure.
- Magnifier Not Holding Position:
- clを確認してくださいamp 安定した表面にしっかりと固定されます。
- Adjust the gooseneck carefully to find a stable position.
8. 保証とサポート
The Kulannder LED Magnifier Lamp comes with a one-year warranty. If you encounter any quality issues or require assistance, please contact Kulannder customer support. Refer to the product packaging or the retailer's web具体的な連絡先情報については、サイトをご覧ください。