Lorex ACSOL2B
Lorex ソーラーパネル U471AA 2K ワイヤレスカメラ用 ユーザーマニュアル
Model: ACSOL2B
導入
This manual provides comprehensive instructions for the installation, operation, and maintenance of your Lorex Solar Panel, designed exclusively for U471AA 2K Wire-Free cameras. This solar panel offers an environmentally-friendly solution to continuously power your camera, extending battery life and ensuring uninterrupted surveillance.
安全情報
- Ensure all connections are secure and waterproof to prevent damage from moisture.
- Do not attempt to disassemble or modify the solar panel. This may void the warranty and cause damage.
- Install the solar panel in a location where it is not easily accessible to unauthorized individuals.
- Avoid placing the solar panel near flammable materials or in areas with extreme temperatures outside its operating range.
- Use only the provided mounting hardware to ensure secure installation.
パッケージ内容
パッケージにすべてのアイテムが含まれていることを確認します。
- Lorex Solar Panel (Model: ACSOL2B)
- 取り付けブラケット
- 取り付けネジと壁プラグ
- USB Charging Cable (integrated with solar panel)
製品終了view
The Lorex Solar Panel is designed to provide continuous power to your compatible Lorex U471AA 2K Wire-Free cameras. It features a durable, weather-resistant design suitable for outdoor use.

図1: フロント view of the Lorex Solar Panel, showing the photovoltaic cells and the integrated mounting base.

図2: 角度付き view of the Lorex Solar Panel, highlighting the adjustable mounting bracket for versatile positioning.
- 太陽電池: 太陽光を電気エネルギーに変換します。
- 取付けブラケット: 柔軟な位置決めと角度調整が可能です。
- USB充電ケーブル: Connects the solar panel to the camera.
- LEDインジケーター: Provides status information (e.g., charging status).
- IP66 評価: Ensures the panel is weather-resistant against dust and powerful water jets.
設定
1. インストール場所の選択
Optimal performance of the solar panel depends on its placement. Select a location that receives direct sunlight for the majority of the day, ideally 4-6 hours of direct sunlight. Avoid areas with significant shade from trees, buildings, or other obstructions.
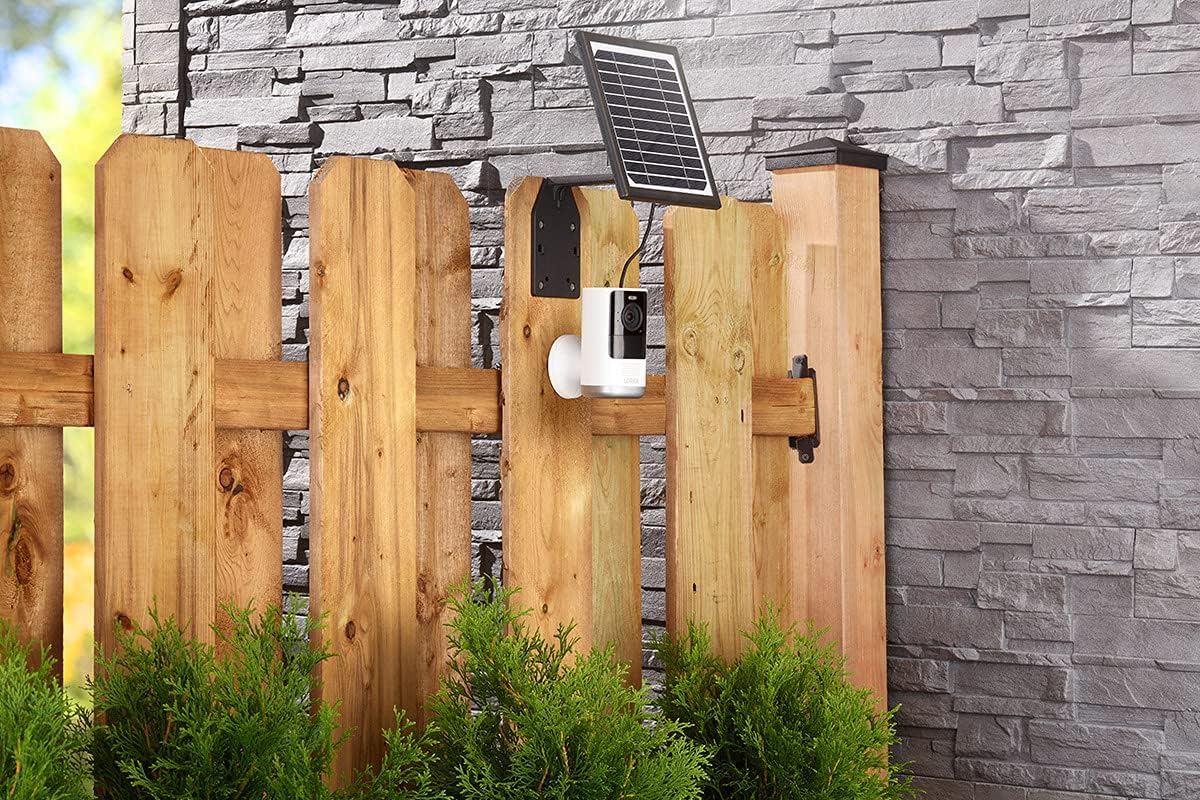
図3: Example installation on a wooden fence, demonstrating outdoor placement.

図4: Example installation on a stone wall, showing a common mounting surface.
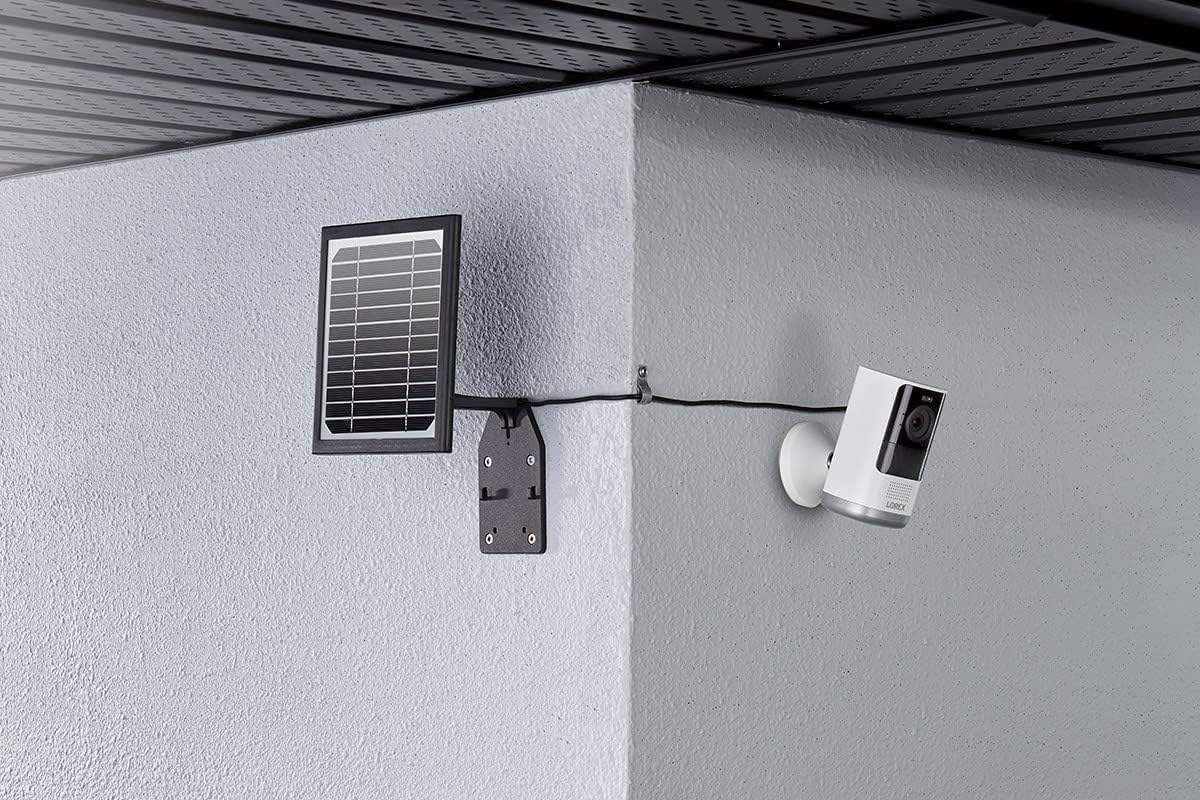
図5: Example installation in a corner, illustrating flexible mounting options.
2. ソーラーパネルの取り付け
- Position the mounting bracket against the chosen surface. Use a pencil to mark the drill holes.
- Drill pilot holes at the marked locations. If mounting on masonry or stucco, insert the wall plugs.
- 付属のネジを使用して取り付けブラケットを表面に固定します。
- Attach the solar panel to the mounting bracket. Adjust the angle of the solar panel to maximize sun exposure. The panel should face the direction that receives the most direct sunlight throughout the day.
3. カメラに接続する
The solar panel comes with an integrated USB charging cable. Connect this cable to the charging port on your Lorex U471AA 2K Wire-Free camera.

図6: 側 view illustrating the connection of the solar panel to the camera via the charging cable.
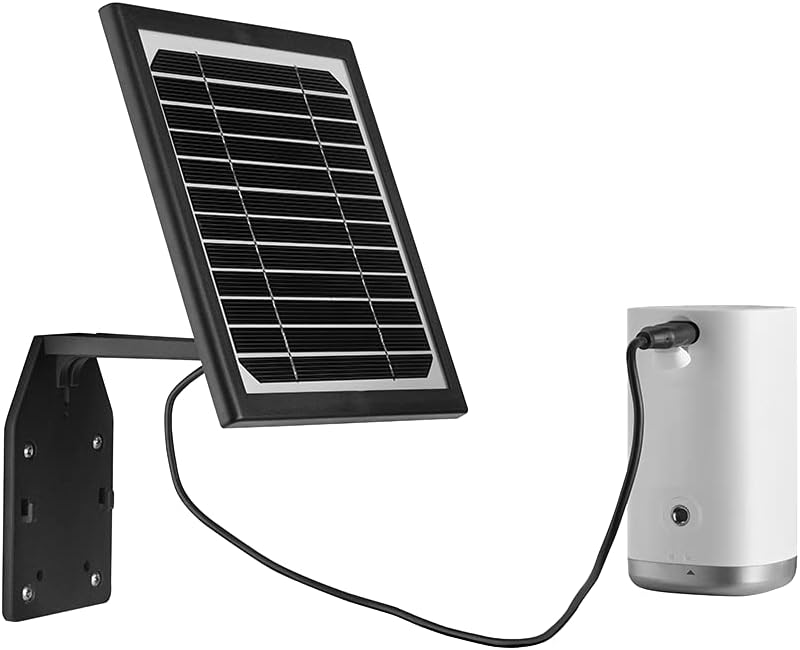
図7: フロント view of the solar panel connected to the camera, showing the cable routing.
Ensure the connection is snug to maintain weather resistance. Once connected, the solar panel will begin charging the camera's battery when exposed to sufficient sunlight. The LED indicator on the solar panel will illuminate to confirm charging status.
オペレーティング
The Lorex Solar Panel operates automatically. When exposed to sunlight, it converts solar energy into electrical energy, which is then used to charge the connected U471AA 2K Wire-Free camera's internal battery. The panel is designed to provide a trickle charge, maintaining the camera's battery level and reducing the need for manual recharging.
- 充電インジケーター: Refer to your camera's user manual for specific battery status indicators. The solar panel itself may have an LED that indicates charging activity.
- エネルギー効率: The panel is designed for high efficiency, even in less than ideal sunlight conditions, though direct sunlight is always preferred for optimal performance.
メンテナンス
定期的なメンテナンスにより、ソーラーパネルの寿命と効率が確保されます。
- クリーニング: 定期的にソーラーパネルの表面を柔らかくて乾いた布で拭いてください。amp 蓄積して効率を低下させる可能性のある埃、汚れ、ゴミを布で取り除いてください。研磨剤入りの洗剤や刺激の強い化学薬品は使用しないでください。
- 障害物チェック: Regularly check for any new obstructions (e.g., growing tree branches, new constructions) that might cast shadows on the panel and reduce its sun exposure.
- ケーブル検査: Inspect the charging cable and connections for any signs of wear, damage, or corrosion. Ensure the connection to the camera remains secure and waterproof.
- セキュリティの強化: Periodically check that the mounting screws and bracket are still securely fastened, especially after strong winds or storms.
トラブルシューティング
| 問題 | 考えられる原因 | 解決 |
|---|---|---|
| Camera battery not charging. | 日光が足りない。 パネル表面が汚れています。 ケーブル接続が緩んでいるか、破損しています。 Camera battery issue. | Relocate panel to an area with more direct sunlight. パネルの表面を清掃します。 Check and secure the USB cable connection. Inspect for damage. Test camera with a standard USB charger to rule out camera battery issues. |
| Solar panel LED not illuminating. | No sunlight. Panel is faulty. Cable not connected. | Ensure panel is exposed to direct sunlight. Contact Lorex support if problem persists after ensuring sunlight and connection. Verify the USB cable is securely connected to the camera. |
| 取り付け後、パネルが破損しているように見えます。 | 不適切なインストール。 Environmental factors (e.g., severe weather). | Review installation steps to ensure correct mounting. Contact Lorex support for assistance if damage is significant. |
仕様
- ブランド: ロレックス
- モデル番号: ACSOL2B
- 材料: シリコン
- 効率: 高効率
- コネクタタイプ: USB
- 最大出力: 3ワット
- 商品の重量: 1.45ポンド
- パッケージ寸法: 8.78 x 7.32 x 3.82インチ
- IP 定格: IP66(耐候性)
- 互換性: Lorex U471AA 2K Wire-Free Cameras
保証とサポート
保証情報およびテクニカルサポートについては、Lorexの公式ウェブサイトをご覧ください。 website or contact Lorex customer service directly. Keep your purchase receipt as proof of purchase for warranty claims.
Lorex サポート: www.lorex.com/support
Ask a question about this manual
Ask about setup, troubleshooting, compatibility, parts, safety, or missing instructions. Manuals+ will review the question and use this page’s manual context to help answer it.