
1. はじめに
The EcoNet Controls Bulldog Valve Robot is a Z-Wave Plus certified smart valve controller designed to automate the opening and closing of your home's main water valve. This device integrates with compatible Z-Wave smart home systems, offering remote water flow control and enhancing flood prevention when paired with Z-Wave leak sensors. Its design allows for installation over existing ball valves without requiring plumbing modifications.

Figure 1: EcoNet Controls Bulldog Valve Robot installed on a water pipe.
2.製品オーバーview
2.1 主な特徴
- Z-Wave Plus認定: Ensures secure, long-range wireless communication with a reach of up to 30 meters (line of sight).
- 配管工事不要: Installs directly over your existing water valve, simplifying the installation process.
- バルブの互換性: Works with ¾", 1", 1.25", and 1.5" ball valves. Refer to the valve compatibility chart for details.
- 高トルクモーター: Provides powerful operation, toggling the valve open or closed in approximately 18 seconds.
- スマートホーム統合: Compatible with various Z-Wave hubs and controllers, including SmartThings, Wink, Hubitat, Nexia, Control4, Universal Devices, Honeywell, and Ring.
- 洪水防止: Can be paired with Z-Wave leak sensors and a compatible hub to automatically shut off water in case of a leak.
2.2 パッケージ内容
パッケージにすべてのコンポーネントが含まれていることを確認します。
- EcoNet Controls Bulldog Valve Robot (Water Shutoff Controller)
- ACアダプター
- 取り付けキット
- ユーザーガイド(このドキュメント)

Figure 2: EcoNet Controls Bulldog Valve Robot with power adapter.
3. 安全情報
- インストールと操作の前に、すべての指示を注意深くお読みください。
- インストールやメンテナンスを行う前に、必ず電源を切ってください。
- This device is designed for indoor use only. Avoid exposure to water or extreme temperatures.
- デバイスの改造や修理は行わないでください。すべてのメンテナンスは資格のある担当者にお任せください。
- Ensure the valve robot is securely mounted to prevent damage or malfunction.
- This device requires a Z-Wave hub for remote control and automation.
4. インストール
The Bulldog Valve Robot is designed for hassle-free installation over existing ball valves without requiring any plumbing work. It is crucial to mount the device correctly to avoid undue stress on your plumbing.
4.1 バルブの互換性
The device supports ¾", 1", 1.25", and 1.5" ball valves. Please consult the compatibility chart below to ensure your valve type is supported.
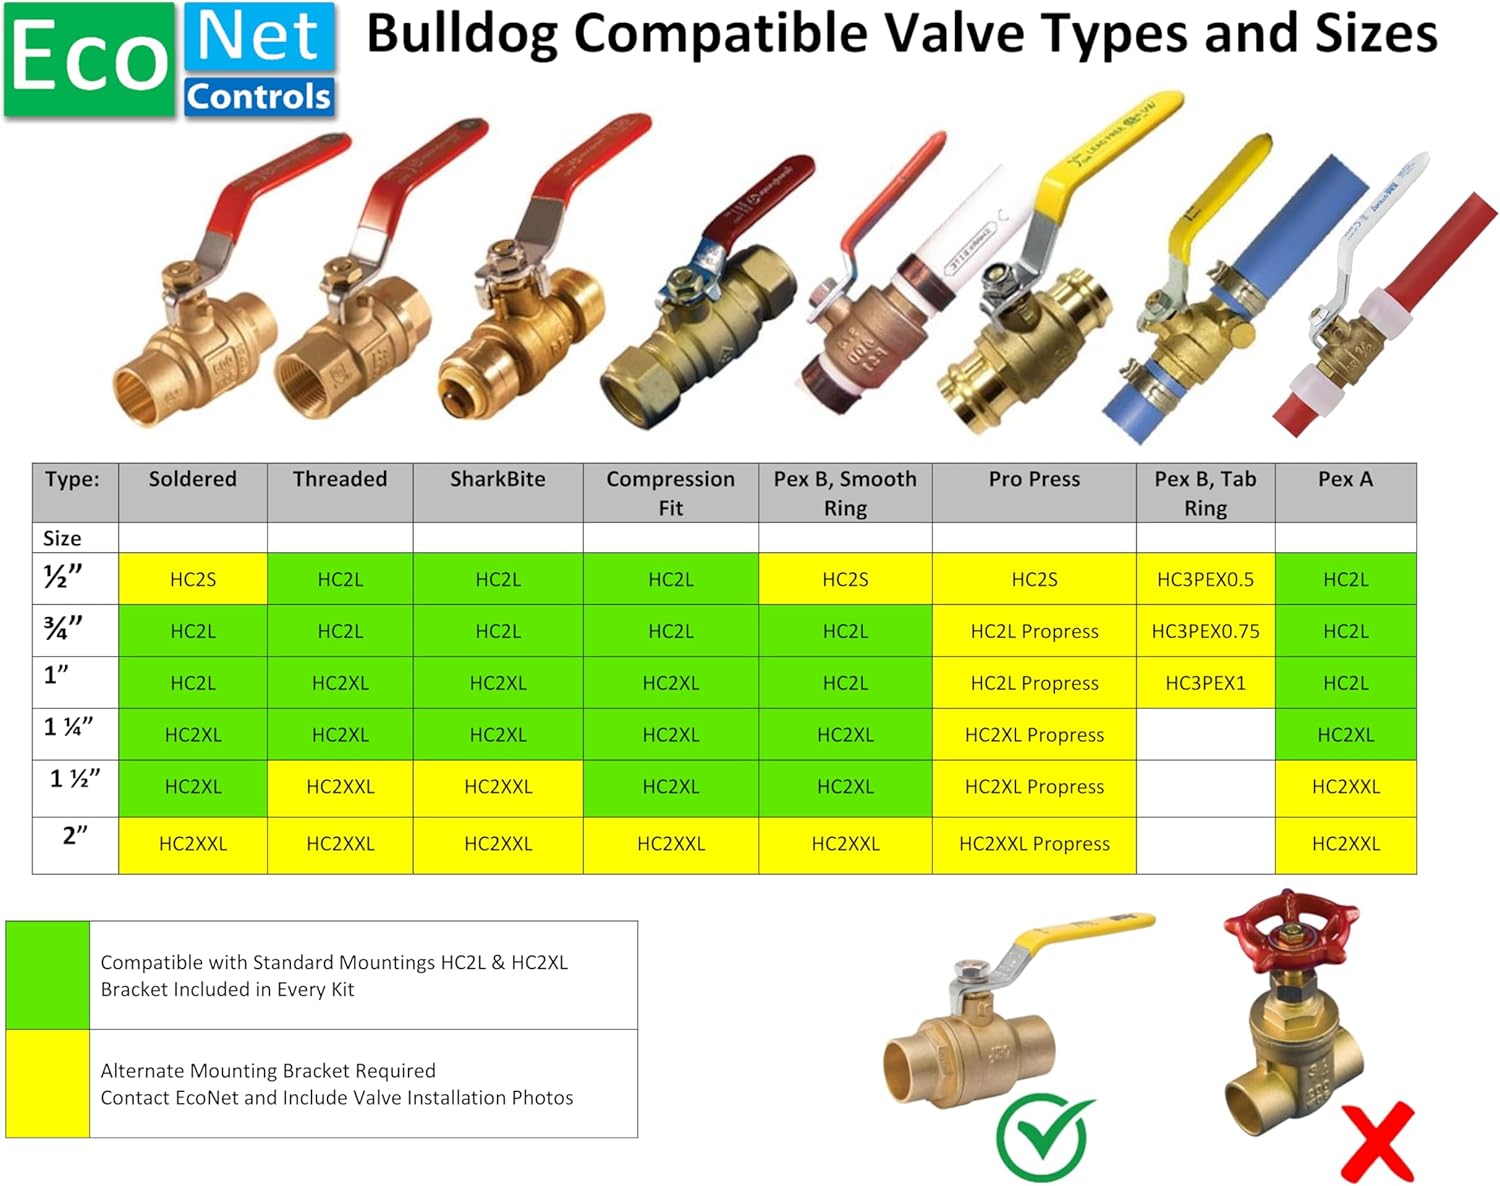
Figure 3: Compatible Valve Types and Sizes.
4.2 インストール手順
- バルブを準備する: Ensure your existing ball valve is in good working condition and accessible.
- 取り付けブラケットの位置を決めます。 Place the lower part of the mounting bracket around the pipe directly below the valve.
- Attach the Valve Robot: Secure the Bulldog Valve Robot to the mounting bracket, ensuring the robot's arm aligns with the valve handle. The robot should mount to the valve body, not the pipe, to prevent stress.
- アセンブリをセキュリティ保護する: Tighten all screws in the mounting kit to ensure a firm and stable installation.
- 接続電源: Plug the AC adapter into the valve robot and then into a standard electrical outlet.

図 4: 分解 view インストール手順。

Figure 5: Correct vs. Incorrect Mounting Method.
5. Z-Wave Setup and Pairing
The Bulldog Valve Robot requires a Z-Wave hub, controller, or gateway for remote control, automation, and notifications. Ensure your Z-Wave hub is powered on and in inclusion mode before proceeding.
5.1 Compatible Smart Home Systems
The Bulldog Valve Robot is compatible with a wide range of Z-Wave certified smart home systems, including but not limited to:
- スマートシングス
- ウィンク
- 生息地
- ネクシア
- コントロール4
- Universal Devices
- ハネウェル
- 指輪
- ヴェラ
- ゴーコントロール
- フィバロ
- 2ギガ
- 住まい
- HomeSeer

Figure 6: Smart Home System Compatibility.
5.2 ペアリング手順
- Place your Z-Wave hub into inclusion (pairing) mode. Refer to your hub's user manual for specific instructions.
- Press the Z-Wave button on the Bulldog Valve Robot. The LED indicator on the robot will flash to confirm it is attempting to pair.
- Once successfully paired, the LED indicator will stop flashing and remain solid for a few seconds, then turn off. The device should appear in your Z-Wave controller's interface.
- Test the connection by sending an open/close command from your Z-Wave controller.
6. 操作
6.1手動制御
The Bulldog Valve Robot can be manually operated by pressing the button on the device. A single press will toggle the valve's state (open or closed). The motor will engage and move the valve handle to the opposite position.
6.2 Remote Control via Z-Wave Hub
Once paired with your Z-Wave hub, you can control the valve robot remotely through your smart home application. Commands to open or close the valve will be sent wirelessly to the device. The valve robot typically takes about 18 seconds to fully open or close.
6.3 Automation with Leak Sensors
For enhanced flood prevention, integrate the Bulldog Valve Robot with Z-Wave leak sensors. Configure automation rules within your Z-Wave hub to automatically shut off the main water supply if a leak is detected by any paired sensor. This functionality requires both the valve robot and leak sensors to be connected to the same Z-Wave network.
7. メンテナンス
- 定期点検: Periodically inspect the mounting and connections to ensure they remain secure.
- クリーニング: Wipe the device with a dry, soft cloth. Do not use abrasive cleaners or allow moisture to enter the device.
- バルブエクササイズ: It is recommended to cycle your main water valve (open and close) at least once a month to prevent it from seizing. This can be done manually or via your Z-Wave controller.
8。 トラブルシューティング
- デバイスが応答しない:
- Check if the AC adapter is securely plugged in and receiving power.
- Ensure the device is within range of your Z-Wave hub.
- Verify that the device is properly paired with your Z-Wave hub. If not, attempt re-pairing.
- バルブが完全に開閉しない:
- Inspect the mounting to ensure it is secure and the robot's arm has a clear path to move the valve handle.
- Check for any obstructions preventing the valve handle from moving freely.
- Ensure the valve itself is not stiff or seized. Manual operation of the valve may be required to free it.
- ペアリングの難しさ:
- Z-Wave ハブがインクルージョン モードになっていることを確認します。
- Try moving the valve robot closer to the Z-Wave hub during the pairing process.
- Perform a factory reset on the valve robot (refer to your hub's manual for exclusion/reset procedures, or contact support).
9. 仕様
| モデル | EVC200-HCSML |
| ブランド | エコネットコントロール |
| Z-Wave認定 | Z-Wave Plus |
| Supported Valve Sizes | ¾", 1", 1.25", 1.5" ball valves |
| 電源入力 | 12 Volts (via AC Adapter) |
| 材料 | プラスチック |
| アイテム重量 | 3ポンド |
| パッケージ寸法 | 10 x 7 x 4インチ |
| 欧州連合 | 628451752196 |
10. 保証とサポート
EcoNet Controls products are designed for reliability and performance. For specific warranty information, please refer to the warranty card included with your product or visit the official EcoNet Controls website. For technical support, troubleshooting assistance, or to inquire about replacement parts, please contact EcoNet Controls customer service.
メーカー: エコネットコントロール
Webサイト: EcoNet Controls Store on Amazon (一般的な製品情報について)
