1. はじめに
ご購入ありがとうございますasing the Homtime D2qi Bluetooth Speaker with Wireless Charging and Alarm Clock. This device is designed to provide a versatile audio experience with convenient features for your daily life. Please read this manual carefully before use to ensure proper operation and to maximize the product's lifespan.
2. 安全情報
- デバイスを極端な温度、湿度、または直射日光にさらさないでください。
- 水やその他の液体に近づけないでください。
- ご自身で本製品を分解したり修理したりしないでください。修理はすべて資格を持った専門家にご依頼ください。
- 付属または推奨の電源アダプターのみを使用してください。
- 落としたり、強い衝撃を与えないでください。
3. パッケージ内容
パッケージに以下の項目が含まれているか確認してください。
- Homtime D2qi Bluetooth Speaker
- 電源アダプター
- ユーザーマニュアル
4.製品オーバーview
The Homtime D2qi combines a high-quality Bluetooth speaker with a digital alarm clock and a convenient wireless charging pad. It features intuitive controls for easy operation.

図4.1: 前面 view of the Homtime D2qi speaker with a smartphone placed on its top surface for wireless charging.

Figure 4.2: The Homtime D2qi speaker positioned on a book, showcasing its compact design and the digital clock display.

Figure 4.3: The Homtime D2qi speaker in a home setting, demonstrating wireless charging functionality.
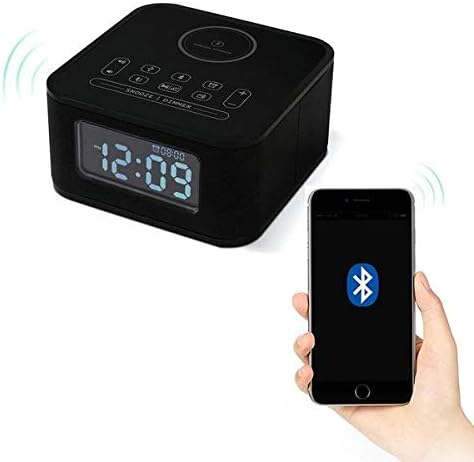
Figure 4.4: The Homtime D2qi speaker connected via Bluetooth to a smartphone.
5. セットアップ
5.1電源接続
- Connect the provided power adapter to the DC input port on the back of the Homtime D2qi.
- 電源アダプタを標準の壁コンセントに差し込みます。
- ディスプレイが点灯し、デバイスの電源がオンになっていることが示されます。
5.2 初期時間設定
初回電源投入時または電源切断後tage, you may need to set the time. Refer to the 'Operating Instructions' section for detailed steps on setting the clock.
6. 操作手順
6.1 Bluetooth接続
- を押す Bluetoothボタン on the top panel to enter Bluetooth pairing mode. The Bluetooth indicator will flash.
- スマートフォンまたはオーディオ デバイスで Bluetooth を有効にし、利用可能なデバイスを検索します。
- Select "Homtime D2qi" from the list.
- 接続されると、Bluetoothインジケーターの点滅が点灯に変わります。これでスピーカーからオーディオを再生できるようになります。
6.2ワイヤレス充電
- Place your Qi-compatible smartphone centrally on the wireless charging pad located on the top surface of the speaker.
- Ensure the phone is properly aligned with the charging coil.
- The charging indicator on your phone will show that charging has begun.
6.3 目覚まし時計機能
- を押す アラームボタン アラーム設定モードに入ります。
- 使用 +/-ボタン 時間と分を調整します。
- を押す アラームボタン もう一度クリックして各設定を確認します。
- アラームをオン/オフにするには、 アラームボタン briefly when not in setting mode.
- スヌーズするには、 スヌーズ/調光ボタン アラームが鳴ったとき。
6.4 無線機能
- を押す モードボタン FMラジオモードに切り替えます。
- を押し続けます 再生/一時停止ボタン 利用可能な放送局を自動スキャンして保存します。
- 使用 前へ/次へボタン 保存したステーション間を移動します。
6.5 通話応答
Bluetooth接続すると、スピーカーをハンズフリー通話に使用できます。
- 着信に応答するには、 再生/一時停止ボタン.
- 通話を終了するには、を押します 再生/一時停止ボタン また。
7. メンテナンス
- 柔らかく乾いた布でデバイスを拭いてください。研磨剤入りの洗剤や溶剤は使用しないでください。
- Keep the charging pad free of dust and debris to ensure efficient wireless charging.
- 長期間使用しない場合は、デバイスを涼しく乾燥した場所に保管してください。
8。 トラブルシューティング
| 問題 | 考えられる原因 | 解決 |
|---|---|---|
| 電源なし | 電源アダプターが接続されていないか、コンセントに障害があります。 | 電源アダプタがデバイスと機能している壁のコンセントにしっかりと差し込まれていることを確認します。 |
| スピーカーから音が出ない | Bluetooth not connected; volume too low; incorrect mode. | Ensure Bluetooth is paired. Increase volume on both the speaker and your device. Check if the speaker is in the correct mode (Bluetooth/Radio). |
| ワイヤレス充電が機能しない | Phone not Qi-compatible; phone not aligned; phone case too thick. | Verify phone supports Qi wireless charging. Realign phone on the charging pad. Remove thick phone cases. |
| Buttons difficult to locate in the dark | Buttons are flush with the surface. | Familiarize yourself with button layout during daylight. Use the dimmer function to adjust display brightness. |
| Bluetooth disconnects automatically | Power saving feature; device out of range. | Reconnect Bluetooth manually. Keep devices within Bluetooth range (approx. 10 meters). |
9. 仕様
| 特徴 | 詳細 |
|---|---|
| ブランド | ホムタイム |
| モデル番号 | D2qi |
| 色 | 黒 |
| スピーカータイプ | Bluetoothスピーカー |
| 接続性 | 無線 |
| 対応デバイス | スマートフォン |
| 出力電力 | 5~10ワット |
| 製品重量 | 0.5キロ |
| パッケージ寸法 | 19.6 x 18.8 x 14.8 cm |
| ハードウェアインターフェイス | Audio/Video Port |
10. 保証とサポート
Homtime products are manufactured to the highest quality standards. For warranty information and customer support, please refer to the warranty card included in your package or visit the official Homtime webサイトでご確認ください。購入証明として購入レシートを保管してください。