
1. はじめに
The EPEVER VS6048AU is a 60A common positive Pulse Width Modulation (PWM) solar charge controller designed for 12V, 24V, 36V, and 48V solar panel power systems. It incorporates advanced digital techniques to ensure efficient and reliable battery charging and load management. This controller is suitable for various applications, including solar home systems, traffic signals, solar street lights, and solar garden lamps.
主な特徴:
- 3-StageインテリジェントPWM充電:バルク、ブースト/イコライズ、フロート。
- Supports three battery charging options: Sealed, Gel, and Flooded.
- Integrated LCD display for dynamic monitoring of operating data and working conditions.
- Dual USB output ports (Max. 5VDC/2.4A) for charging electronic devices.
- 快適で便利な操作を実現するユーザーフレンドリーなボタン設定。
- Multiple load control modes for versatile application.
- エネルギー統計機能。
- バッテリー温度補正機能。
- Extensive electronic protections for system safety.

Image 1.1: The EPEVER VS6048AU Solar Charge Controller shown in various application settings, including home power supply, street lighting, monitoring, and green energy solutions.
2. 安全情報
設置および操作の前に、すべての指示と警告をよくお読みください。指示に従わない場合、感電、火災、または重傷を負う可能性があります。
- コントローラーやその他のコンポーネントの損傷を防ぐために、すべての配線が正しく極性化され、しっかりと接続されていることを確認してください。
- コントローラーを取り付けたり調整したりする前に、必ずソーラーパネルとバッテリー電源を外してください。
- Install the controller in a well-ventilated area, away from flammable gases, moisture, and direct sunlight.
- ソーラーパネル、バッテリー、負荷回路には適切な回路ブレーカーまたはヒューズを使用してください。
- コントローラーをご自身で分解したり修理したりしないでください。修理が必要な場合は、資格のある担当者にご連絡ください。
- バッテリーを扱うときは、目の保護具を含む適切な個人用保護具を着用してください。
- 太陽光発電システムの部品に子供を近づけないでください。
電子保護: The VS6048AU controller includes comprehensive electronic protections:
- PV逆極性保護
- バッテリー容量超過tag電子保護
- バッテリー保護機能
- バッテリー逆接続保護
- バッテリー過熱保護
- 負荷過負荷保護
- 負荷短絡保護
- コントローラー過熱保護

Image 2.1: Visual representation of the electronic protections integrated into the controller and a basic solar power system connection diagram.
3.製品オーバーview
Familiarize yourself with the components and interface of your EPEVER VS6048AU solar charge controller.

画像3.1:正面 view of the EPEVER VS6048AU controller with key components labeled.
- LCDディスプレイ: Shows system status, parameters, and error codes.
- メニューボタン: Used to navigate through different display interfaces and enter/exit setting modes.
- SETボタン: 選択内容の確認、パラメータの変更、データのクリアに使用します。
- USB Output Ports (5VDC/2.4A): 外部電子機器の充電に。
- Temp. Sensor Port (RTS Port): Connects to the optional remote temperature sensor for accurate battery temperature compensation.
- PVターミナル: Connect to the solar panel array.
- バッテリー端子: バッテリーバンクに接続します。
- 負荷端末: DC 負荷に接続します。
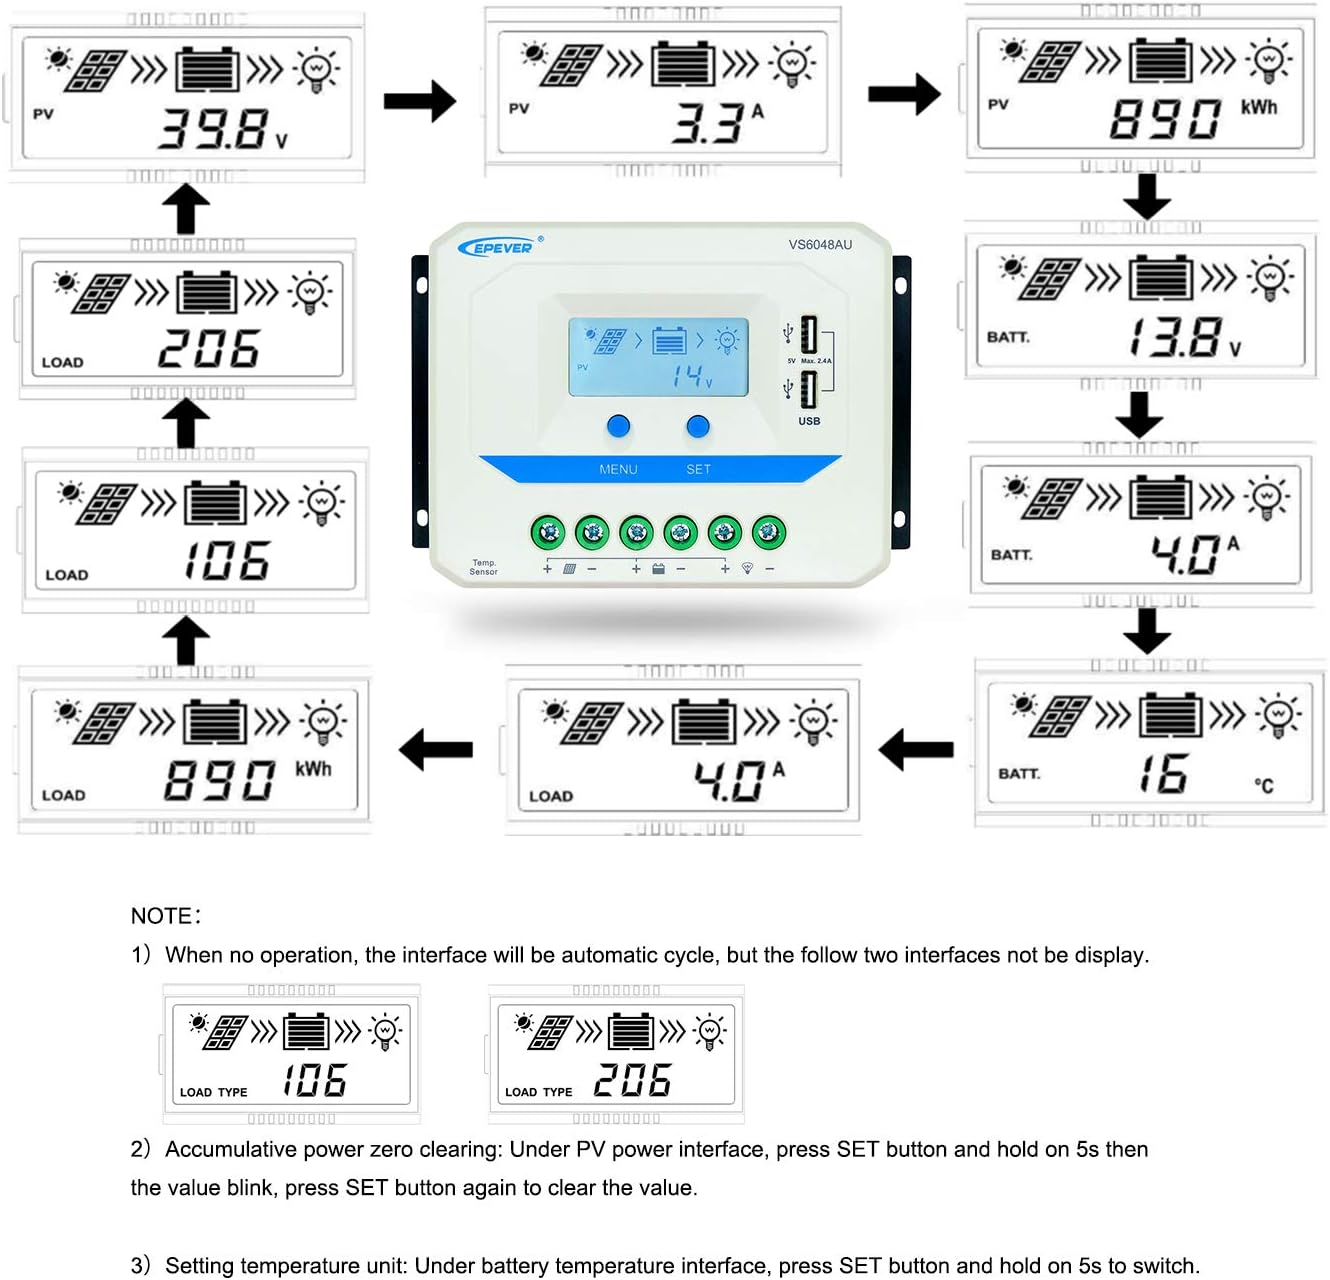
Image 3.2: Dimensions of the EPEVER VS6048AU Solar Charge Controller (approximately 21.4 cm x 12.87 cm x 7.22 cm).
LCD Display Status Description
The LCD display provides visual feedback on the system's operational status. Refer to the table below for icon meanings:

Image 3.3: Detailed description of the icons displayed on the VS6048AU LCD screen.
4. セットアップとインストール
ソーラー充電コントローラーを正しく設置するには、以下の手順に従ってください。接続を行う前に、すべての電源が切断されていることを確認してください。
配線順序:
- バッテリーを接続します。 Connect the battery to the controller's battery terminals. Ensure correct polarity (positive to positive, negative to negative). The controller will detect the battery voltage.
- 負荷を接続する: DC負荷をコントローラの負荷端子に接続します。極性が正しいことを確認してください。
- ソーラーパネルを接続します。 ソーラーパネルアレイをコントローラーのPV端子に接続します。極性が正しいことを確認してください。
重要: 必ず最初にバッテリー、次にソーラーパネル、最後に負荷を接続してください。取り外しは逆の順序で行ってください:負荷、ソーラーパネル、バッテリー。
インストールビデオガイド:
Video 4.1: An official EPEVER video demonstrating the connection process for the solar charge controller, including battery and load connections. This visual guide can assist with proper installation.
5. 操作手順
The EPEVER VS6048AU controller features an intuitive LCD display and button interface for monitoring and configuration.
LCDディスプレイナビゲーション:
When no operation is performed, the LCD interface will automatically cycle through various display screens, showing real-time data such as PV voltage、電流、バッテリー容量tage、および負荷ステータス。
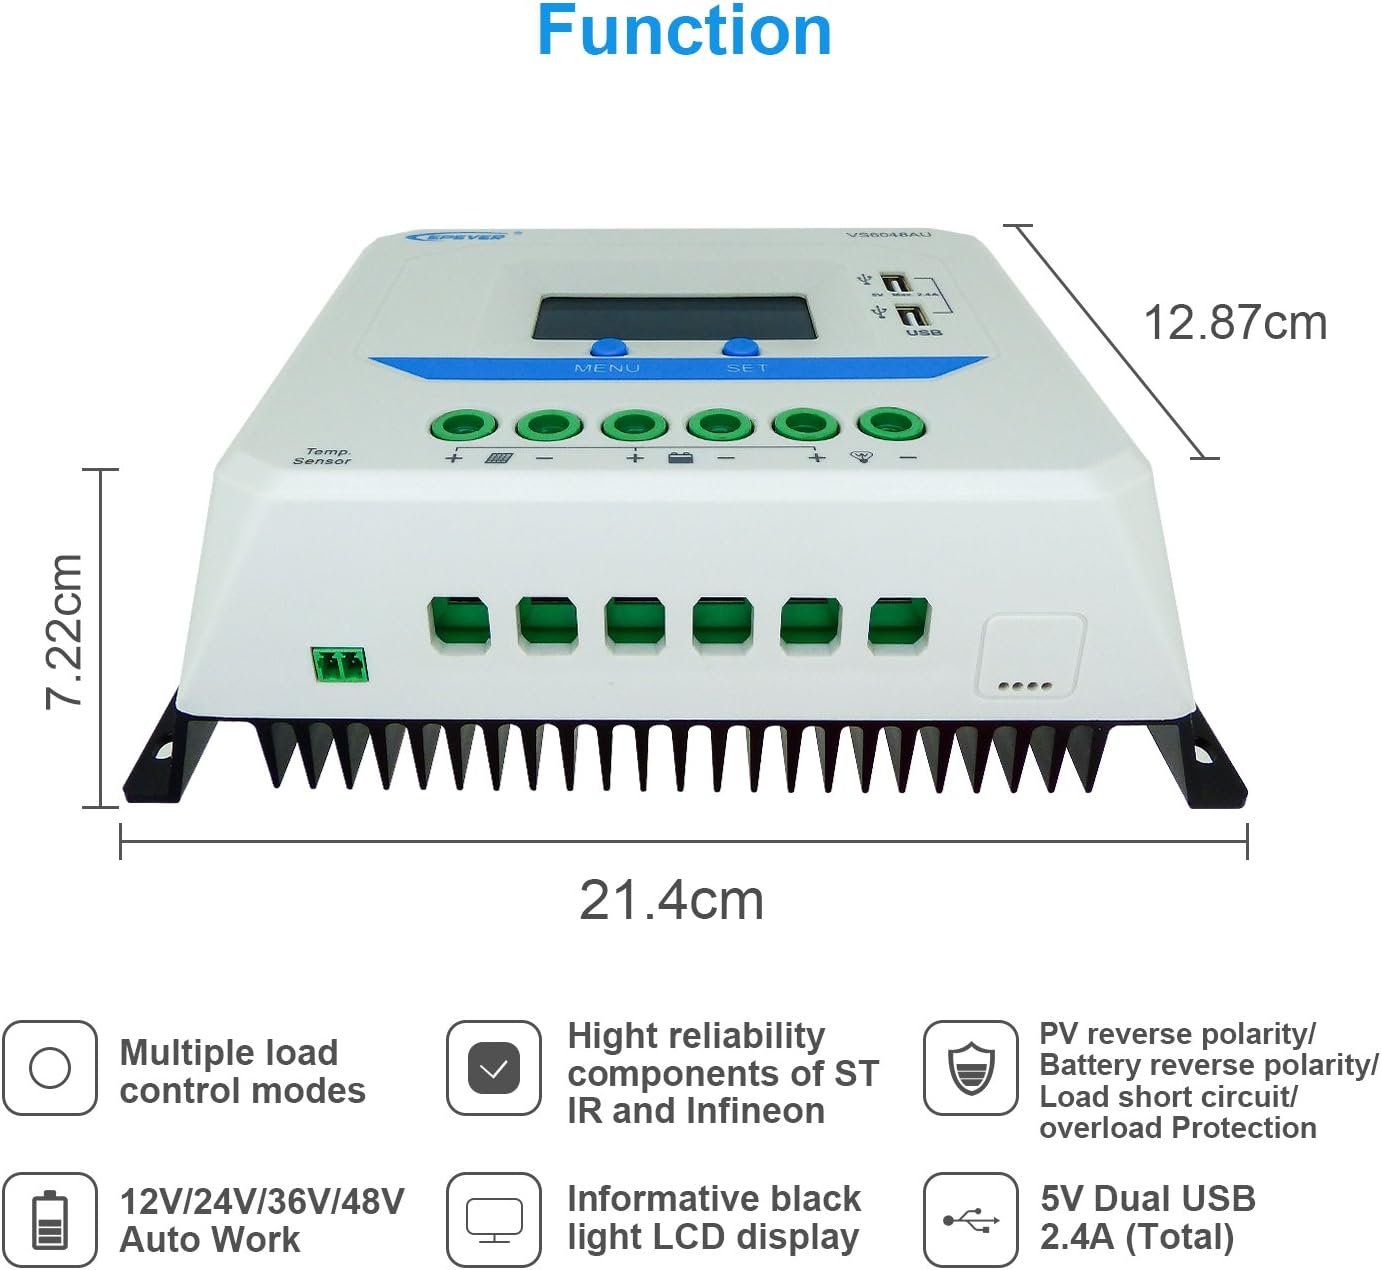
Image 5.1: Illustration of the automatic cycling interfaces on the VS6048AU LCD display.
- を押す メニュー button to manually cycle through the display interfaces.
- を押し続けます メニュー button to enter or exit the parameter setting mode.
- In parameter setting mode, use the セット button to adjust values or confirm selections.
特別な操作:
- Accumulative Power Clearing: Under the PV power interface, press and hold the セット button for 5 seconds until the value blinks, then press セット again to clear the accumulative power value.
- 設定温度単位: Under the battery temperature interface, press and hold the セット button for 5 seconds to switch between Celsius (°C) and Fahrenheit (°F).
充電モード:
コントローラーは3秒tagインテリジェントPWM充電アルゴリズム:
- 一括充電: バッテリーは最大電流で充電され、tagブーストボリュームに到達tage.
- Boost/Equalize Charging: The battery is charged at a constant voltage. An Equalize charge is typically performed once a month to balance battery cells.
- フロート充電: バッテリー容量tage is maintained at the Float voltage, and the charging current is reduced to a trickle to keep the battery fully charged.
The controller supports charging for Sealed, Gel, and Flooded battery types. Ensure the correct battery type is selected in the settings for optimal charging performance.
USB出力:
The dual USB ports provide a maximum output of 5VDC/2.4A for charging compatible electronic devices.
6. メンテナンス
Regular maintenance ensures the longevity and optimal performance of your EPEVER VS6048AU solar charge controller.
- 清潔さ: コントローラーは清潔に保ち、ほこりやゴミが付かないようにしてください。清掃には乾いた布をご使用ください。
- 接続: すべての配線接続部の締め付け具合や腐食がないか定期的に点検してください。接続が緩んでいると過熱や損傷の原因となる可能性があります。
- 換気: Ensure the installation area has adequate ventilation to prevent overheating of the controller.
- 検査: Inspect the controller and wiring for any signs of damage, such as frayed cables or cracked casing. Replace damaged components immediately.
- バッテリーの状態: バッテリー容量を監視するtage and performance regularly. Ensure the battery type setting in the controller matches your battery.
7。 トラブルシューティング
このセクションでは、ソーラー充電コントローラーで発生する可能性のある一般的な問題について説明します。
| 問題 | 考えられる原因 | 解決 |
|---|---|---|
| LCDに表示されない | バッテリーが接続されていないか、電圧が低いtage; 逆極性。 | バッテリーの接続と極性を確認してください。バッテリーの電圧を確認してください。tageは9Vを超えています。 |
| バッテリーが充電されない | PV panels not connected; PV reverse polarity; insufficient sunlight; PV open circuit voltag低すぎます。 | Check PV connections and polarity. Ensure adequate sunlight. Verify PV open circuit voltageは仕様範囲内です。 |
| ロードが機能しない | Load disconnected; load short circuit; load overload; battery low voltage切断します。 | Check load connections. Remove short circuit. Reduce load. Recharge battery. |
| コントローラーの過熱 | Poor ventilation; excessive ambient temperature; prolonged high current operation. | Ensure proper ventilation. Relocate controller to a cooler environment. Reduce load if possible. |
| USB出力が機能しない | Device not compatible; controller fault. | Try another USB device. If issue persists, contact support. |
8. 仕様
Detailed technical specifications for the EPEVER VS6048AU Solar Charge Controller.

Image 8.1: Comprehensive technical specifications table for the EPEVER VS-AU series, including the VS6048AU model.
| パラメータ | バリュー(VS6048AU) |
|---|---|
| モデル | VS6048AU |
| ノミナルシステムVoltage | 12V/24V/36V/48V オートワーク |
| バッテリー入力量tage範囲 | 9V〜64V |
| 定格充電/放電電流 | 60A |
| 最大。 PV開回路Voltage | 96V |
| 電池のタイプ | 密閉(デフォルト)/ゲル/浸水 |
| ブースト充電Voltage | Sealed: 14.4V, Gel: 14.2V, Flooded: 14.6V |
| 充電量を均等化tage | 密閉型: 14.6V、ゲル: なし、液式: 14.8V |
| フロート充電Voltage | 密閉/ゲル/浸水: 13.8V |
| 低ボリュームtageリコネクトVoltage | 密閉/ゲル/浸水: 12.6V |
| 低ボリュームtage切断Voltage | 密閉/ゲル/浸水: 11.1V |
| 自家消費 | ≤10mA (12V)、≤18mA (24V) |
| 温度補正 | -3mV/°C/2V (77°F) |
| 接地 | コモンポジティブ |
| USB出力 | 5VDC/2.4A(合計) |
| 全体寸法 | 214x128.7x72.2ミリメートル |
| ターミナル | 3AWG (25mm²) |
| 正味重量 | 1.02キロ |
| 囲い | IP30 |
| 作業環境温度 | -25°C ~ +55°C |
| 湿度範囲 | ≤95% (NC) |
9. 保証とサポート
EPEVER products are designed for reliability and performance. For technical assistance or warranty inquiries, please refer to the following:
- テクニカルサポート: EPEVER provides technical support through its local service centers. For assistance, please contact the authorized dealer or service center in your region.
- 保証情報: Please refer to the warranty card included with your product or visit the official EPEVER web詳細な保証条件については、サイトをご覧ください。
- Free Solar System Design: EPEVER's service centers may offer free solar system design assistance to help you optimize your setup.


