1. はじめに
This manual provides essential instructions for the safe and effective installation and handling of the Technical Precision replacement light bulb for the AMETEK DIGISTROBE III. This product is a high-quality replacement component designed to restore the functionality of your AMETEK DIGISTROBE III device. Please read this manual thoroughly before proceeding with installation.
2. 安全情報
Always prioritize safety when handling electrical components. Failure to follow these safety guidelines may result in electric shock, fire, or damage to the product or device.
- 電源を切る: Before attempting any installation or replacement, ensure the AMETEK DIGISTROBE III device is completely disconnected from its power source.
- 冷却を許可します: If the previous bulb was in use, allow sufficient time for it to cool down before handling to prevent burns.
- 取り扱いにはご注意ください: Light bulbs, especially halogen types, can be fragile. Avoid touching the glass envelope directly with bare hands, as oils can create hot spots and reduce bulb life. Use a clean cloth or gloves.
- コレクトボリュームtage: Ensure the replacement bulb's voltage (230 Volts) matches the requirements of your AMETEK DIGISTROBE III device.
- 廃棄: 古い電球は地域の規制に従って廃棄してください。
3. インストール手順
Follow these steps carefully to replace the light bulb in your AMETEK DIGISTROBE III.
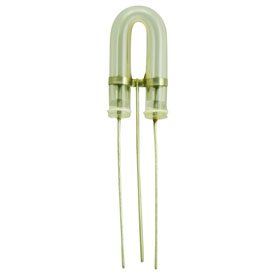
Figure 1: The Technical Precision replacement light bulb. This image displays the replacement light bulb, characterized by its distinctive U-shaped glass envelope and three electrical contact pins at the base, designed for precise fit and function within the AMETEK DIGISTROBE III.
- デバイスを準備します。 Ensure the AMETEK DIGISTROBE III is turned off and unplugged from all power sources. Place it on a stable, clean surface.
- Access the Bulb Compartment: Refer to your AMETEK DIGISTROBE III's original manual for specific instructions on how to open the device and access the light bulb compartment. This usually involves removing a cover or panel.
- 古い電球を取り外します:
- If the bulb was recently in use, allow it to cool completely.
- Gently grasp the old bulb (using a cloth or gloves) and carefully pull it straight out from its socket. Avoid twisting if the socket is a push-in type. Note the orientation of the pins if applicable.
- 新しい電球を取り付けます。
- Carefully unpackage the Technical Precision replacement bulb. Avoid touching the glass with bare hands.
- Align the pins of the new bulb with the corresponding holes in the socket.
- Gently push the bulb firmly into the socket until it is fully seated. Do not force it.
- デバイスを保護する: Close the bulb compartment and re-secure any covers or panels that were removed.
- テスト機能: Plug the AMETEK DIGISTROBE III back into its power source and turn it on to verify that the new bulb is functioning correctly.
4. Operating the Device (After Bulb Replacement)
Once the Technical Precision replacement bulb is installed, the operation of your AMETEK DIGISTROBE III device will resume as per its original design. Refer to the original AMETEK DIGISTROBE III user manual for detailed instructions on operating the device, including power settings, strobe frequency adjustments, and other functions.
5. メンテナンス
The Technical Precision replacement bulb requires minimal maintenance. To ensure optimal performance and longevity:
- クリーニング: If the bulb's glass surface becomes dusty or smudged, ensure the device is unplugged and the bulb is cool. Gently wipe the glass with a clean, dry, lint-free cloth. Avoid using abrasive cleaners or liquids.
- ストレージ: If storing a spare bulb, keep it in its original packaging in a cool, dry place away from direct sunlight and extreme temperatures.
- 定期点検: Periodically inspect the bulb for any signs of damage or discoloration. If any issues are observed, replace the bulb.
6。 トラブルシューティング
If the new bulb does not function after installation, consider the following:
- 光なし:
- Ensure the AMETEK DIGISTROBE III is properly plugged into a working power outlet.
- Verify that the device's power switch is in the "ON" position.
- Check if the bulb is fully and correctly seated in its socket. Gently re-seat it if necessary (after disconnecting power).
- Inspect the bulb for any visible damage (e.g., broken filament, cracked glass). If damaged, replace it.
- If the device still does not light up, the issue may lie with the AMETEK DIGISTROBE III unit itself, not the bulb. Consult the device's original manual or manufacturer for further assistance.
- 暗いまたはちらつく光:
- 電球がしっかりと固定されていることを確認してください。
- Check for any loose connections within the device (if safely accessible and you are qualified to do so).
- This could indicate an issue with the device's power supply or internal components.
7. 製品仕様
| ブランド | 技術的精度 |
| モデル番号 | DIGISTROBE III (Replacement) |
| タイプ | ハロゲン電球 |
| ワットtage | 16ワット |
| 巻tage | 230ボルト |
| 材料 | Copper (contacts), Glass (envelope) |
| 含まれるコンポーネント | 1 x Replacement Part |
8. 保証とサポート
For information regarding warranty coverage for this Technical Precision replacement bulb, please refer to the purchase documentation or contact Technical Precision directly. Support for the AMETEK DIGISTROBE III device itself should be directed to the original manufacturer of the AMETEK device.
Technical Precision Contact: ぜひご覧ください Technical Precision Store on Amazon 連絡先情報や製品の詳細については、こちらをご覧ください。