1. はじめに
This user manual provides comprehensive instructions for the operation and maintenance of your TKSTAR TK905 GPS Tracker. Designed for real-time tracking and monitoring, this device utilizes advanced GPS and AGPS dual positioning technology to provide accurate location data for vehicles, motorcycles, trucks, and other assets. Please read this manual thoroughly before using the device to ensure proper functionality and safety.
2.製品オーバーview
2.1 主な特徴
- 3G GPS Tracker: Supports GSM (2G) & WCDMA (3G) networks.
- Real-time Tracking: Locate and monitor targets via SMS, APP, and Internet.
- Precise Positioning: Utilizes GPS and AGPS dual positioning.
- Multifunctionality: Includes SMS/APP/Web tracking, Electronic fence, History route playback, Over-speed alarm, Shake alarm, Loosing alarm, and Low power alarm.
- Geo-fence: Define restricted areas and receive alerts upon entry or exit.
- Super Long Standby Time: Built-in 3.7V 7800mAh rechargeable Li-ion battery, offering up to 80 days standby.
- Strong Magnetic Mount: Equipped with powerful magnets for easy installation on metallic surfaces.
2.2 デバイスコンポーネント
The TKSTAR TK905 GPS Tracker is a compact device designed for durability and ease of use. It features a robust casing and essential ports for operation.

Figure 1: TKSTAR TK905 GPS Tracker showing its ports and dimensions. The device has an indicator light, a USB port for charging, and a SIM card slot. Dimensions are approximately 90mm (3.5 inches) length, 72mm (2.8 inches) width, and 22mm (0.8 inches) thickness.
The device includes a USB port for charging, a SIM card slot for network connectivity, and an indicator light to show operational status. Its strong magnetic base allows for secure attachment to various surfaces, particularly suitable for vehicles.
3. セットアップ
3.1SIMカードのインストール
The TKSTAR TK905 requires a local SIM card that supports both 2G (GSM) and 3G (WCDMA) networks for full functionality. In the US, T-Mobile is a recommended provider. Ensure the SIM card has an active data plan and is not PIN-locked.
- Open the rubber cover on the side of the tracker to expose the SIM card slot.
- Insert the activated SIM card into the slot with the metal contacts facing down and the notched corner oriented correctly.
- カチッと音がするまで SIM カードをゆっくりと押し込みます。
- 防水性を確保するため、ゴムカバーをしっかりと閉じてください。
3.2デバイスの充電
Before first use, fully charge the TK905 GPS Tracker. The device has a built-in 7800mAh rechargeable Li-ion battery.
- Connect the provided USB charging cable to the tracker's USB port.
- Connect the other end of the cable to a standard USB power adapter (e.g., phone charger, computer USB port).
- The indicator light will illuminate during charging. It will change color or turn off once fully charged.
- A full charge can provide up to 80 days of standby time, depending on usage and network conditions.
4. 操作手順
4.1 電源のオン/オフ
- To power on: Press and hold the power button (if available, otherwise, insertion of SIM card and charging may activate it). The indicator light will flash.
- To power off: Send an SMS command or use the mobile application (refer to specific app instructions).
4.2 リアルタイムトラッキング
The TK905 allows for real-time tracking via a dedicated mobile application or web platform. This feature provides the current location of the device.

Figure 2: Real-time tracking interface on a smartphone, showing the current location of the GPS tracker on a map.
Download the official TKSTAR tracking application from your smartphone's app store or access the web platform using the provided URL. Log in with your device ID and password. The map will display the current position of your tracker.
4.3 履歴ルートの再生
Review past travel routes of your tracker through the application or web platform. This feature is useful for monitoring travel history.
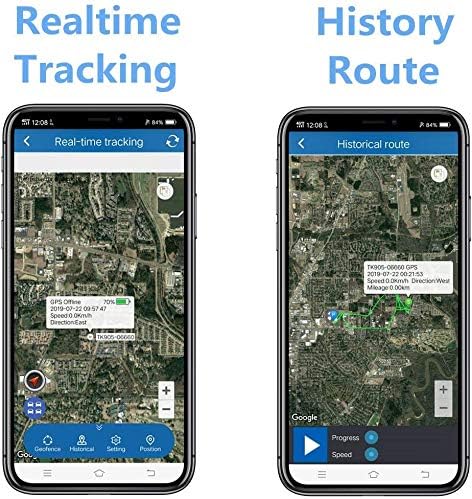
Figure 3: Comparison of Real-time Tracking and History Route features on the mobile application. The history route displays the path taken by the device over a selected period.
Navigate to the "History Route" section within the application or web interface. Select the desired date and time range to view the recorded path.
4.4 Geo-fence Function
Set up virtual boundaries (geo-fences) on the map. You will receive an alert if the tracker enters or exits these predefined areas.

Figure 4: Geo-fence feature illustration. Users can define a geographical area, and the tracker will send an alert if it crosses the boundary.
Access the "Geo-fence" setting in the application. Draw a polygon or circle on the map to define your desired area. Save the geo-fence, and configure alert notifications.
4.5つのアラーム機能
The TK905 supports various alarm types to enhance security and monitoring:
- 過速度アラーム: Set a speed limit. If the tracker exceeds this limit, an alert will be sent.
- シェイクアラーム: Receive an alert if the device detects vibration or movement after being stationary for a set period (e.g., 5 minutes).
- Loosing Alarm: Alerts if the device is removed from its magnetic attachment point (if applicable).
- 低電力アラーム: Notifies you when the battery level is critically low, prompting you to recharge the device.

Figure 5: Shake Alarm in action. The device sends an SMS alert to the user's phone when it detects unauthorized movement or vibration.
Configure these alarms within the mobile application or web platform settings. Ensure your notification settings are correctly configured to receive alerts.
5. メンテナンス
Proper maintenance ensures the longevity and optimal performance of your TKSTAR TK905 GPS Tracker.
- クリーニング: 柔らかく乾いた布でデバイスを拭いてください。刺激の強い化学薬品や研磨剤入りの洗剤の使用は避けてください。
- 耐水性: Ensure the rubber cover for the SIM card slot and USB port is always securely closed to maintain water resistance. While the device is designed to be waterproof, avoid prolonged submersion.
- バッテリーのケア: To maximize battery life, avoid fully discharging the battery frequently. Store the device in a cool, dry place when not in use for extended periods. Recharge periodically if stored for a long time.
- ストレージ: Store the tracker in a temperature-controlled environment, away from extreme heat or cold, and direct sunlight.
- SIMカード: Periodically check the SIM card's data plan and ensure it remains active to avoid service interruptions.
6。 トラブルシューティング
| 問題 | 考えられる原因 | 解決 |
|---|---|---|
| デバイスの電源がオンになっていません。 | Low battery; device not activated. | Charge the device fully. Ensure SIM card is correctly inserted and activated. |
| No real-time tracking data. | No network signal; SIM card issues (no data, expired, PIN-locked); device in an area with poor GPS signal. | Check network coverage. Verify SIM card status with your provider. Move the device to an open area with clear sky view. |
| 位置が不正確です。 | Weak GPS signal; interference; device indoors or underground. | デバイスにクリアな view of the sky. Avoid placing it near large metal objects or in enclosed spaces. |
| アラームが動作しません。 | Alarm settings not configured; notification settings on phone/app disabled. | Verify alarm settings in the application/web platform. Check your phone's notification settings for the tracking app. |
| バッテリー寿命が短い。 | Frequent tracking updates; poor network signal (device consumes more power searching); old battery. | Adjust tracking interval to a longer period. Ensure good network coverage. If battery life significantly degrades, consider contacting support for battery replacement options. |
7. 仕様
- モデル: TK905
- 製品寸法: 0.9 x 2.8 x 3.5インチ(約2.29 x 7.11 x 8.89 cm)
- 商品の重量: 10.6オンス(約300.5グラム)
- 接続技術: Cellular (GSM/WCDMA)
- サポートされているアプリケーション: GPS Tracking App/Web プラットフォーム
- バッテリー: 3.7V 7800mAh Rechargeable Li-ion battery
- 待機時間: 最長80日間
- メーカー: TKスター
- 初回利用可能日: 25年2017月XNUMX日
8. 保証とサポート
For warranty information, technical support, or service inquiries regarding your TKSTAR TK905 GPS Tracker, please contact the manufacturer directly through their official webご購入時に提供された連絡先情報、またはサイトをご覧ください。保証請求の際には、購入証明としてレシートを保管してください。
For general inquiries or to visit the brand's store, you may refer to the TKSTAR Store on Amazon: TKSTAR Store.