
導入
This manual provides detailed instructions for the installation, operation, and maintenance of your Venstar T1900 Residential Slimline Platinum Thermostat. Please read this manual thoroughly before attempting to install or operate the thermostat to ensure proper function and to avoid potential damage.
重要な安全情報
- サーモスタットの取り付けやメンテナンスを行う前に、必ずメイン回路ブレーカーまたはヒューズ ボックスで暖房/冷房システムの電源をオフにしてください。
- This thermostat operates on 24 Volts AC. Do not connect to line voltage(120Vまたは240V)。
- 電気配線に精通していない場合は、資格のある技術者が設置を行う必要があります。
- Do not short circuit the terminals on the gas valve or at the system control to test the thermostat. This will damage the thermostat and void the warranty.
- 短絡を防止するために、すべての配線接続が安全かつ絶縁されていることを確認してください。
パッケージ内容
パッケージに次のアイテムが含まれていることを確認してください。
- Venstar T1900 サーモスタットユニット
- 取り付け金具(ネジと壁アンカー)
- ユーザーマニュアル(このドキュメント)
製品終了view
The Venstar T1900 is a 7-day programmable digital thermostat designed for residential use. It offers precise temperature control and energy-saving scheduling capabilities. This thermostat is compatible with heat/cool, heat pump, and dual-fuel systems, controlling up to three heat stages と XNUMX つのクールな stages。
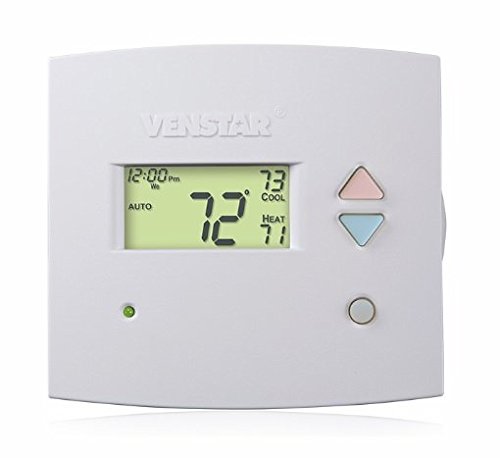
図1: フロント view of the Venstar T1900 Thermostat. This image displays the thermostat's LCD screen and control buttons, indicating its slimline design.
主な特徴:
- 7日間のプログラム可能性: 曜日ごとにカスタマイズされた暖房および冷房スケジュールを可能にします。
- システム互換性: Works with heat/cool, dual-fuel, and heat pump systems.
- マルチStage コントロール: Manages up to three heat stages と XNUMX つのクールな stages。
- リモートコントロール機能: Controllable by phone using an optional add-on (sold separately).
- Automatic or Manual Operation: Provides flexibility for scheduled or on-demand temperature adjustments.
インストールガイド
必要なツール:
- ドライバー(プラスまたはマイナス)
- Drill with appropriate drill bit (if installing new wall anchors)
- ワイヤストリッパ
- 鉛筆
- レベル(オプション)
1.電源を切ります
Locate the circuit breaker or fuse box that controls your heating and cooling system. Turn off the power completely before proceeding with any wiring.
2. Remove Old Thermostat (if applicable)
- 古いサーモスタットのカバーを慎重に取り外します。
- 参考のために既存の配線接続の写真を撮ります。
- Label each wire with the terminal designation it was connected to (e.g., R, G, Y, W).
- 配線を外し、古いサーモスタットの取り付けプレートを壁から取り外します。
3. Mount the New Thermostat Base
- Separate the front cover of the T1900 thermostat from its base plate.
- Position the base plate on the wall where you want to install the thermostat. Ensure it is level.
- 取り付け穴に鉛筆で印を付けます。
- 必要に応じて下穴を開け、壁アンカーを挿入します。
- 付属のネジを使用して、サーモスタットのベース プレートを壁に固定します。
4.配線
Connect the wires from your HVAC system to the corresponding terminals on the T1900 thermostat base. Refer to the wiring diagram provided with your specific HVAC system for precise connections. Ensure wires are stripped approximately 3/8 inch and securely fastened under the terminal screws.
Common Terminal Designations:
- R/Rc/Rh: 24V Power (Heating/Cooling)
- C: Common (24V return)
- G: ファン
- Y/Y1: コンプレッサーStage 1(冷却)
- Y2: コンプレッサーStage 2(冷却)
- W/W1: ヒートStage 1(暖房)
- W2: ヒートStage 2(暖房)
- O / B: Reversing Valve (Heat Pumps)
Note: The T1900 supports various system types. Consult the detailed wiring diagrams in the full installation manual for specific configurations (e.g., heat pump with auxiliary heat, conventional multi-stage システム)。
5. サーモスタットをベースに取り付ける
Once wiring is complete and verified, carefully align the thermostat front cover with the mounted base plate and snap it into place.
6.電源を回復します
Return to your circuit breaker or fuse box and restore power to your heating and cooling system.
初期設定
Upon initial power-up, the thermostat may prompt you to configure basic settings. Follow the on-screen instructions to set the current date, time, and system type (e.g., Conventional, Heat Pump).
System Type Configuration:
It is crucial to correctly configure the thermostat for your specific HVAC system. Incorrect settings can lead to improper operation or damage. Access the installer settings menu (refer to the full installation guide for specific button sequences) to select:
- システムタイプ: Heat/Cool, Heat Pump, Dual Fuel
- ヒート数Stages
- クールSの数tages
- Reversing Valve Operation: O(冷却)またはB(加熱)
操作手順
表示について理解する:
The LCD screen displays the current temperature, set temperature, system mode, fan mode, time, and programming status. Refer to the icons and indicators on the screen for current operational status.
Setting System Mode:
を押す モード 利用可能なシステム モードを切り替えるボタン:
- 熱: The system will operate to maintain the heating setpoint.
- 涼しい: The system will operate to maintain the cooling setpoint.
- 自動: サーモスタットは、設定された温度範囲を維持するために、必要に応じて加熱と冷房を自動的に切り替えます。
- OFF: 暖房および冷房システムはオフになっています。
Setting Fan Mode:
を押す FAN ファンモードを切り替えるボタン:
- 自動: ファンは、暖房または冷房システムがアクティブに動作しているときのみ作動します。
- に: 暖房や冷房の要求に関係なく、ファンは継続的に作動します。
温度調整:
使用 UP そして 下 arrow buttons to adjust the desired temperature setpoint. In programmable modes, this will temporarily override the schedule until the next scheduled change.
番組スケジュール(7日間):
The T1900 allows for 7-day programming, enabling different schedules for each day of the week. This feature helps save energy by adjusting temperatures when you are away or asleep.
- を押す プログラム プログラミングモードに入るためのボタン。
- 使用 日 button to select the day or group of days you wish to program (e.g., Mon-Fri, Sat-Sun, or individual days).
- 使用 時間 button to cycle through the four available periods: Wake, Leave, Return, Sleep.
- 使用 UP そして 下 arrow buttons to set the desired temperature for each period.
- 使用 所有 button to exit programming mode or save changes.
Refer to the detailed programming section in the full user guide for advanced options and specific button sequences.
Remote Control (Optional Add-on):
The Venstar T1900 thermostat can be controlled remotely via a phone using an optional add-on module (sold separately). This module connects to the thermostat and allows for remote access and control through a dedicated application. Installation and setup instructions for the remote control module are provided with the module itself.
メンテナンス
サーモスタットの清掃:
To maintain the appearance and functionality of your thermostat, periodically wipe the exterior with a soft, damp 布で拭いてください。研磨剤入りの洗剤、溶剤、化学スプレーは使用しないでください。プラスチックや電子部品を損傷する恐れがあります。
バッテリー交換:
The Venstar T1900 thermostat does not require batteries for operation as it is powered by the 24V AC system.
トラブルシューティング
If you experience issues with your Venstar T1900 thermostat, consult the following common problems and solutions:
| 問題 | 考えられる原因 | 解決 |
|---|---|---|
| サーモスタットの表示が空白 | サーモスタットに電力が供給されていません。 | Check the circuit breaker for your HVAC system. Ensure all wiring connections are secure. |
| 暖房/冷房システムが反応しない | 間違ったシステム モードが選択されました。配線に問題があります。システムがロックアウトされています。 | Verify the system mode (HEAT/COOL/AUTO). Check wiring connections. Wait 5 minutes for system lockout to reset. |
| 温度の読み取りが不正確であるようです | サーモスタットの位置、センサーの障害。 | Ensure the thermostat is not exposed to direct sunlight, drafts, or heat sources. Clean any dust from the thermostat vents. |
| Programming schedule is not working | Program not saved; temporary override active; incorrect time/day setting. | Ensure programs are saved. Check if a temporary override is active and cancel it. Verify current time and day settings. |
| ファンはAUTOモードで連続運転します | Fan mode set to ON; wiring issue. | Press the FAN button to ensure it is set to AUTO. Check fan wiring. |
If these solutions do not resolve the issue, please contact customer support or a qualified HVAC technician.
仕様
| 特徴 | 仕様 |
|---|---|
| ブランド | Venstar |
| モデル名 | ヴェンスター T1900 |
| コントローラータイプ | プッシュボタン |
| 特集 | プログラム可能 |
| 色 | 白 |
| 製品の具体的な用途 | Heat Pump, Heater |
| 温度制御タイプ | Programmable, Smart/Remote (with add-on) |
| 巻tage | 24ボルトAC |
| 表示タイプ | LCDまたはLED |
| 制御方法 | Remote (with add-on) |
| バックライト | はい |
| 製品寸法 | 5.3 x 2 x 2インチ |
| アイテム重量 | 0.01オンス |
| 電池は必要ですか? | いいえ |
保証情報
Venstar products are manufactured to high-quality standards. This product is covered by a limited warranty against defects in materials and workmanship. The specific terms and duration of the warranty may vary. Please refer to the warranty card included with your product or visit the official Venstar web詳細な保証情報および登録手順については、こちらのサイトをご覧ください。
カスタマーサポート
For technical assistance, troubleshooting, or warranty inquiries, please contact Venstar customer support. You can typically find contact information, including phone numbers and email addresses, on the official Venstar web地点 (www.venstar.com) または製品パッケージに記載されています。
When contacting support, please have your thermostat model number (T1900) and any relevant purchase information ready.


