
SCHEPPACH UK-HC 16W
SCHEPPACH HC 16W DIY 壁掛けコンプレッサー ユーザーマニュアル
Model: UK-HC 16W
1. はじめに
Thank you for choosing the SCHEPPACH HC 16W DIY Wall Compressor. This manual provides essential information for the safe and efficient operation, maintenance, and troubleshooting of your new compressor. Please read this manual thoroughly before initial use and keep it for future reference.
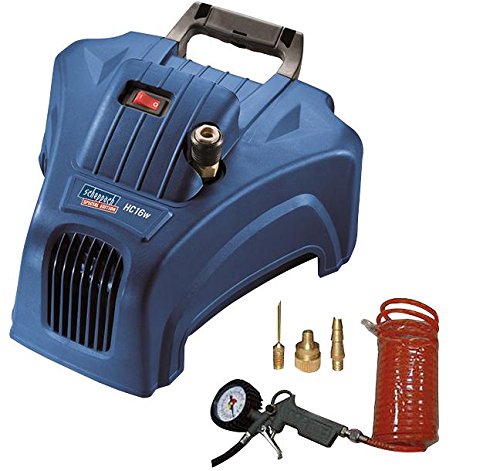
Figure 1: SCHEPPACH HC 16W DIY Wall Compressor and included accessories (inflator with pressure gauge, 5m hose, 3 adapters).
2. 安全に関する注意事項
Always observe basic safety precautions when using electrical appliances to reduce the risk of fire, electric shock, and personal injury. This compressor is designed for DIY use and should not be used for commercial or industrial applications.
- 電源がボリュームと一致していることを確認してくださいtage specified on the compressor (230V).
- 湿った状態またはdでコンプレッサーを操作しないでくださいamp 条件。
- 操作エリアに子供や関係者以外の人を近づけないでください。
- Wear appropriate personal protective equipment, such as safety glasses, when operating the compressor and air tools.
- 圧縮空気を人や動物に向けて発射しないでください。
- Disconnect the compressor from the power supply before performing any maintenance or adjustments.
- Do not modify the compressor or its accessories.
- Ensure adequate ventilation when operating the compressor.
3.製品オーバーview
The SCHEPPACH HC 16W is a compact and portable oil-free air compressor designed for various DIY tasks. Its oil-free pump eliminates the need for lubrication, making it ready for immediate use.
主な特徴:
- コンパクトで持ち運びに便利なデザイン。
- Oil-free pump for maintenance-free operation.
- Can be used on the ground or wall-mounted with the included bracket.
- Suitable for a range of air tools including tire inflators and blow guns.
付属品:
- 圧力計付きインフレーター
- 5m Flush Hose
- アダプター3個
4. セットアップ
開梱:
Carefully remove the compressor and all accessories from the packaging. Inspect for any damage that may have occurred during transit. Retain packaging for future storage or transport.
配置:
The compressor can be placed on a stable, level surface or mounted to a wall. If wall-mounting, ensure the wall can support the weight of the compressor and that there is adequate space for ventilation and access to controls.
- Ground Use: Place the compressor on a flat, stable surface, ensuring it is not obstructed and has good airflow around it.
- 壁掛け:
- Identify a suitable location on a sturdy wall, preferably near a power outlet.
- 付属の壁取り付けブラケットをテンプレートとして使用し、穴あけポイントをマークします。
- 穴を開けて適切な壁アンカーを挿入します (壁の種類によっては付属していません)。
- Securely fasten the bracket to the wall.
- Attach the compressor to the mounted bracket.
接続アクセサリ:
Connect the 5m flush hose to the air outlet on the compressor. Attach the desired air tool (e.g., inflator with pressure gauge) to the other end of the hose. Use the appropriate adapters as needed.
5. 操作手順
初期起動:
- Ensure all connections are secure and the compressor is placed on a stable surface or securely wall-mounted.
- 電源コードをアース付き 230V AC 電源コンセントに差し込みます。
- Turn the power switch (usually red, located on top of the unit) to the "ON" position. The compressor will begin to build pressure.
- Allow the compressor to reach its maximum operating pressure (8 bar) and shut off automatically. This indicates proper function.
エアツールの使用:
Once the compressor has built pressure, you can begin using your air tools. The compressor will automatically cycle on and off to maintain the desired pressure as you use air.
- タイヤインフレータ: Attach the inflator with pressure gauge to the hose. Connect it to the tire valve and monitor the pressure gauge while inflating.
- Blow Gun: Use the blow gun for cleaning dust and debris from surfaces. Always wear eye protection.
- アダプター: Use the included adapters for various inflation needs (e.g., sports balls, inflatable toys).
シャットダウン:
- 電源スイッチを「OFF」の位置にしてください。
- Unplug the compressor from the power outlet.
- Release any remaining air pressure from the hose and tools by briefly activating the tool or using the pressure relief valve (if present).
6. メンテナンス
The SCHEPPACH HC 16W compressor features an oil-free pump, significantly reducing maintenance requirements. However, regular checks are still important for optimal performance and longevity.
- クリーニング: Regularly wipe down the exterior of the compressor with a clean, damp cloth. Do not use harsh chemicals or abrasive cleaners. Ensure ventilation grilles are free from dust and debris.
- エアフィルター: Check the air filter periodically for cleanliness. A clogged air filter can reduce compressor efficiency. Clean or replace as necessary (refer to manufacturer guidelines for replacement parts).
- ホースと接続部: Inspect the air hose and all connections for signs of wear, cracks, or leaks before each use. Replace damaged components immediately.
- ストレージ: When not in use, store the compressor in a clean, dry place, away from extreme temperatures and direct sunlight.
7。 トラブルシューティング
This section provides solutions to common issues you might encounter with your compressor. For problems not listed here, contact customer support.
| 問題 | 考えられる原因 | 解決 |
|---|---|---|
| コンプレッサーが起動しません。 | No power supply; Power switch off; Thermal overload. | Check power cord and outlet; Turn power switch ON; Allow compressor to cool down. |
| コンプレッサーは連続的にまたは頻繁に作動します。 | Air leak in hose or connections; Excessive air tool usage. | Check all connections for leaks and tighten; Reduce continuous air tool usage; Inspect hose for damage. |
| 低気圧。 | Air leak; Clogged air filter; Insufficient power. | Check for leaks; Clean or replace air filter; Ensure proper voltage供給。 |
| 異常な騒音や振動。 | Loose components; Compressor not on stable surface. | Check and tighten any loose screws; Ensure compressor is on a stable, level surface. |
8. 仕様
| パラメータ | 価値 |
|---|---|
| モデル | UK-HC 16W |
| メーカー | シェパッハ |
| ブランド | プロシリーズ |
| 入力電力 | 1000W |
| 供給量tage | 230V 交流 |
| 最高使用圧力 | 8バール |
| 風量 | 160 L/min (LPM) |
| 寸法(長さ×幅×高さ) | 350 x 370 x 210 ミリメートル |
| ポンプタイプ | オイルフリー |
9. 保証とサポート
This product comes with a UK Standard Manufacturer Term Warranty. For warranty claims or technical support, please contact your retailer or the manufacturer, SCHEPPACH, directly. Keep your proof of purchase for warranty validation.
For further assistance, please refer to the contact information provided with your purchase or visit the official SCHEPPACH webサイト。
Ask a question about this manual
Ask about setup, troubleshooting, compatibility, parts, safety, or missing instructions. Manuals+ will review the question and use this page’s manual context to help answer it.