
1. はじめに
This manual provides detailed instructions for the safe and effective operation of the Meco 2250-HZ Auto Digital Clamp Meter. This device is designed for measuring various electrical parameters, including AC/DC voltage, AC current, frequency, continuity, and diode testing. Please read this manual thoroughly before use and retain it for future reference.
2. 安全情報
Always observe standard safety precautions when working with electrical circuits. Failure to do so may result in injury or damage to the meter. This meter is designed with over-voltage protection up to 200V DC and AC Peak. However, exercise caution.
- 体積を測定しようとしないでくださいtag指定された最大限度を超える電圧または電流。
- 測定を行う前に、テスト リードが良好な状態にあり、正しく接続されていることを確認してください。
- メーターが損傷しているように見える場合、または電池カバーがしっかりと閉じられていない場合は、メーターを操作しないでください。
- Avoid using the meter in wet environments or in the presence of explosive gases or dust.
- Always disconnect power to the circuit before connecting or disconnecting test leads, especially for current measurements.
3.製品オーバーview
The Meco 2250-HZ Auto Digital Clamp Meter features a robust design for reliable performance. Familiarize yourself with the components shown below.
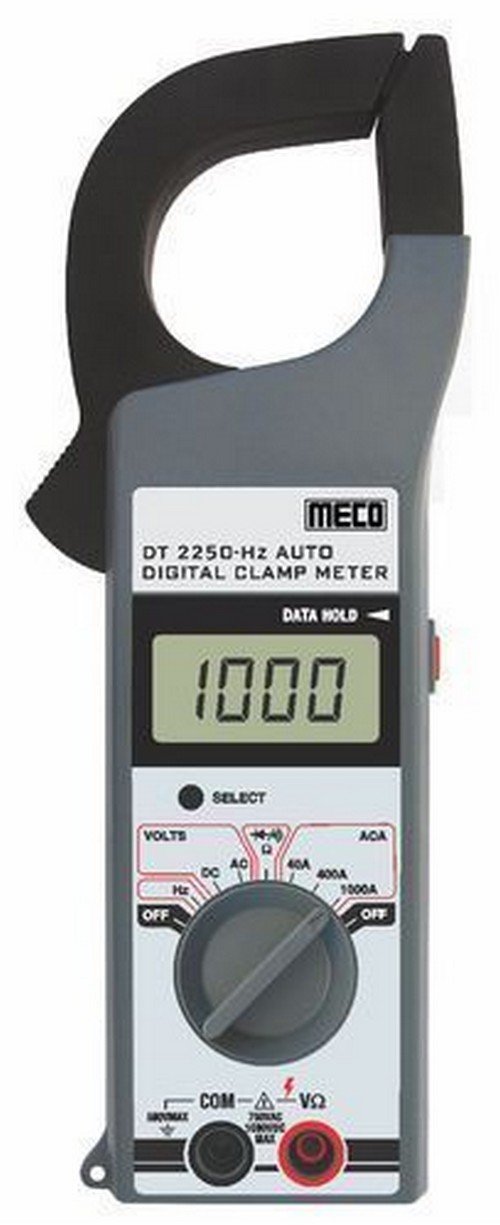
図1: フロント view of the Meco 2250-HZ Auto Digital Clamp Meter. This image displays the clamp jaw at the top, the LCD screen showing '1000', the function dial, and the input terminals at the bottom. The 'SELECT' and 'DATA HOLD' buttons are visible next to the display.
主要コンポーネント:
- Clamp あご: 非接触AC電流測定に使用します。
- LCDディスプレイ: 3¾ digit liquid crystal display with a maximum reading of 3999. Shows measurement values, polarity, overrange indication (OL or -OL), and low battery indication.
- 機能ダイヤル: Rotary switch to select measurement functions (OFF, Volts DC/AC, Hz, ACA 40A/400A/1000A).
- 選択ボタン: Used to switch between DC and AC voltage modes, or other sub-functions within a dial setting.
- データホールドボタン: ディスプレイの現在の読み取り値を固定します。もう一度押すと解除されます。
- Input Terminals (COM, VΩ): ボリューム用テストリード接続用tage、抵抗、導通、およびダイオードの測定。
4. セットアップ
4.1 バッテリーの取り付け
The Meco 2250-HZ Auto Digital Clamp Meter requires batteries for operation. Batteries are not included with the product. To install or replace batteries:
- メーターがオフになっていることを確認してください。
- メーターの背面にある電池ボックスを見つけます。
- ドライバーを使用して電池ボックスのカバーを開きます。
- 正しい極性 (+ と -) に注意して必要な電池を挿入します。
- 電池カバーを取り付けて、ネジで固定します。
A low battery indication will appear on the display when the battery voltage is low, signaling the need for replacement.
5. 操作手順
5.1 一般的な操作
- Turn the function dial to the desired measurement setting.
- Connect test leads to the appropriate input terminals (COM and VΩ) for voltage, resistance, continuity, or diode tests.
- For current measurements, use the clamp jaw around a single conductor.
- を押す 選択 button to toggle between AC/DC modes or other sub-functions if available for the selected range.
- を押す データ保持 ボタンを押すと、ディスプレイの現在の表示が固定されます。もう一度押すと解除されます。
5.2 AC/DC ボリュームtag測定
- Set the function dial to the "VOLTS" position.
- Connect the black test lead to the COM terminal and the red test lead to the VΩ terminal.
- を押す 選択 ACまたはDCのボリュームを選択するボタンtage measurement. The display will indicate "AC" or "DC".
- テスト リード線をテスト対象の回路またはコンポーネントに並列に接続します。
- 巻を読むtagLCDディスプレイのe値。
5.3 交流電流測定(Clamp)
- Set the function dial to the desired AC current range (40A, 400A, or 1000A).
- clを開くamp トリガーを押すと顎が動きます。
- 回路の導体の1つだけをcl内に囲みますamp ジョーが完全に閉じていることを確認してください。
- LCD ディスプレイで AC 電流値を読み取ります。
5.4 周波数(Hz)測定
- ファンクションダイヤルを「Hz」の位置に設定します。
- Connect the black test lead to the COM terminal and the red test lead to the VΩ terminal.
- Connect the test leads in parallel to the circuit where frequency needs to be measured.
- LCD ディスプレイで周波数値をヘルツ (Hz) 単位で読み取ります。
5.5 Audible Continuity Check
- Set the function dial to the continuity/diode symbol (often shared with resistance).
- Connect the black test lead to the COM terminal and the red test lead to the VΩ terminal.
- Touch the test probes across the component or circuit to be tested.
- 導通が存在する場合(抵抗が低い場合)、メーターからビープ音が鳴ります。
5.6ダイオードテスト
- Set the function dial to the continuity/diode symbol.
- Connect the black test lead to the COM terminal and the red test lead to the VΩ terminal.
- Connect the red test lead to the anode of the diode and the black test lead to the cathode. The display will show the forward voltageドロップ。
- Reverse the test leads. The display should show "OL" (overload) for a good diode.
6. メンテナンス
6.1 クリーニング
メーターのcを拭くasin広告付きgamp cloth and a mild detergent. Do not use abrasives or solvents. Keep the display clean and dry.
6.2 電池の交換
Refer to Section 4.1 for battery installation and replacement instructions. Replace batteries promptly when the low battery indicator appears to ensure accurate readings.
7。 トラブルシューティング
| 問題 | 考えられる原因 | 解決 |
|---|---|---|
| メーターの電源が入りません。 | 電池が切れているか、正しく取り付けられていない。 | 電池の極性を確認し、必要に応じて電池を交換してください。 |
| "OL" or "-OL" displayed. | Overrange condition; measurement exceeds meter's range. | より高い範囲を選択するか、測定値がメーターの能力内であることを確認してください。 |
| 不正確な測定値。 | Low battery, poor test lead connection, or incorrect function selection. | Replace batteries, ensure secure connections, verify function dial setting. |
| No audible beep during continuity test. | 開回路または高抵抗。 | Verify the circuit is closed and resistance is low enough for continuity. |
8. 仕様
| 特徴 | 詳細 |
|---|---|
| 画面 | 3¾ digit LCD, max reading 3999 |
| 極性 | Automatic, negative polarity indication |
| オーバーレンジ表示 | "OL" or "-OL" displayed |
| ゼロ調整 | 自動 |
| バッテリー寿命 | 典型的な200時間 |
| オーバーVoltag保護 | 200V DC and AC Peak |
| Audible Continuity Check | はい |
| ダイオード試験 | はい |
| 低バッテリー表示 | はい |
| アイテム重量 | 600 g (1.32 ポンド) |
| 製品寸法 | 21 x 13 x 6 cm |
| 材料 | プラスチック |
| メーカー | Meco Instruments |
9. 保証とサポート
For warranty information or technical support, please contact the retailer or the manufacturer, Meco Instruments, directly. Keep your purchase receipt as proof of purchase.
