
導入
ご購入ありがとうございますasing the STOGA Ubox STV040 Dual Lens Car DVR Camera. This manual provides detailed instructions for the proper installation, operation, and maintenance of your device. Please read this manual thoroughly before using the product to ensure optimal performance and safety.
パッケージ内容
開封後はパッケージの内容をご確認ください。不足品や破損品がございましたら、販売店までご連絡ください。
- 1 x STOGA Ubox STV040 Car DVR Camera
- カーチャージャー x 1
- 1 x Car Mount
- 1 x External GPS Module
- ユーザーマニュアル x 1
製品終了view
Familiarize yourself with the components and features of your STOGA Ubox STV040 Car DVR Camera.

図1: フロント view of the DVR camera with the display screen active.

図2: フロント view detailing the dual wide-angle lenses and surrounding controls.
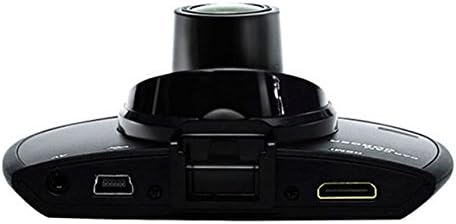
図3: トップ view illustrating the connectivity ports (HDMI, USB, AV).
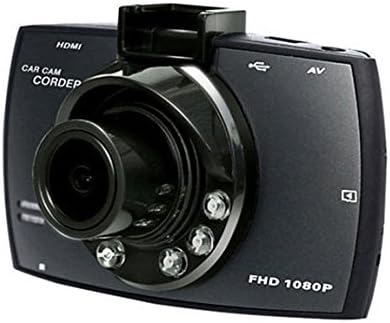
図4: Angled perspective of the DVR camera, showing its compact design.
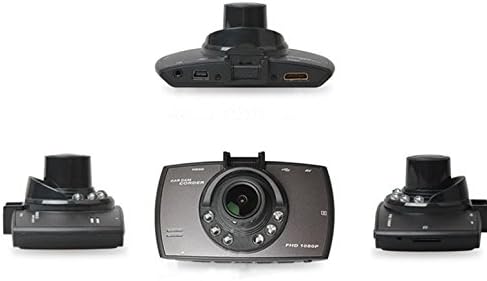
図5: 包括的な view of the DVR camera from various angles.
設定
1. Micro SDカードの取り付け
Insert a Micro SD card (Class 6 or higher, 4GB-32GB) into the designated slot on the DVR camera. Ensure the card is inserted correctly until it clicks into place. The device supports continuous loop recording and emergency event recording.
2.カメラの取り付け
- Attach the car mount to the windshield in a position that does not obstruct your view.
- Securely attach the DVR camera to the car mount.
- Adjust the camera angle to ensure both lenses capture the desired view (front and interior/side). The dual lenses are 180-degree rotatable.
3. 電源接続
Connect the car charger to the DVR camera's power input and plug the other end into your vehicle's 12V power outlet (cigarette lighter socket). The camera will typically power on automatically when the vehicle starts and power off when the vehicle is turned off.
4. GPSモジュールの接続(オプション)
Connect the external GPS module to the designated GPS port on the DVR camera. This enables GPS logging, recording location data along with video footage.
操作手順
電源オン/オフ
- 自動: The camera powers on and starts recording automatically when the car engine starts. It powers off automatically when the engine is turned off.
- マニュアル: 電源ボタンを長押しして、デバイスの電源を手動でオンまたはオフにします。
記録モード
- ループ録音: The camera continuously records video in segments. When the memory card is full, it automatically overwrites the oldest unlocked footage.
- 緊急録画(Gセンサー): The built-in G-Sensor detects sudden impacts or collisions. In such an event, the current video segment is automatically locked and protected from being overwritten.
メニューナビゲーション
Use the control buttons located on the device to navigate through the menu options on the 2.0" TFT LCD screen. Adjust settings such as video resolution, date/time stamp, language (English, Chinese, Japanese, Russian), and G-Sensor sensitivity.
再生
- 現在アクティブな場合は録画を停止します。
- Enter playback mode via the menu.
- 目的のビデオを選択します file for playback on the device screen.
- Alternatively, remove the Micro SD card and insert it into a computer to view files.
パスワード保護
The device supports password protection to prevent unauthorized access to recordings. Refer to the on-screen menu for setting up and managing this feature.
メンテナンス
- クリーニング: Use a soft, dry cloth to clean the camera lenses and screen. Avoid abrasive cleaners or solvents.
- マイクロSDカード: Format the Micro SD card regularly (e.g., once a month) to ensure optimal performance and prevent data corruption. Back up important file■フォーマットする前。
- 温度: デバイスを極端な温度、長時間の直射日光、高湿度にさらさないでください。
- ファームウェアの更新: メーカーの webパフォーマンスの向上や機能の追加のために、利用可能なファームウェア アップデートを定期的にサイトから確認してください。
トラブルシューティング
| 問題 | 考えられる原因 / 解決策 |
|---|---|
| カメラの電源が入りません。 |
|
| 録画が突然停止します。 |
|
| ビデオ品質が低い。 |
|
| GPSが機能しません。 |
|
| バッテリーが充電されません。 |
|
仕様
| 特徴 | 詳細 |
|---|---|
| モデル番号 | Ubox STV040 |
| 画面 | 2.0" TFT LCD (960 x 240 pixels) |
| レンズ | Dual 140-degree A+ wide-angle, 180-degree rotatable |
| センサー | シーモス |
| ビデオ解像度 | 1280 x 480 @ 30 fps, 640 x 480 @ 30 fps |
| ビデオフォーマット | 動画 |
| 画像フォーマット | M-JPG |
| ナイトビジョン | 赤外線ナイトビジョン機能 |
| ストレージ | Micro TF (SD HC) card, 4GB-32GB, Class 6 and above |
| GPS | Supports external GPS module |
| Gセンサー | Integrated, supports emergency event recording lock |
| マイク/スピーカー | 統合された |
| 出力 | CVBS (Video Output) |
| バッテリー | 3.7V 700mA Lithium-Polymer battery |
| オペレーティングシステムの互換性 | Windows 2000/XP/Vista/Windows 7 |
| サポートされている言語 | English, Chinese, Japanese, Russian |
保証とサポート
保証情報およびテクニカルサポートについては、ご購入時に付属の説明書をご参照いただくか、販売店にお問い合わせください。保証請求の際は、購入証明としてレシートを保管してください。
For further assistance, you may also visit the official STOGA webサイト(利用可能な場合)を参照するか、カスタマー サービス部門にお問い合わせください。