

1. はじめに
The Lowrance Outboard Autopilot System (Model 000-11749-001) is designed to provide automatic steering for cable-steer outboard motors on vessels up to 30 feet in length. This system integrates with Lowrance High Definition System (HDS) displays, enabling precise course control, waypoint navigation, and route following. It allows users to maintain a constant heading or execute specific turn patterns, freeing them to focus on other activities while on the water.
The system includes the NAC-1 computer, a helm drive unit, a Point-1 GPS/Compass, and an Auto/Standby switch, all designed for seamless integration via NMEA 2000. It supports Lowrance SmartSteer control, allowing easy switching between electric-steer trolling motor control and outboard motor control directly from your HDS display. Additionally, trails can be converted to routes for retracing previous paths.
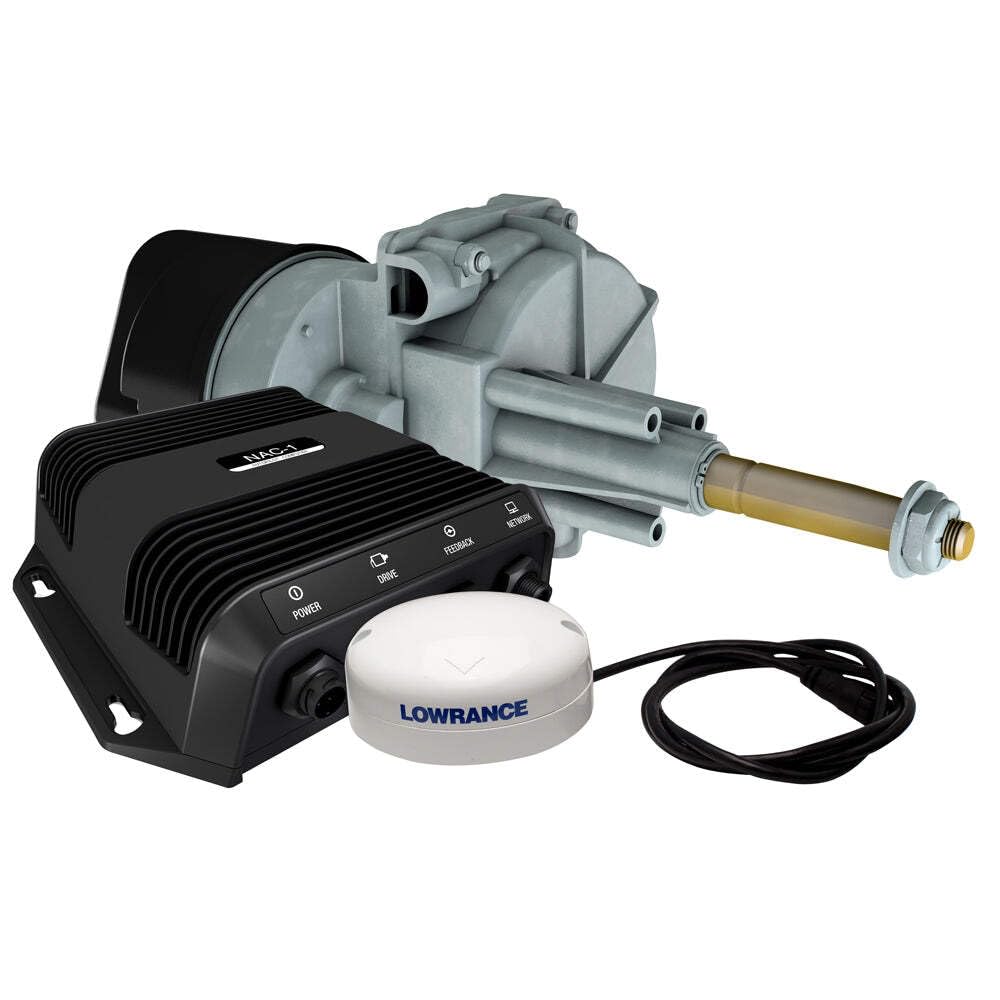
Figure 1: Main components of the Lowrance Outboard Autopilot System.
2. 安全情報
Read all instructions carefully before installation and operation. Failure to follow these instructions may result in product malfunction, property damage, or personal injury.
- Always maintain situational awareness: The autopilot system is an aid to navigation and does not replace the need for constant vigilance.
- 可動部分には近づかないでください: Ensure hands, clothing, and other objects are clear of the helm drive unit during operation.
- 電気安全: Disconnect power before performing any installation or maintenance. Ensure all wiring is correctly connected and protected from the marine environment.
- 専門家による設置を推奨します: インストール手順のいずれかの部分について不明な点がある場合は、資格のある海洋電子技術者にご相談ください。
- 現地の規制を確認してください: Adhere to all local and national boating safety regulations.
3. パッケージ内容
以下にリストされているすべてのアイテムがパッケージに含まれていることを確認してください。
- NAC-1 Autopilot Computer
- Helm Drive Unit (for cable-steer outboards)
- Point-1 GPS/Compass Module
- Auto/Standby Switch
- NMEA 2000 Starter Kit (includes power cable, T-connectors, terminators, drop cables)
- 取り付け金具
- ドキュメント(このマニュアル、クイックスタートガイド)
4. セットアップとインストール
This section outlines the general steps for installing the Lowrance Outboard Autopilot System. Refer to the detailed installation guide included with your product for specific diagrams and instructions.
4.1 インストールの計画
Before beginning, plan the routing of all cables and the mounting locations for each component. Ensure adequate space and access for maintenance.
- NAC-1 Computer: Mount in a dry, protected area, accessible for wiring.
- Helm Drive Unit: Install near the helm, ensuring it aligns correctly with the existing steering cable system. This may require modifications to your steering system.
- Point-1 GPS/Compass: 障害物のない場所に設置してください view of the sky, away from magnetic interference (e.g., speakers, large metal objects).
- Auto/Standby Switch: Install in a convenient location at the helm.
4.2 コンポーネントのインストール
- Mount the Helm Drive Unit: Securely attach the helm drive unit to the steering system according to the specific instructions for your boat's cable steering mechanism. Ensure smooth operation of the steering cable through the unit.
- Install the NAC-1 Computer: Mount the NAC-1 computer using the provided hardware. Connect the helm drive unit cable to the NAC-1.
- Mount the Point-1 GPS/Compass: Secure the Point-1 module. Connect its NMEA 2000 cable.
- Install the Auto/Standby Switch: Mount the switch and connect its cable to the NAC-1 computer.
4.3 NMEA 2000 Network Connection
The system communicates via an NMEA 2000 network. If you do not have an existing NMEA 2000 network, use the provided starter kit to build one.
- Connect the NAC-1 computer, Point-1 GPS/Compass, and your Lowrance HDS display to the NMEA 2000 backbone using T-connectors and drop cables.
- Ensure the network is properly terminated at both ends with NMEA 2000 terminators.
- Connect the NMEA 2000 power cable to a 12V DC power source, ensuring it is fused appropriately.

Figure 2: Lowrance HDS display integrated with the autopilot system.
4.4 初期電源投入とキャリブレーション
After installation, power on your HDS display and the autopilot system. Follow the on-screen prompts on your HDS display to calibrate the autopilot. This typically involves a compass calibration and a rudder response test.
5. 操作手順
The Lowrance Outboard Autopilot System is controlled primarily through your Lowrance HDS display using the SmartSteer interface.
5.1 Engaging and Disengaging Autopilot
- 従事する: Press the "Auto" button on the Auto/Standby switch or select "Auto" from the SmartSteer menu on your HDS display. The system will attempt to hold the current heading.
- 解除: Press the "Standby" button on the Auto/Standby switch, manually steer the boat, or select "Standby" from the SmartSteer menu.
5.2 Steering Modes
The autopilot offers several steering modes:
- ヘディングホールド: Maintains a constant magnetic or true heading. Adjust the heading using the HDS display controls.
- ウェイポイントナビゲーション: Steers the vessel directly to a selected waypoint.
- ルートの追跡: Follows a pre-defined route consisting of multiple waypoints.
- Turn Patterns: Executes pre-programmed turn patterns (e.g., U-turn, spiral) for fishing or search operations.

Figure 3: Detailed chart view on a Lowrance display, showing navigation capabilities.
5.3 SmartSteer Interface
The SmartSteer interface on your HDS display allows you to:
- Select between outboard motor control and compatible electric-steer trolling motor control (e.g., MotorGuide Xi5 Pinpoint).
- Adjust autopilot settings and parameters.
- Convert recorded trails into navigable routes.
6. メンテナンス
Regular maintenance ensures the longevity and reliable operation of your autopilot system.
- ケーブルと接続を検査します。 Periodically check all NMEA 2000 cables and power connections for corrosion, wear, or damage. Ensure all connections are secure.
- コンポーネントをクリーンにします: Wipe down the NAC-1 computer, Point-1 GPS/Compass, and Auto/Standby switch with a damp 布。刺激の強い化学物質は避けてください。
- Helm Drive Unit: Inspect the helm drive unit for any signs of wear on moving parts. Ensure the steering cable moves freely. Lubricate as recommended by your steering system manufacturer.
- ソフトウェアアップデート: ローランスをチェック website periodically for software updates for your HDS display and autopilot components. Keeping software up-to-date can improve performance and add new features.
7。 トラブルシューティング
This section addresses common issues. For more complex problems, contact Lowrance customer support.
| 問題 | 考えられる原因 | 解決 |
|---|---|---|
| Autopilot does not engage. | No power to NAC-1; NMEA 2000 network issue; HDS not recognizing autopilot. | Check power connections to NAC-1 and NMEA 2000 network. Verify NMEA 2000 terminators are in place. Ensure HDS display is updated and configured to recognize the autopilot. |
| Poor steering performance or erratic course holding. | Improper calibration; magnetic interference near Point-1; mechanical issue with helm drive or steering cable. | Perform a full autopilot calibration (compass and rudder response). Relocate Point-1 GPS/Compass away from interference. Inspect helm drive and steering cable for obstructions or damage. |
| HDS display does not show SmartSteer options. | Software not updated; NMEA 2000 communication error; autopilot not detected. | Ensure your HDS display has the latest software. Check NMEA 2000 connections. Verify the NAC-1 computer is powered on and recognized by the network. |
8. 仕様
| 特徴 | 詳細 |
|---|---|
| モデル番号 | 000-11749-001 |
| ブランド | ローランス |
| 互換性 | Lowrance HDS Gen2, HDS Gen2 Touch displays |
| 船型 | Single outboard, cable-steer vessels up to 30 feet |
| 含まれているコンポーネント | NAC-1 computer, Helm Drive, Point-1 GPS/Compass, Auto/Standby switch |
| ネットワーク·インタフェース | NMEA2000 |
| 巻tage | 12 ボルト (DC) |
| アイテム重量 | 2 Pounds (approximate, for main unit) |
| 製品寸法 | 8 x 7.1 x 2インチ(約、本体) |
| 材料 | Aluminum (for certain components) |
9.保証とサポート
9.1 保証情報
Lowrance products are covered by a limited warranty. For specific warranty terms and conditions, please refer to the warranty card included with your product or visit the official Lowrance webサイトでご確認ください。保証請求に備えて購入証明書を保管してください。
9.2 カスタマーサポート
For technical assistance, troubleshooting beyond this manual, or warranty service, please contact Lowrance customer support:
- Webサイト: 訪問 www.lowrance.com/support FAQ、ソフトウェアのダウンロード、連絡先情報については、こちらをご覧ください。
- 電話: ローランスを参照 web地域サポートの電話番号のサイト。