
1. はじめに
ご購入ありがとうございますasing the Fonestar AS-170RU Hi-Fi Amplifier. This device is designed to provide high-fidelity stereo audio amplification, featuring a built-in USB/MP3 player, AM/FM digital tuner, and multiple audio inputs. This manual provides detailed instructions for safe installation, operation, and maintenance of your ampご使用前にこのマニュアルをよくお読みになり、今後の参考のために保管してください。
2. 安全に関する注意事項
- 電源: 確実に amplifier is connected to a power supply matching the voltage specified on the unit. Disconnect the power cord from the outlet if the unit will not be used for an extended period.
- 換気: 通気口を塞がないでください。過熱を防ぐため、適切な空気の流れを確保するために、ユニットの周囲に十分なスペースを確保してください。
- 水と湿気: 本製品を雨、湿気、または液体の滴りや飛び散りにさらさないでください。花瓶など、液体の入った物を本製品の上に置かないでください。
- 熱源: ユニットをラジエーター、暖房口、ストーブ、その他の機器(電気を含む)などの熱源から遠ざけてください。 amp熱を発生する装置。
- クリーニング: 乾いた布でのみ拭いてください。 液体クリーナーやエアロゾルクリーナーは使用しないでください。
- サービス: この製品を自分で修理しようとしないでください。 すべてのサービスを資格のあるサービス担当者に依頼してください。
- 配置: 安定した平らな面に設置してください。直射日光や強い磁場の近くに置かないでください。
3. パッケージ内容
パッケージに以下のアイテムが含まれていることを確認してください。
- Fonestar AS-170RU Hi-Fi Ampリファイアー
- リモートコントロール
- AMアンテナ
- FMアンテナ
- ユーザーマニュアル(このドキュメント)
4.製品オーバーview
4.1フロントパネル
The front panel provides access to essential controls and the display.
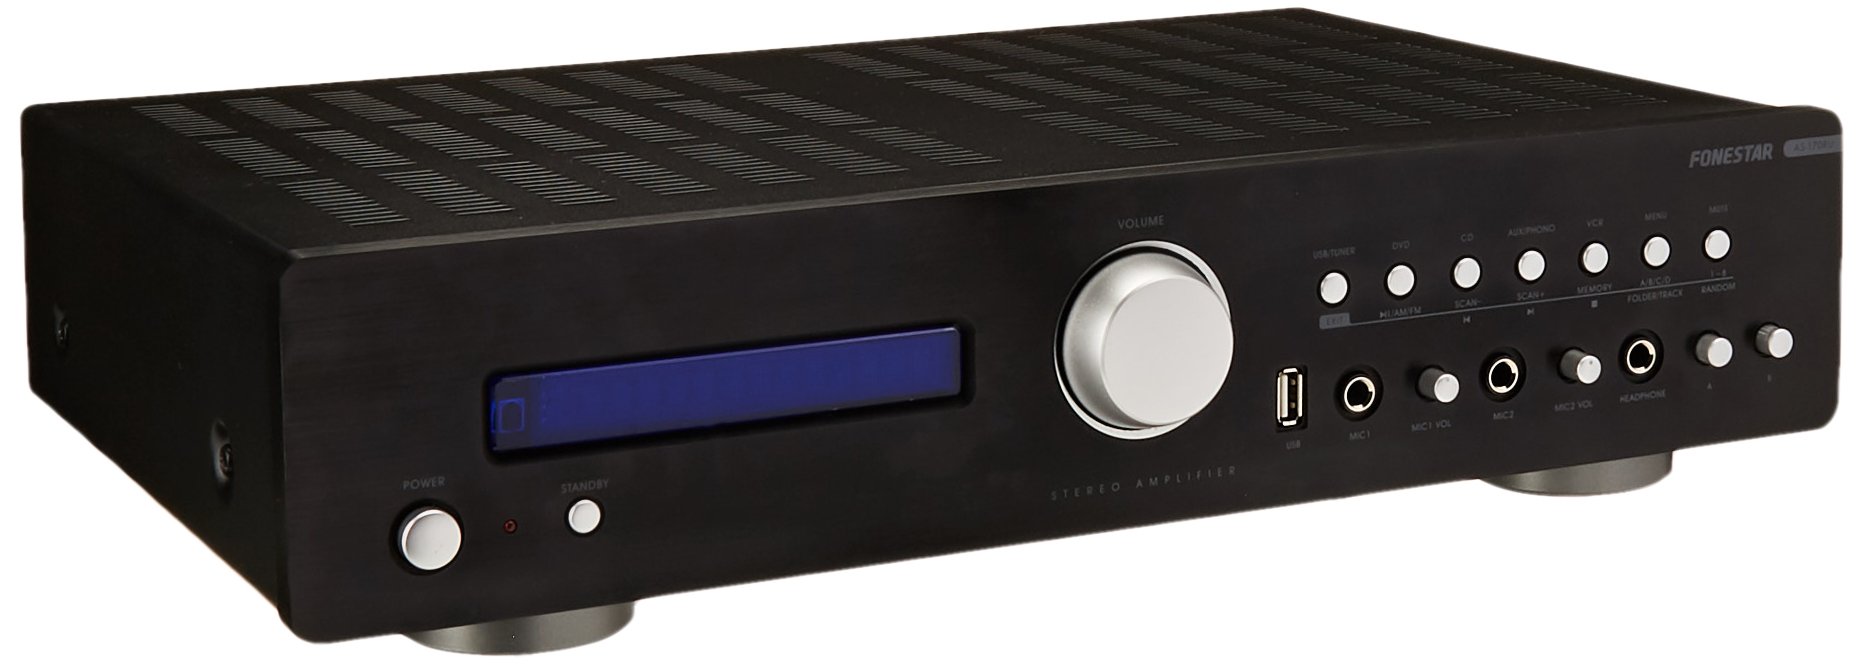
Image: Fonestar AS-170RU Front Panel. この画像は正面を示しています view の amplifier, showing the VFD display, USB port, headphone output, input selectors, volume knob, and other control buttons.
- 電源ボタン: 回転する ampリファイアのオンまたはオフ。
- VFDディスプレイ: Shows current input, volume level, tuner information (frequency, RDS), and USB/MP3 track details (ID3 tag).
- USBポート: For connecting USB storage devices to play MP3 files.
- ヘッドフォン出力: ヘッドホン接続用6.3mmジャック。
- 入力セレクター: Buttons for choosing audio sources (CD, DVD, VCR, AUX/Phono, USB/Tuner).
- 音量コントロール: Rotary knob to adjust the master volume level.
- マイク入力: Two 6.3mm microphone jacks with independent volume control.
- トーンコントロール: Buttons or menu options for adjusting Bass, Treble, and Balance.
4.2 背面パネル
The rear panel contains all the necessary connections for your audio sources, speakers, and antennas.

Image: Fonestar AS-170RU Rear Panel. This image illustrates the rear connections of the amplifier, including speaker terminals (A/B), various RCA input jacks (CD, DVD, VCR, AUX/Phono), REC OUT, PRE OUT, AMP IN, and antenna connections (FM COAX, AM LOOP ANT).
- スピーカー出力(A/B): Terminals for connecting two pairs of speakers. Supports 4-16 ohms for A or B, or 8-16 ohms for A+B.
- オーディオ入力(RCA):
- CD入力: CDプレーヤーを接続します。
- DVD Input: For connecting a DVD player or other audio source.
- VCR Input: For connecting a VCR or other audio source.
- AUX/PHONO Input: For connecting auxiliary devices or a turntable (Phono input may require a pre-amplifier if your turntable does not have one built-in).
- REC OUT: 録音機器に接続するための RCA 出力。
- プリアウト: 外部電源に接続するためのRCA出力 amplifier。
- AMP で: RCA input for connecting an external pre-amplifier。
- アンテナ接続:
- FM COAX 75Ω: FMアンテナを接続します。
- AM LOOP ANT: For connecting the supplied AM loop antenna.
4.3リモコン
The included remote control allows convenient operation of the amp遠くからでも見えます。

Image: Fonestar AS-170RU Remote Control. This image shows the remote control unit with various buttons for power, input selection, volume, mute, tuner functions, USB playback controls, and tone adjustments.
- 待機する: 電源のオン/オフ。
- 入力セレクター: Buttons for CD, DVD, VCR, AUX/PHONO, USB/TUNER.
- 音量アップ/ダウン(VOL +/-): マスターボリュームを調整します。
- ミュート: オーディオ出力を無音にします。
- AM / FM: Switches between AM and FM tuner modes.
- スキャン: Scans for radio stations.
- MEMORY: ラジオ局のプリセットを保存します。
- USB Playback Controls: Play/Pause, Stop, Skip Track, Folder/Track navigation.
- EQ OFF / BASS / TREBLE: Access tone controls.
- RDS / ID3: Displays RDS information for radio or ID3 tag MP3用 files.
5. セットアップ
5.1スピーカーの接続
- 確実に amp充電器の電源を切り、コンセントからプラグを抜きます。
- Connect your speakers to the "SPEAKERS OUTPUT" terminals on the rear panel.
- プラス(+)端子を amplifier (red) to the positive (+) terminal of your speaker, and the negative (-) terminal (black) to the negative (-) terminal.
- The AS-170RU supports two groups of speakers (A and B). You can connect one pair to "SPEAKERS A" and another to "SPEAKERS B".
- スピーカーのインピーダンスが amplifier's specifications: 4-16 ohms for A or B, or 8-16 ohms for A+B.
5.2 オーディオソースの接続
Use RCA cables to connect your audio components to the corresponding input jacks on the rear panel.
- CDプレーヤー: 「CD」入力に接続します。
- DVDプレーヤー: Connect to the "DVD" input.
- VCR: Connect to the "VCR" input.
- Auxiliary Device (e.g., smartphone, tablet): Connect to the "AUX/PHONO" input.
- ターンテーブル: Connect to the "AUX/PHONO" input. If your turntable does not have a built-in pre-amplifier, you may need an external phono pre-amplifier。
5.3 接続アンテナ
- FMアンテナ: Connect the supplied FM wire antenna to the "FM COAX 75Ω" terminal. Extend the wire for optimal reception.
- AMアンテナ: Connect the supplied AM loop antenna to the "AM LOOP ANT" terminals. Position the loop for best reception.
5.4電源接続
すべてのオーディオとスピーカーの接続が完了したら、 amplifier's power cord into a suitable AC power outlet.
6. 操作手順
6.1 基本操作
- 電源オン/オフ: Press the Power button on the front panel or the STANDBY button on the remote control to turn the ampリファイアのオンまたはオフ。
- 入力ソースを選択します: Press the desired input selector button on the front panel (CD, DVD, VCR, AUX/PHONO) or the remote control (CD, DVD, VCR, AUX/PHONO, USB/TUNER).
- 音量を調整: 音量レベルを調整するには、前面パネルの音量ノブを回すか、リモコンの VOL +/- ボタンを使用します。
- ミュート: Press the MUTE button on the remote control to temporarily silence the audio. Press it again to restore sound.
6.2 USB/MP3再生
- Insert a USB storage device (flash drive) into the USB port on the front panel.
- Select "USB/TUNER" as the input source. The amplifierは自動的にMP3を検出し、再生を開始します files.
- Use the playback controls on the remote control (Play/Pause, Stop, Skip Track, Folder/Track) to navigate and control your music.
- The VFD display will show track information, including ID3 tags 利用可能な場合。
- の amplifier supports up to 65,000 indexable folders and files, with a maximum of 8 folder levels.
6.3 AM/FMチューナーの操作
- Select "USB/TUNER" as the input source, then press the AM/FM button on the remote control to switch between AM and FM bands.
- 自動スキャン: Press the SCAN button on the remote control to automatically search for and store available radio stations.
- 手動チューニング: Use the tuning buttons (usually arrow keys) on the remote control to manually adjust the frequency.
- プリセットステーション: の amplifier supports 64 presets. Use the MEMORY button to store and recall your favorite stations.
- RDS関数: If available, press the RDS button on the remote control to display Radio Data System information (e.g., station name, program type).
6.4つのマイク入力
- Connect microphones to the 6.3mm MIC 1 and MIC 2 jacks on the front panel.
- Adjust the independent volume controls for each microphone to achieve the desired level.
6.5 Tone and Balance Control
の amplifier allows adjustment of bass, treble, and balance through its menu system or dedicated buttons on the remote control. Refer to the remote control section for specific buttons like EQ OFF, BASS, TREBLE.
7. メンテナンス
- クリーニング: 清掃する前に電源を切ってください。外装面は柔らかく乾いた布で拭いてください。研磨剤入りの洗剤、ワックス、溶剤は使用しないでください。
- 換気: 通気口にほこりやごみが詰まっていないか定期的に確認してください。
- ストレージ: ユニットを長期間保管する場合は、電源コンセントから抜き、直射日光や極端な温度を避け、涼しく乾燥した場所に保管してください。
8。 トラブルシューティング
問題が発生した場合は、 amp問題がある場合は、考えられる解決策については次の表を参照してください。
| 問題 | 考えられる原因 | 解決 |
|---|---|---|
| 電源なし | 電源コードが接続されていない、電源コンセントに障害がある、 Ampスタンバイモードのライファイア。 | Ensure power cord is securely plugged in. Test the outlet with another device. Press the Power/STANDBY button. |
| 音が出ない | 間違った入力が選択されています。音量が低すぎます。スピーカーが正しく接続されていません。ミュート機能が有効です。 | Select the correct input source. Increase volume. Check speaker connections. Deactivate MUTE. |
| ラジオの受信状態が悪い | アンテナが接続されていないか、位置が適切ではありません。干渉が発生します。 | Connect and adjust the position of the AM/FM antennas. Move the amp他の電子機器から離して置いてください。 |
| USB再生が機能しない | USB device not inserted correctly; Incompatible file format; USB device faulty. | USBデバイスが完全に挿入されていることを確認してください。 fileはMP3形式です。別のUSBデバイスをお試しください。 |
| Amplifier turns off unexpectedly or cycles power | Overheating; Short circuit in speaker wiring; Internal fault. | Ensure adequate ventilation. Check speaker wires for frayed strands causing short circuits. If the problem persists, disconnect power and contact qualified service personnel. |
9. 仕様
- モデル: AS-170RU
- 出力: 80 + 80 W RMS at 4 Ω
- スピーカーインピーダンス: 4-16 Ω (A or B), 8-16 Ω (A+B)
- 保護: 3 circuits (short circuits, overload, overvoltage)
- USBプレーヤー: MP3 file 再生、ID3 tag support. Max 65,000 indexable folders/files, max 8 folder levels.
- チューナー: Digital AM/FM, 64 presets, RDS.
- 入力: 2 x Microphone (6.3mm), 4 x RCA (CD, DVD, VCR, AUX/Phono), 1 x RCA (AMP の)。
- 出力: 1 x RCA (REC OUT), 1 x RCA (PRE OUT), Headphone (6.3mm).
- 画面: Blue VFD.
- トーンコントロール: Bass, Treble, Balance (via menu/remote).
- 寸法: 40 x 40 x 60 cm(約15.7 x 15.7 x 23.6インチ)
- 重さ: 7.2 kg(約15.87ポンド)
10. 保証とサポート
For warranty information and technical support, please refer to the warranty card included with your product or contact your authorized Fonestar dealer. Do not attempt to repair the unit yourself, as this may void your warranty.