
1. はじめに
Thank you for choosing the Fonestar AS-24U Hi-Fi USB/SD/MP3 Ampライファイア。このマニュアルには、本製品を安全かつ効率的に操作するための重要な情報が記載されています。ご使用前に必ずお読みいただき、今後の参考のために保管してください。
2. 安全に関する注意事項
- 電源: 確実に ampライファイアは指定された電圧に一致する電源に接続されているtage(230V)。
- 換気: 通気口を塞がないでください。過熱を防ぐため、適切な空気の流れを確保するために、ユニットの周囲に十分なスペースを確保してください。
- 水分: 保管してください amplifier away from water, moisture, and high humidity environments. Do not expose it to dripping or splashing.
- 熱源: ラジエーター、暖房送風口、ストーブ、その他の熱を発生する器具などの熱源の近くにユニットを置かないでください。
- クリーニング: 清掃する前に電源コードを抜いてください。乾いた柔らかい布を使用してください。液体洗剤やエアゾール洗剤は使用しないでください。
- サービス: この製品を自分で修理しようとしないでください。 すべてのサービスを資格のあるサービス担当者に依頼してください。
- 物体/液体の侵入: 危険な電圧に触れる可能性があるため、開口部から本製品にいかなる物も押し込まないでください。tag故障やショートの原因となる箇所があります。
3.製品オーバーview
3.1フロントパネル
The front panel features controls for power, input selection, volume adjustment, and USB/SD media playback. It also includes a display for media information.
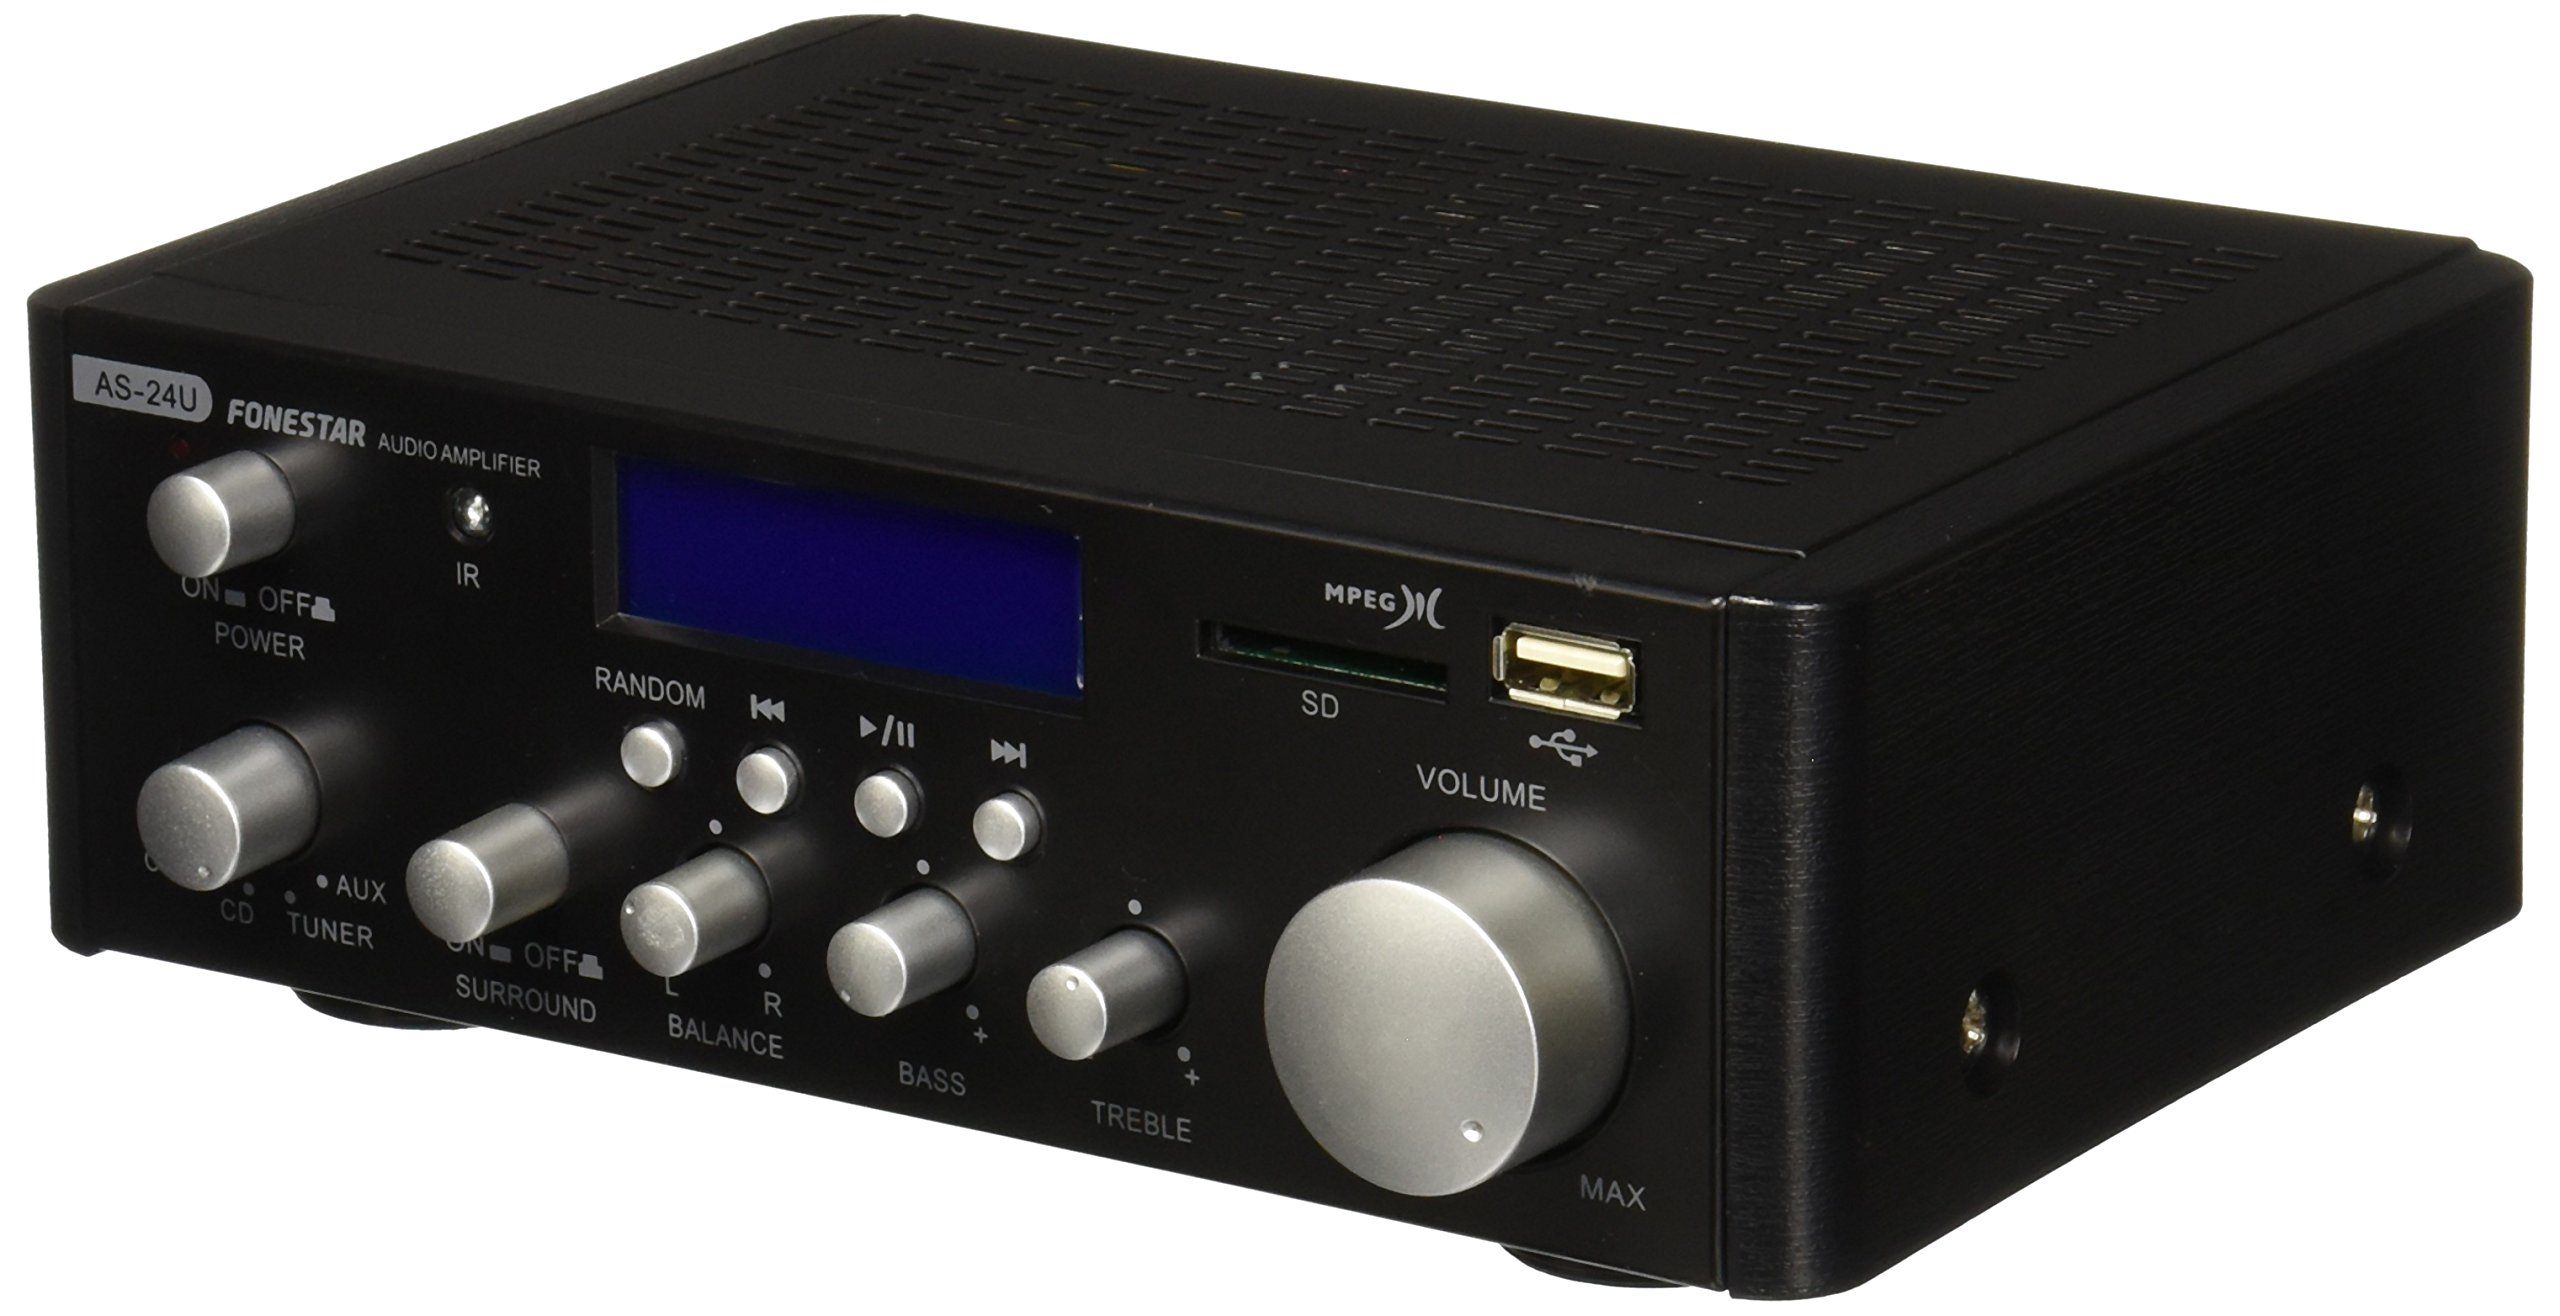
画像1:正面 view of the Fonestar AS-24U amplifier, showing the main controls and display.
3.2 背面パネル
The rear panel provides all necessary connections for audio input sources, speaker outputs, and power.

画像2:リア view of the Fonestar AS-24U amplifier, detailing input/output ports and power connection.
- INPUT (AUX, TUNER, CD): RCA stereo inputs for connecting external audio sources.
- SPEAKER OUT (STEREO): Spring clip terminals for connecting passive speakers (4-8 Ω).
- SPEAKER OUT (SURROUND): Additional spring clip terminals for surround speakers (8 Ω).
- 電源入力: AC power input for the main power cable.
- 巻TAGEセレクター: Switch for selecting between 115V and 230V power input. Ensure this is set correctly for your region.
3.3リモコン
付属のリモコンで簡単に操作できます。 amplifier's media playback functions.
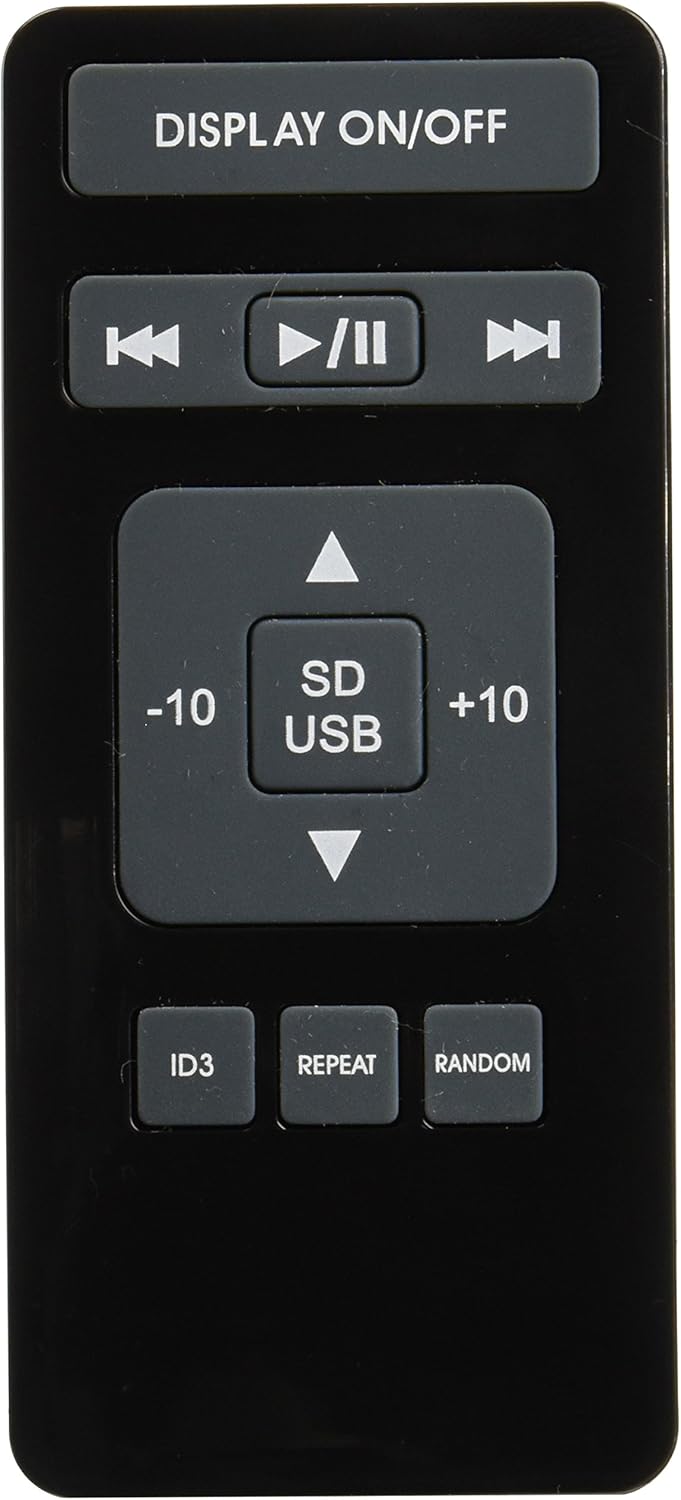
Image 3: Remote control for the Fonestar AS-24U amplifier, showing buttons for media playback and display control.
- ディスプレイのオン/オフ: Toggles the front panel display.
- 再生/一時停止、前へ/次へ: Controls for media playback.
- SD / USB: Selects between SD card and USB drive as the media source.
- -10/+10: Skips tracks by 10.
- ID3: Displays ID3 tag MP3 の情報 files.
- 繰り返す: 繰り返しモードを切り替えます (例: 1 つ繰り返し、すべて繰り返し)。
- ランダム: Toggles random playback.
4. セットアップ
4.1スピーカーの接続
- 確実に amp充電器の電源がオフになっており、プラグが抜かれています。
- Connect your passive speakers to the SPEAKER OUT terminals on the rear panel.
- プラス(+)端子を amplifier to the positive (+) terminal on your speaker, and the negative (-) to the negative (-).
- For stereo speakers, use the 4-8 Ω terminals. For surround speakers, use the 8 Ω terminals. Ensure your speakers' impedance matches the ampライファイアの仕様。
4.2 オーディオソースの接続
- Connect your audio devices (e.g., CD player, tuner, auxiliary device) to the corresponding RCA INPUT jacks (CD, TUNER, AUX) on the rear panel.
- Ensure left and right channels are correctly matched (red for right, white for left).
4.3電源接続
- Verify the VOLTAGE SELECTOR switch on the rear panel is set to the correct voltage for your region (e.g., 230V).
- Connect the power cable to the POWER IN socket on the rear panel and then to a suitable wall outlet.
5. 操作手順
5.1 電源のオン/オフ
フロントパネルの電源ボタンを押して電源を入れます。 amplifier on or off. A soft start protection circuit is integrated.
5.2 入力ソースの選択
Use the input selector knob or buttons on the front panel to choose between CD, TUNER, AUX, USB, or SD inputs.
5.3 音量の調整
Rotate the main volume knob on the front panel to adjust the overall sound level. Start with a low volume and gradually increase it to a comfortable listening level.
5.4 USB/SD再生
- MP3オーディオが入ったUSBフラッシュドライブまたはSDカードを挿入します fileをフロントパネルのそれぞれのスロットに挿入します。
- Select the USB or SD input using the input selector.
- Use the playback controls (Play/Pause, Previous/Next) on the front panel or remote control to manage your music.
- The remote control allows for additional functions like skipping 10 tracks (+10/-10), displaying ID3 tags, repeating tracks, and random playback.
6. メンテナンス
6.1 クリーニング
掃除するには amplifier, first unplug it from the power outlet. Use a soft, dry cloth to wipe down the exterior surfaces. Do not use abrasive cleaners, waxes, or solvents as they may damage the finish.
6.2 ストレージ
保管する場合は、 amplifier for an extended period, ensure it is unplugged, clean, and stored in a cool, dry place away from direct sunlight and extreme temperatures.
7。 トラブルシューティング
- 電源なし:
- 電源ケーブルが両方のコンセントにしっかりと接続されているか確認してください。 amp充電器と壁のコンセント。
- 壁のコンセントが機能していることを確認してください。
- Verify the VOLTAGE SELECTOR switch is set correctly.
- 音が出ない:
- 正しい入力ソースが選択されていることを確認します。
- すべてのスピーカー接続の極性が適切で、しっかりと固定されていることを確認します。
- 音量がミュートされておらず、上がっていることを確認してください。
- 別のオーディオソースでテストします。
- 歪んだ音:
- 音量を下げます。
- スピーカーのインピーダンス互換性を確認します。
- オーディオ ケーブルが破損しておらず、しっかりと接続されていることを確認します。
- USB/SD 再生の問題:
- USBドライブまたはSDカードが互換性のあるフォーマットになっていることを確認してください。 file システム (例: FAT32)。
- オーディオを確認する fileはMP3形式です。
- 別の USB ドライブまたは SD カードを試してください。
8. 仕様
| ブランド | フォンスター |
| モデル | AS-24U |
| Stereo Power Output | 25 + 25 W max, 15 + 15 W RMS (4 Ω), 12 + 12 W RMS (8 Ω) |
| Surround Power Output | 10 + 10 W max, 6 + 6 W RMS (8 Ω) |
| 入力 | 3 stereo (CD, Tuner, AUX), 2 x RCA 400 mV |
| 保護 | ソフトスタート、短絡、過負荷 |
| 巻tage | 230ボルト |
| 寸法(長さ×幅×高さ) | 5 x 5 x 10 cm(約50 x 50 x 100 mm) |
| 重さ | 1.9キロ |
| スピーカーの接続性 | 有線 |
9. 保証とサポート
This Fonestar AS-24U amplifier comes with a standard manufacturer's warranty. Please refer to the warranty card included with your purchase for specific terms and conditions. For technical support, service, or warranty claims, please contact your retailer or the official Fonestar customer service.