製品終了view
The Focusrite ISA Two is a classic dual mono transformer-based microphone preamplifier designed for professional audio recording. It incorporates the renowned Lundahl LL1538 mic input transformer, originally selected by Rupert Neve for the ISA 110, ensuring exceptional audio quality.
主な機能は次のとおりです。
- Lundahl LL1538 Transformer: Utilizes the high-quality Lundahl LL1538 mic input transformer for superior sound.
- High Gain and Low Noise: Offers up to 80 dB of clean gain on the microphone input with minimal noise.
- 可変入力インピーダンス: Four selectable input impedance settings, including the original ISA 110 value, allow for optimal matching with various microphones.
- User-Calibrated Metering: Each channel features an eight-LED array for clear level display, with a rear panel calibration knob to match DAW converters.
- 多彩な入力: Two 1/4-inch front panel DI inputs for instruments and rear panel TRS line inputs.
- ハイパスフィルタ: An 18dB/octave high-pass filter, based on the ISA 110 module, is built-in for precise low-frequency control.
- Balanced Inserts: Each channel includes balanced insert points (1/4-inch TRS send and receive) for integrating external hardware processors.
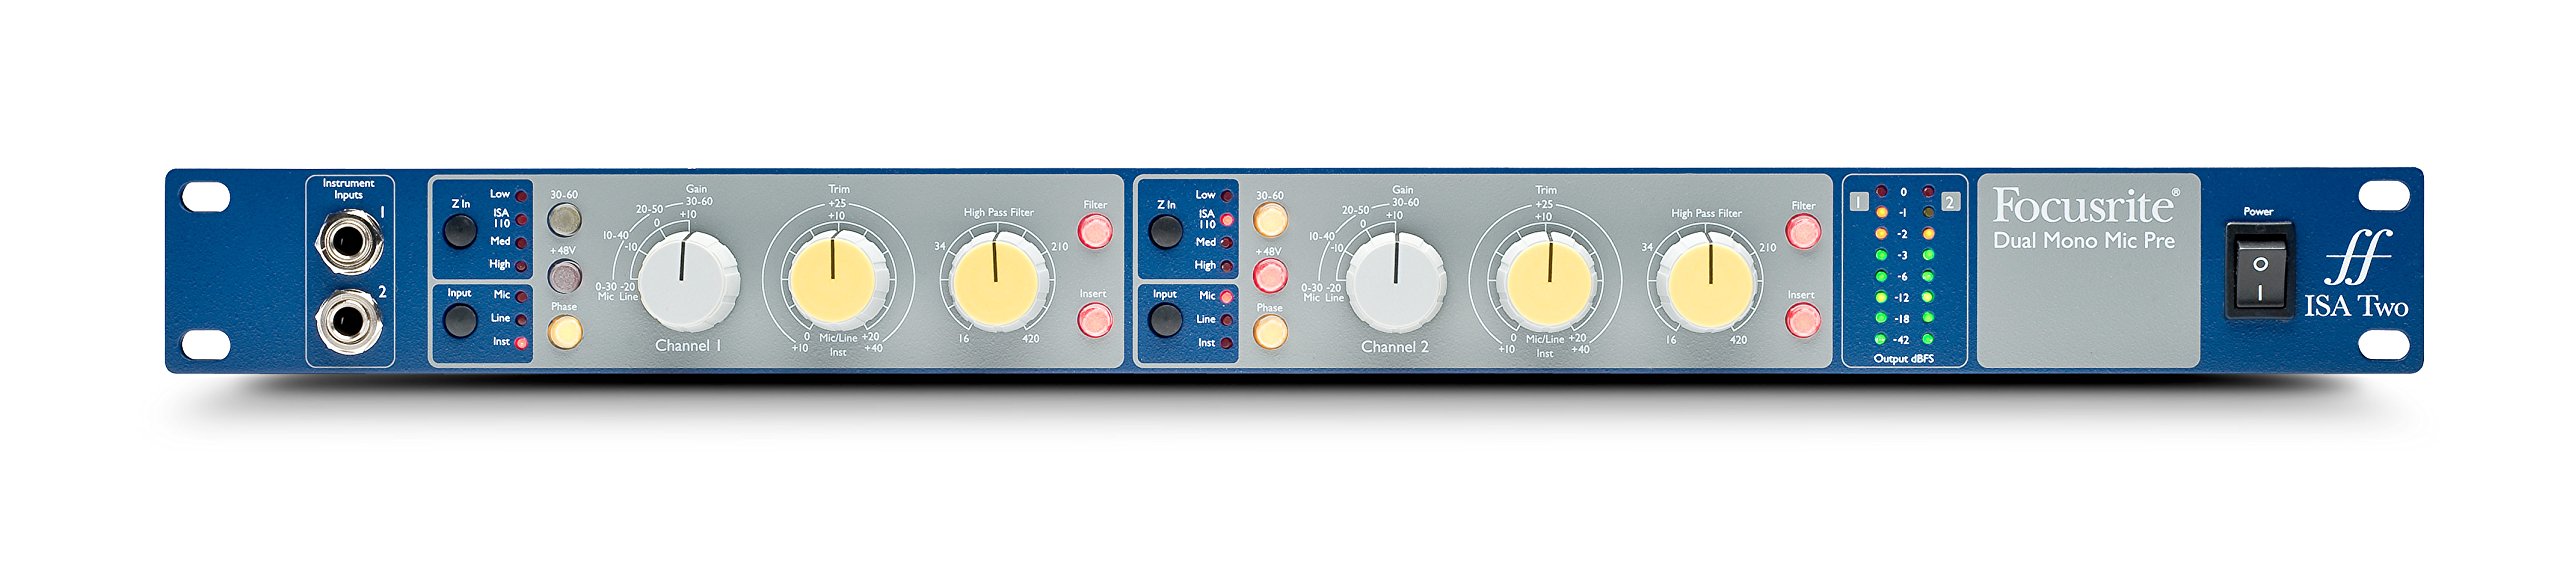
図1: 前面 view of the Focusrite ISA Two preampライフファイア、ショーasing its controls and metering.
パッケージ内容
パッケージにすべてのアイテムが揃っていることを確認します。
- Focusrite ISA Two Unit
- IEC電源ケーブル
セットアップガイド
Follow these steps to set up your ISA Two preamplifier:
- ラックマウントの設置: The ISA Two is designed for standard 19-inch rack mounting. Secure the unit using appropriate rack screws.
- 電源接続: Connect the supplied IEC power cable to the rear panel power inlet and then to a suitable AC power source. Ensure the power switch is in the OFF position before connecting.
- マイクの接続: Use balanced XLR cables to connect your microphones to the 'MIC INPUT' XLR connectors on the rear panel for each channel.
- ラインソースの接続: For line-level signals, use balanced TRS cables to connect to the 'LINE INPUT' TRS connectors on the rear panel.
- 機器の接続: For instruments such as guitars or basses, use 1/4-inch jack cables to connect to the 'Instrument Inputs' on the front panel.
- 出力接続: Connect the 'OUTPUT' XLR connectors on the rear panel to your audio interface, mixer, or other recording equipment using balanced XLR cables.
- Insert Connections: If using external hardware processors, connect them to the 'SEND' and 'RETURN' 1/4-inch TRS jacks on the rear panel for each channel.

Figure 2: Rear panel of the Focusrite ISA Two, showing microphone, line, output, and insert connections.
操作手順
This section details the operation of the ISA Two preamplifier's controls:
- 電源オン: After all connections are made, switch the power button on the front panel to the ON position.
- 入力選択: Use the 'Input' buttons (Mic, Line, Inst) to select the appropriate input source for each channel. Ensure only one input type is active per channel.
- ゲインコントロール: The large 'Gain' knob adjusts the primary gain level (e.g., 0-30 dB, 30-60 dB). The smaller 'Trim' knob provides fine-tuning (+/-10 dB) for precise level setting.
- Variable Input Impedance (Z In): For microphone inputs, select one of the four impedance settings (Low, ISA 110, Med, High) to optimize the interaction with your microphone. Experiment to find the best sonic match.
- ファンタム電源(+ 48V): Activate the +48V button for condenser microphones that require phantom power. Ensure the microphone is connected before engaging phantom power.
- ハイパスフィルター (HPF): Engage the 'Filter' button and use the 'High Pass Filter' knob to remove unwanted low-frequency rumble or proximity effect. The filter offers an 18dB/octave slope.
- Insert Function: Press the 'Insert' button to engage any external hardware processors connected to the rear panel insert points.
- メータリング: Monitor your signal levels using the eight-LED array. Adjust gain and trim to achieve optimal levels without clipping (red LEDs). The VU meter provides an average level indication.
For a visual demonstration of the ISA Two in action, watch the official product video:
Video 1: Focusrite ISA Two Classic Dual Mono Transformer-Based Microphone Preamplifier in use during a recording session. This video demonstrates the preamplifier's features and sound quality in a practical studio environment.
メンテナンス
To ensure the longevity and optimal performance of your Focusrite ISA Two, follow these maintenance guidelines:
- クリーニング: 本体の外装を清掃する際は、柔らかく乾いた布をご使用ください。研磨剤入りの洗剤、溶剤、ワックスの使用は避けてください。
- 換気: Ensure adequate airflow around the unit, especially if rackmounted, to prevent overheating.
- ストレージ: When not in use for extended periods, store the unit in a cool, dry environment away from direct sunlight and extreme temperatures.
- ケーブル管理 Keep cables organized and free from kinks or excessive tension to prevent damage to connectors and the unit.
トラブルシューティング
If you encounter issues with your ISA Two, consider the following common troubleshooting steps:
- 電源なし: Check the power cable connection to both the unit and the wall outlet. Ensure the power switch is ON.
- オーディオ出力なし: Verify all input and output cables are securely connected. Check the input selection (Mic, Line, Inst) and ensure phantom power is engaged if using a condenser microphone. Confirm gain levels are appropriately set.
- 歪んだオーディオ: Reduce the input gain and trim levels. Check for proper impedance matching with your microphone. Ensure no cables are damaged.
- 断続的な信号: Inspect all cable connections for looseness or damage. Try swapping cables to isolate a faulty one.
- ノイズ/ハム音: Ensure all equipment is properly grounded. Check for nearby sources of electromagnetic interference.
If problems persist after these steps, contact Focusrite support for further assistance.
技術仕様
| 仕様 | 価値 |
|---|---|
| ブランド | フォーカスライト |
| モデル名 | ISA2 2 号 |
| 接続技術 | アナログ |
| コネクタタイプ | 2入力/2出力 |
| 色 | ブルー / グレー |
| アイテム重量 | 7 ポンド |
| 商品の寸法 (長さ x 幅 x 高さ) | 5.55 x 15.16 x 26.06インチ |
| 材料 | ステンレス鋼 |
| ハードウェアプラットフォーム | マイクプレamp |
| チャンネル数 | 2 |
| 周波数応答 | 20 kHz |
| エンクロージャ材質 | ステンレス鋼 |
| モデル番号 | AMS-ISA-2 |
| 国際取引識別番号 (GTIN) | 815301005148 |
| 欧州連合 | 815301005148 |
| 製造元部品番号 | ISA2 2 号 |
保証とサポート
The Focusrite ISA Two comes with a 2年間保証 購入日から、製造上の欠陥および通常使用における故障をカバーします。
For technical support, product registration, or to view the full warranty terms and conditions, please visit the official Focusrite webこちらのサイトをご覧ください。よくある質問や追加リソースもご覧いただけます。
オンラインサポート: www.focusrite.com/support