1. セットアップ
1.1 Unpacking the Camcorder
すべての部品をパッケージから慎重に取り出します。以下のものがすべて揃っていることを確認してください。
- JVC GR-25U VHS-C VideoMovie Camcorder (main unit)
- AC電源アダプター/充電器
- Rechargeable Battery Pack (BN-V60U)
- RF Unit and A/V Cables
- Carrying Case (optional, may vary by package)
- 取扱説明書(本書)
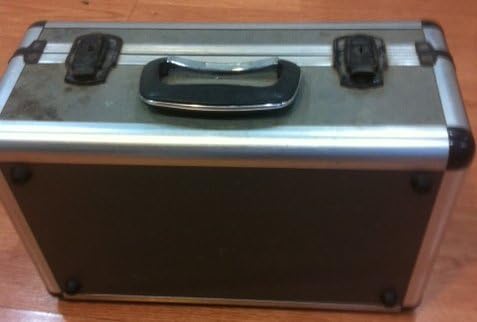
Image: A silver and black carrying case, designed to protect the camcorder and its accessories during transport and storage.

Image: Various camcorder accessories including the JVC RF unit, a rechargeable battery pack (BN-V60U), and several connecting cables for audio/video output.
1.2 バッテリーの充電
Before initial use, fully charge the battery pack. Connect the AC power adapter to the battery charger port on the battery pack, then plug the adapter into a standard electrical outlet. The charging indicator light will illuminate. Charging typically takes several hours. Refer to the battery pack for specific charging times.

Image: The JVC AC power adapter, used for charging the camcorder's battery and powering the unit directly from a wall outlet.
1.3バッテリーの挿入
Once charged, slide the battery pack onto the designated battery compartment on the rear of the camcorder until it clicks securely into place. Ensure it is firmly attached to prevent accidental disconnection during use.
1.4 Inserting a VHS-C Cassette
- Open the cassette compartment cover, usually located on the top or side of the camcorder.
- Insert a VHS-C cassette with the tape window facing outwards and the arrow on the cassette pointing towards the camcorder.
- Gently push the cassette until it seats correctly.
- カセットコンパートメントカバーを、ロックされるまでしっかりと閉じます。
2. ビデオカメラの操作
2.1 電源のオン/オフ
To power on the camcorder, slide the POWER switch to the 'ON' position. The viewfinder or LCD screen will activate. To power off, slide the switch to 'OFF'.
2.2 基本的な録音
- Ensure a charged battery or AC adapter is connected and a VHS-C cassette is inserted.
- Open the LCD screen or extend the viewファインダ。
- ビデオカメラを被写体に向けます。
- を押す 記録 button (usually red) to begin recording. The recording indicator will appear in the display.
- を押す 記録 もう一度ボタンを押すと、録音が停止します。
2.3 再生
再するためにview your recordings:
- Switch the camcorder to PLAY/VCR mode (if available, otherwise use the menu).
- 使用 遊ぶ, 巻き戻し、 そして 早送り テープをナビゲートするためのボタン。
- プレス 停止 再生を終了します。
2.4 テレビへの接続
あなたはできる view your recordings on a television using the supplied RF unit or A/V cables.
- Using the RF Unit: Connect the RF unit to the camcorder's A/V output and then to your TV's antenna/cable input. Tune your TV to the appropriate channel (usually channel 3 or 4).
- Using A/V Cables: Connect the yellow (video) and white/red (audio) cables from the camcorder's A/V output directly to the corresponding input jacks on your television. Select the correct A/V input on your TV.
2.5 ズーム機能
使用 W(ワイド) そして T (Tele) buttons or lever, typically located near the top of the camcorder, to zoom out or zoom in, respectively. The GR-25U features a 6x optical zoom.
2.6 フォーカス調整
The camcorder may feature an autofocus system. For manual focus, switch to マニュアルフォーカス mode and rotate the focus ring on the lens until the image appears sharp in the viewファインダーまたは液晶画面に表示されます。
3. メンテナンス
3.1 ビデオカメラのクリーニング
- ビデオカメラの外側は、柔らかく乾いた布で拭いてください。頑固な汚れには、軽く拭いてください。amp布を水で濡らします。
- Use a soft brush or air blower to remove dust from the lens. For smudges, use a lens cleaning cloth and solution specifically designed for optical lenses.
- Never use strong solvents like benzene or thinner, as they can damage the camcorder's finish.
3.2バッテリーケア
- バッテリーの寿命を延ばすには、バッテリーを頻繁に完全に放電しないようにしてください。
- バッテリーを使用しないときは、涼しく乾燥した場所に保管してください。
- ビデオカメラを長期間使用しない場合は、バッテリーを取り外してください。
3.3 テープヘッドのクリーニング
Over time, tape heads can accumulate dirt, leading to poor picture or sound quality. Use a commercially available VHS-C head cleaning cassette periodically to maintain optimal performance. Follow the instructions provided with the cleaning cassette.
3.4 ストレージ
When storing the camcorder, ensure it is powered off and the battery is removed. Store it in its carrying case in a dry, dust-free environment away from extreme temperatures and direct sunlight.
4。 トラブルシューティング
This section addresses common issues you might encounter with your JVC GR-25U camcorder.
- 電源なし:
Ensure the battery is charged and correctly inserted, or the AC adapter is properly connected to a working power outlet. Check the power switch position. - 録音なし:
Verify that a VHS-C cassette is inserted and that the write-protect tab on the cassette is not set to 'SAVE' (red tab visible). Ensure the camcorder is in recording mode. - Poor Picture Quality (Playback):
This could indicate dirty video heads. Try using a head cleaning cassette. Also, check the condition of the VHS-C tape itself. - Tape Jamming:
Do not force the tape. Power off the camcorder and try to gently remove the cassette. If it remains jammed, seek professional service. Avoid using damaged tapes. - 再生中に音が出ない:
Check the volume settings on the camcorder and your television. Ensure audio cables are correctly connected if playing back through a TV. - Camcorder Does Not Respond:
Remove the battery and/or disconnect the AC adapter, wait a few minutes, then reconnect and try again. This can reset the internal system.
5. 仕様
The following are key technical specifications for the JVC GR-25U VHS-C VideoMovie Camcorder:
| ブランド | JVC |
| モデル番号 | GR-25U |
| ビデオキャプチャ解像度 | 480p |
| 画面サイズ | 2.7インチ |
| 特集 | 軽量 |
| 欧州連合 | 012886409938 |
| メーカー部品番号 | GR-25U VHS-C |
| 電源 | DC 9V (AC Adapter), DC 6V (Battery) |
| 重さ | 約。 800g (1.8ポンド) |
| カセットタイプ | VHS-C |
| レンズ | f/1.2, 6x Zoom |
| 最小照度 | 3ルクス |
| 動作温度 | 0°C ~ 40°C (32°F ~ 104°F) |
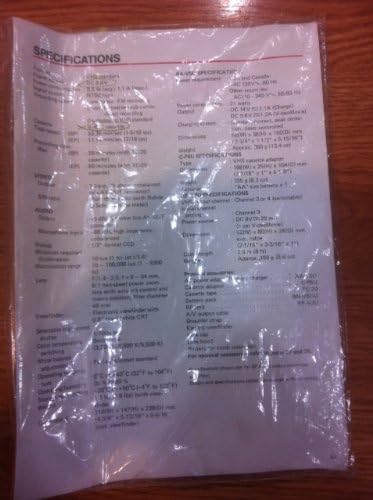
Image: A plastic-covered sheet detailing the technical specifications of the JVC GR-25U camcorder, including video, audio, and general characteristics.
6.保証とサポート
6.1 保証情報
Warranty terms and conditions for the JVC GR-25U VHS-C VideoMovie Camcorder are typically provided at the time of purchase. Please refer to any warranty cards or documentation included with your original product packaging. For detailed information regarding warranty coverage, duration, and claims, please contact JVC customer service or visit their official webサイト。
6.2 カスタマーサポート
Should you require further assistance, technical support, or service for your camcorder, please contact JVC customer support. Contact information can usually be found on the manufacturer's website or in the original product documentation. When contacting support, please have your camcorder's model number (GR-25U) and serial number ready.


