
1. はじめに
ご購入ありがとうございますasing the Karcher KA 350 Compact Stereo System. This versatile audio system combines modern design with a wide range of playback options, including a 3-disc CD changer, dual cassette deck, turntable, USB port, SD card reader, and an integrated radio. This manual provides essential information for safe operation, setup, and maintenance of your device. Please read it thoroughly before use and retain it for future reference.
2. 重要な安全上の注意事項
- 電源: 電源のボリュームを確認してくださいtage はユニットの定格ラベルと一致します。
- 換気: 通気口を塞がないでください。適切な空気の流れを確保するために、ユニットの周囲に十分なスペースを確保してください。
- 水と湿気: 本製品を雨、湿気、水滴、水しぶきにさらさないでください。花瓶など、液体の入った物を本製品の上に置かないでください。
- 熱: ユニットをラジエーター、暖房口、ストーブ、その他の機器(電気を含む)などの熱源から遠ざけてください。 amp熱を発生する装置。
- クリーニング: 清掃する前に、本製品を壁のコンセントから抜いてください。柔らかく乾いた布のみを使用してください。
- サービス: この製品を自分で修理しようとしないでください。 すべてのサービスを資格のあるサービス担当者に依頼してください。
- 子供たち: 本体および付属品は子供の手の届かないところに保管してください。
- レーザーの安全性: This product uses a laser. Use of controls or adjustments or performance of procedures other than those specified herein may result in hazardous radiation exposure.
3. パッケージ内容
すべての品物が揃っていて良好な状態であることを確認してください。
- Karcher KA 350 Compact Stereo System (Main Unit)
- リモートコントロール
- 取扱説明書
- ステレオスピーカー(2台)
- 電源ケーブル
- FMアンテナ(ワイヤータイプ)
4.製品オーバーview
4.1 フロントパネルコントロール
The front panel provides access to all primary functions and controls for the KA 350 system.

図4.1: フロントパネルのコントロール
- オン/スタンバイボタン: ユニットの電源をオンまたはオフにします。
- ファンクションボタン: Selects between CD, Tuner (Radio), Phono (Turntable), Tape (Cassette), and USB/SD modes.
- ボリュームノブ: マスターボリュームレベルを調整します。
- CD コントロール: Play/Pause, Stop, Skip/Search (Forward/Backward), Open/Close CD tray.
- カセットデッキコントロール: Play, Record, Fast Forward, Rewind, Stop/Eject for Deck 1 and Deck 2.
- USB/SD Controls: Play/Pause, Stop, Skip/Search (Forward/Backward).
- チューナーコントロール: Band selection (AM/FM), Tuning Up/Down, Memory presets.
- 画面: 現在のモード、トラック情報、無線周波数、および時間を表示します。
4.2 リアパネルの接続
The rear panel houses all necessary input and output connections for the system.
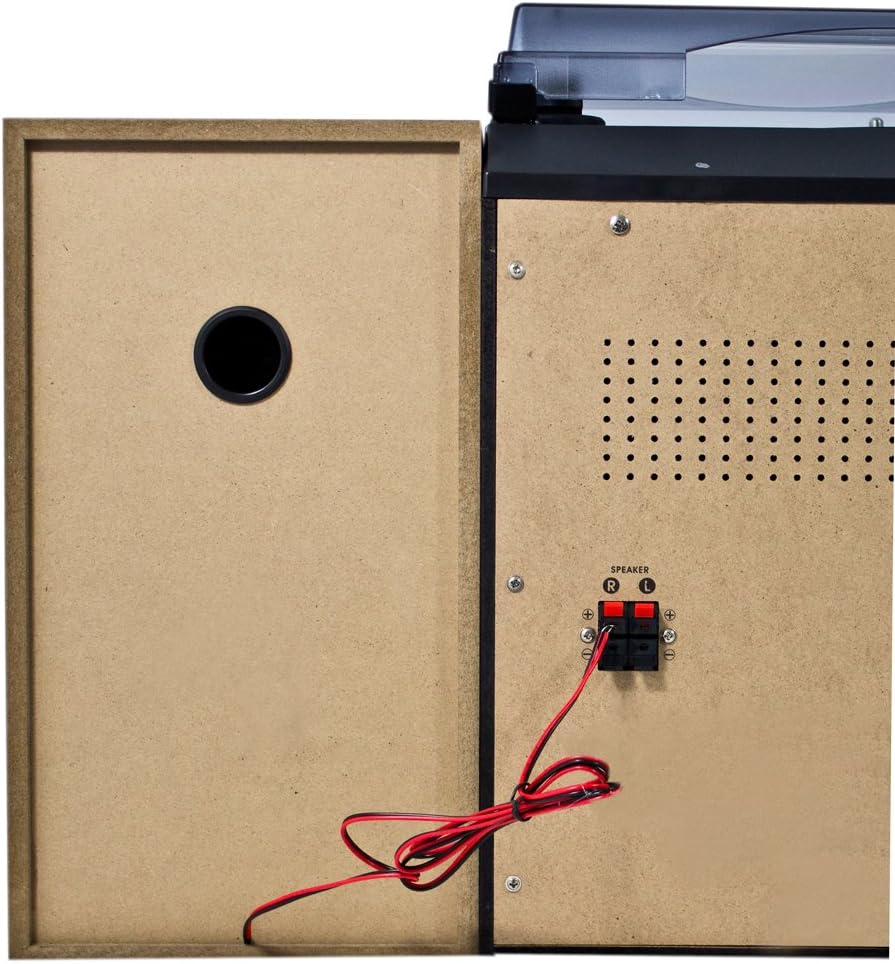
図4.2: 背面パネルの接続
- スピーカー端子(R/L): Connect the included stereo speakers. Ensure correct polarity (+ to + and - to -).
- AC電源入力: ここに電源ケーブルを接続します。
- FMアンテナ端子: Connect the supplied FM wire antenna for radio reception.
4.3 主なコンポーネント

Figure 4.3: Karcher KA 350 Main Components
- ターンテーブル: Located on top, for playing vinyl records.
- 3-Disc CD Changer: Front-loading tray for multiple CDs.
- Dual Cassette Deck: 再生と録音用のカセットコンパートメントが 2 つあります。
- USBポート: USB フラッシュドライブを接続します。
- SDカードスロット: SDメモリーカードを挿入します。
- ステレオスピーカー: Two external speakers for audio output.
5. セットアップ
5.1開梱と配置
- パッケージからすべてのコンポーネントを慎重に取り出します。
- 本体を安定した平らな場所に置いてください。
- 最適なステレオサウンドを得るために、スピーカーを本体の両側に等距離に配置します。
- ユニットの周囲に十分な換気があることを確認してください。
5.2 スピーカーの接続
Connect the supplied speakers to the speaker terminals on the rear of the main unit.

Figure 5.1: Speaker Unit
- Identify the speaker wires. Each wire typically has two strands, one marked for positive (+) and one for negative (-).
- Connect the positive (+) terminal of the left speaker to the 'L+' terminal on the main unit's rear panel.
- Connect the negative (-) terminal of the left speaker to the 'L-' terminal on the main unit's rear panel.
- Repeat the process for the right speaker, connecting it to the 'R+' and 'R-' terminals.
- Ensure all connections are secure to prevent sound distortion or damage.
5.3 FMアンテナの接続
For optimal radio reception, connect the supplied FM wire antenna.
- Insert the FM antenna plug into the FM antenna jack on the rear panel.
- Extend the wire antenna fully and position it for the best possible reception. You may need to experiment with its placement.
5.4電源接続
- Plug the AC power cable into the AC power input on the rear of the main unit.
- 電源ケーブルのもう一方の端を標準の壁のコンセントに差し込みます。
6. 操作手順
6.1 電源オン/オフ
を押す 待機して 前面パネルまたはリモコンのボタンを押して、ユニットの電源をオンまたはオフにします。
6.2 モード選択
を押す 関数 button repeatedly to cycle through the available modes: CD, Tuner (Radio), Phono (Turntable), Tape (Cassette), and USB/SD.
6.3 CDプレーヤーの操作

Figure 6.1: CD Changer Tray
- を押す 関数 ボタンをクリックしてCDモードを選択します。
- を押す 開く/閉じる ボタンをクリックしてCDトレイを開きます。
- Place up to three CDs onto the disc trays, label side up.
- を押す 開く/閉じる もう一度ボタンを押してトレイを閉じます。
- を押す 再生/一時停止 ボタンをクリックして再生を開始します。
- 使用 スキップ/検索 buttons to navigate between tracks or fast forward/rewind.
6.4 カセットプレーヤー/レコーダーの操作
- を押す 関数 ボタンを押してTAPEモードを選択します。
- を押す 停止/イジェクト button on either Deck 1 or Deck 2 to open the cassette compartment.
- カセットテープを挿入し、コンパートメントを閉じます。
- を押す 遊ぶ ボタンをクリックして再生を開始します。
- To record, insert a blank tape into Deck 2 (for recording from Deck 1 or other sources) or Deck 1 (for recording from external sources if applicable). Press the 記録 ボタン。
6.5 ターンテーブルの操作
- を押す 関数 PHONOモードを選択するボタン。
- ダストカバーを開けます。
- ビニールレコードをプラッターの上に置きます。
- 速度選択スイッチを使用して適切な速度 (33、45、または 78 RPM) を選択します。
- Carefully lift the tone arm and place the stylus onto the desired groove of the record.
- レコードの終わりに、トーンアームを手動で元の位置に戻します。
6.6 USB/SD再生
- を押す 関数 ボタンを押してUSB/SDモードを選択します。
- USB フラッシュ ドライブを USB ポートに挿入するか、SD カードを SD カード スロットに挿入します。
- ユニットは自動的に互換性のあるオーディオを検出し、再生を開始します。 file(MP3、WMA、AAC)。
- 使用 再生/一時停止 そして スキップ/検索 再生を制御するボタン。
6.7無線操作
- を押す 関数 button to select TUNER mode.
- を押す バンド button to select between FM and AM bands.
- 使用 チューニング ボタンを押して手動で放送局を選局するか、長押しして自動スキャンします。
- To save a station, press the メモリ ボタンをクリックしてから、 スキップ/検索 ボタンを押してプリセット番号を選択し、 メモリ 再度確認します。
6.8リモコン
The included remote control allows convenient operation of all functions from a distance. Ensure batteries are correctly inserted.
7. メンテナンス
7.1 ユニットのクリーニング
- 清掃する前に、必ず電源コンセントからユニットのプラグを抜いてください。
- 外側の表面を拭くときは、柔らかく乾いた布を使用してください。
- 仕上げを傷める恐れがあるため、研磨剤入りの洗剤、ワックス、溶剤は使用しないでください。
7.2 ターンテーブルの針の手入れ
- Handle the stylus with extreme care. Only touch the tone arm, not the stylus itself.
- 柔らかいブラシで後ろから前に向かってブラッシングして、スタイラスを定期的に掃除してください。
- Replace the stylus when it shows signs of wear (e.g., distorted sound, skipping).
7.3 カセットデッキのお手入れ
- 定期的にテープヘッド、キャプスタン、ピンチローラーを綿棒で軽く拭いてください。ampイソプロピルアルコールで消毒しました。
- Demagnetize the tape heads periodically to maintain sound quality.
8。 トラブルシューティング
| 問題 | 考えられる原因 | 解決 |
|---|---|---|
| 電源なし | 電源ケーブルが接続されていません。電源コンセントがアクティブではありません。 | 電源ケーブルの接続を確認し、別のコンセントを試してください |
| 音が出ない | Volume too low; Speakers not connected correctly; Incorrect function mode selected | Increase volume; Check speaker connections and polarity; Select correct function mode |
| CDがスキップしたり再生されない | CD is dirty or scratched; CD inserted incorrectly | Clean or replace CD; Insert CD label side up |
| ラジオの受信状態が悪い | アンテナが接続されていないか、位置が適切ではありません。信号が弱いです。 | Connect and adjust FM antenna; Try repositioning the unit |
| ターンテーブル速度が正しくありません | 間違った速度が選択されました | Adjust the speed selector switch (33/45/78 RPM) |
| USB/SD 再生の問題 | 互換性がない file フォーマット; USB/SDカードが正しく挿入されていない; 破損している files | 確保する files are MP3, WMA, or AAC; Reinsert USB/SD card; Try a different USB/SD card |
9. 仕様
| 特徴 | 仕様 |
|---|---|
| ブランド | ケルヒャー |
| モデル番号 | KA350 |
| 接続技術 | FM/MW Tuner, USB, SD |
| 色 | 黒 |
| スピーカータイプ | Stereo (2 speakers included) |
| 商品の寸法 (長さ x 幅 x 高さ) | 70.5 x 41 x 37.3 cm |
| 電源 | コード式電気 |
| 対応デバイス | スマートフォン、タブレット、MP3プレーヤー、パソコン |
| アイテム重量 | 10.8キログラム |
| 電力出力(RMS) | 2 x 5 W(合計50 W) |
| Supported Media Standards | MP3, CD, Cassette, USB, SD |
| サポートされているオーディオ形式 | CD-DA, MP3, WMA, AAC |
| Bluetooth サポート | いいえ |
| スピーカーの数 | 2 |
| オーディオ出力モード | ステレオ |
| サラウンドサウンド構成 | 2.0 |
| 含まれるコンポーネント | Compact system, Remote control, Instruction manual |
10. 保証とサポート
保証情報およびテクニカルサポートについては、製品に付属の保証書を参照するか、ケルヒャーの公式ウェブサイトをご覧ください。 webサイトでご確認ください。保証請求に備えて購入証明書を保管してください。
メーカー: ケルヒャー


