Possini Euro Design 43060
Possini Euro Design Art Deco Modern Ceiling Light Instruction Manual
モデル: 43060
1.製品オーバーview
This manual provides essential information for the safe installation, operation, and maintenance of your Possini Euro Design Art Deco Modern Ceiling Light. This slim, low-profile flushmount fixture is designed to enhance various indoor spaces such as bedrooms, hallways, kitchens, bathrooms, living rooms, and dining areas. It features an oil-rubbed bronze finish and a marbleized glass bowl shade, providing both functional illumination and a contemporary aesthetic.

Figure 1.1: The Possini Euro Design Art Deco Modern Ceiling Light, showcasing its oil-rubbed bronze finish and marbleized glass shade, installed flush against a ceiling.

Figure 1.2: A direct view of the ceiling light from below, highlighting the intricate marbleized pattern of the glass bowl shade.
2. 安全情報
警告:感電の危険があります。設置または修理を行う前に、ヒューズボックスまたは回路ブレーカーの電源を切ってください。
- Always ensure the power supply is turned off before installing, cleaning, or performing any maintenance on the fixture.
- Installation should be performed by a qualified electrician or a knowledgeable individual familiar with electrical wiring.
- Handle the glass shade with care to prevent breakage. The glass may feature minor pinprick bubbles, which are normal and not defects.
- 指定された種類の電球のみを使用してください。tage (maximum 100 watts per bulb, standard-medium base).
- この器具は屋内使用のみを目的として設計されており、耐水性ではありません。
- Ensure the installation location is well-ventilated, especially if used in a bathroom.
3. 箱の中身
Carefully unpack all components and inspect for any damage. Keep all packaging materials until you are certain all parts are present and in good condition.
- Ceiling Light Fixture (Oil-Rubbed Bronze finish with Marbleized Glass Bowl Shade)
- 取り付け金具
- 取扱説明書
Note: Bulbs are not included. This fixture requires two standard-medium base bulbs (E26 base).
4. セットアップとインストール
Follow these steps for proper installation. If you are unsure about any part of the installation process, consult a qualified electrician.
- インストールの準備: Turn off the electricity at the main fuse box or circuit breaker. Ensure the power is completely disconnected before proceeding.
- キャノピーの取り付け: Secure the mounting hardware (included) to the electrical junction box in your ceiling. The canopy is 9 1/2 inches wide and 3/4 inches high.
- 配線: Connect the fixture's wires to the corresponding household wires according to local electrical codes. Typically, black to black (live), white to white (neutral), and green or bare copper to green or bare copper (ground). Ensure all connections are secure with wire nuts.
- 固定具の取り付け: Carefully attach the fixture body to the mounted canopy, ensuring all wires are tucked safely inside the junction box.
- 電球の取り付け: Insert two standard-medium base (E26) bulbs, up to 100 watts each (not included), into the sockets.
- Securing the Glass Shade: Carefully place the marbleized glass bowl shade onto the fixture and secure it using the provided fasteners. Ensure it is seated properly to prevent accidental falls.
- 電力を回復する: Once installation is complete and all components are securely in place, restore power at the fuse box or circuit breaker.
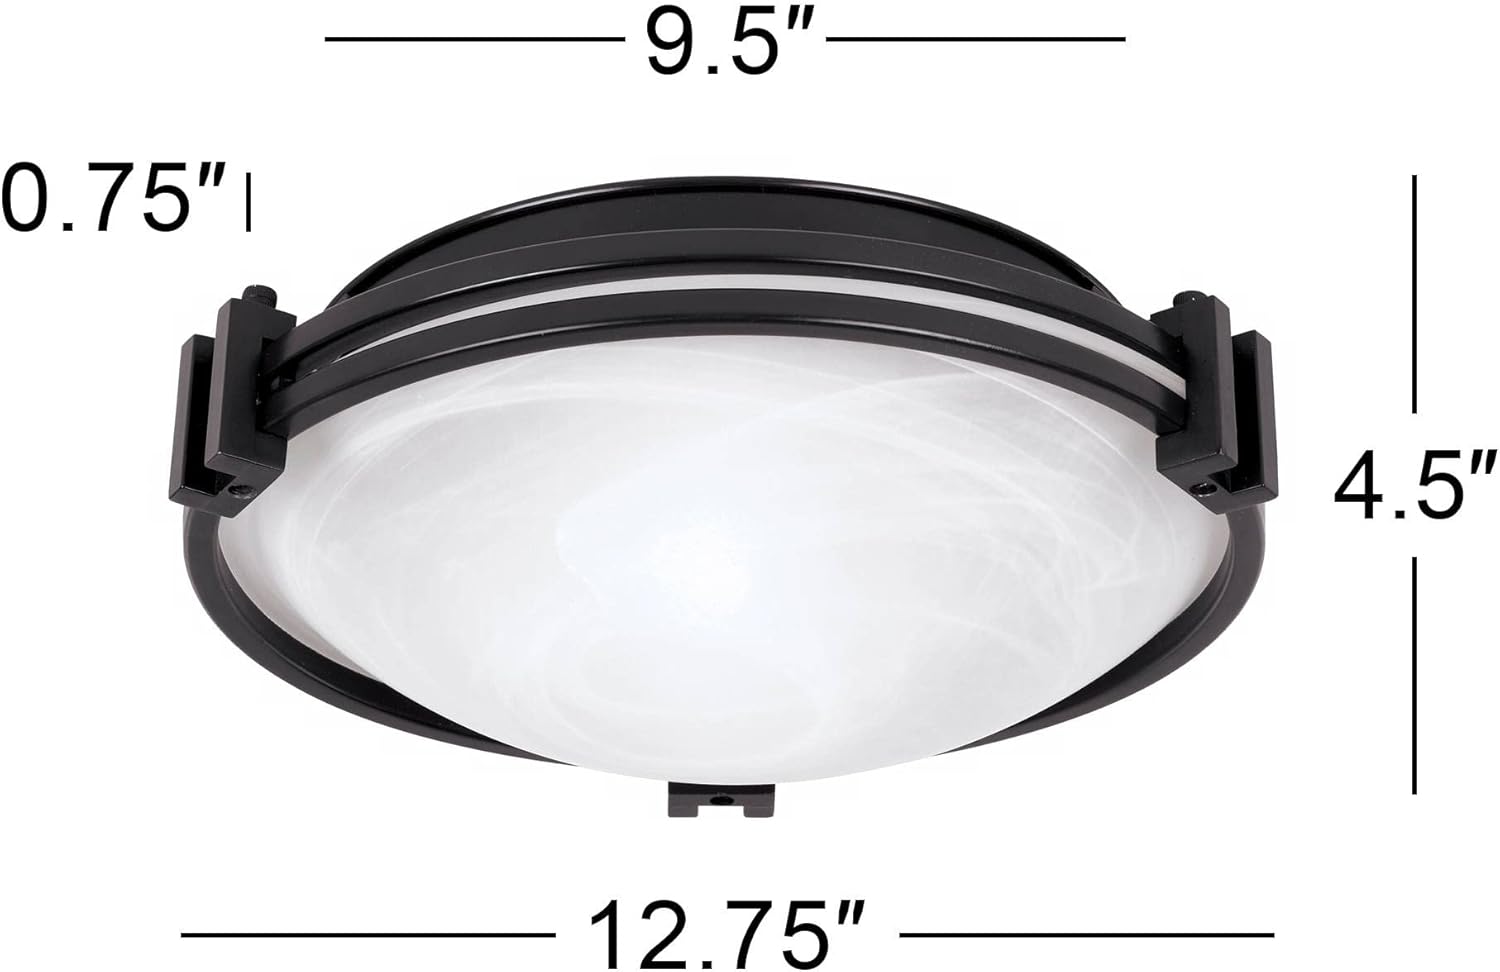
Figure 4.1: Dimensional diagram of the fixture, showing its 12 3/4" width and 4 1/2" height, with a 9 1/2" wide canopy.
Video 4.1: A "Ceiling Light Buying Guide" from LampsPlus, offering general advice on selecting and understanding ceiling light types, including flushmounts and semi-flushmounts. This video provides helpful context for installation and placement considerations.
5. 操作手順
This fixture operates like a standard ceiling light. Once installed and wired correctly, it can be controlled by a wall switch (not included). The fixture is compatible with dimmer switches, allowing you to adjust the light output to set the desired mood. Ensure any dimmer switch used is compatible with the type of bulbs installed (e.g., LED compatible dimmers for LED bulbs).
The fixture uses two standard-medium base bulbs, each up to 100 watts, for a total maximum wattage of 200 watts. For energy efficiency, consider using LED bulbs.
6. メンテナンス
定期的なメンテナンスを行うことで、天井照明の外観と機能性を維持することができます。
- クリーニング: Disconnect power before cleaning. Use a soft, dry cloth to wipe the metal finish. For the glass shade, a mild glass cleaner can be used, applied to the cloth first, not directly to the shade. Avoid abrasive cleaners or solvents that may damage the finish or glass.
- 電球の交換: Ensure power is off before replacing bulbs. Allow old bulbs to cool before removal. Replace with new standard-medium base (E26) bulbs, up to 100 watts each.
- 検査: すべての接続と取り付けハードウェアが安全に保たれているかどうかを定期的に確認してください。
7。 トラブルシューティング
天井照明に問題が発生した場合は、次の一般的な問題と解決策を参照してください。
| 問題 | 考えられる原因 | 解決 |
|---|---|---|
| ライトが点灯しません。 |
|
|
| 軽いちらつき。 |
|
|
| Glass shade cracks. |
|
|
8. 仕様
| ブランド | ポッシーニ ユーロ デザイン |
| モデル番号 | 43060 |
| 製品寸法 | 長さ12.75インチ x 幅12.75インチ x 高さ4.5インチ |
| キャノピーの寸法 | 幅9.5インチ x 高さ0.75インチ |
| アイテム重量 | 4.53 ポンド |
| 材料 | Metal (Oil-Rubbed Bronze Finish), Glass (Marbleized Shade) |
| 光源の種類 | Standard-medium base bulb (E26) |
| 光源の数 | 2 |
| 最大ワットtage | 100 watts per bulb (200 watts total) |
| 巻tage | 120ボルト |
| インストールタイプ | フラッシュマウント |
| 屋内/屋外での使用 | 屋内のみ |
| 組み立てが必要 | No (minor assembly for shade attachment) |
| 原産国 | 中国 |
| 欧州連合 | 736101057338 |
9. 保証とサポート
This Possini Euro Design product is backed by the manufacturer's standard warranty. For specific warranty details, claims, or technical support, please contact Possini Euro Design customer service or the retailer from whom the product was purchased. Please have your model number (43060) and proof of purchase ready when contacting support.
Video 9.1: A brand video from Possini Euro Design, showcasing various modern and contemporary lighting styles. This video highlights the aesthetic and design philosophy of the brand.
Ask a question about this manual
Ask about setup, troubleshooting, compatibility, parts, safety, or missing instructions. Manuals+ will review the question and use this page’s manual context to help answer it.